2.4 Financial Accounts.

Finance User Manual ENG -> 2. Finance Configurations ->  2.4 Financial Accounts.

LUFI-20401 Account Properties
LUFI-20402 Account Inactivation
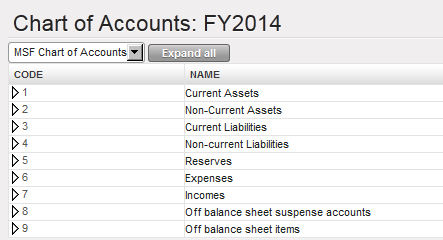
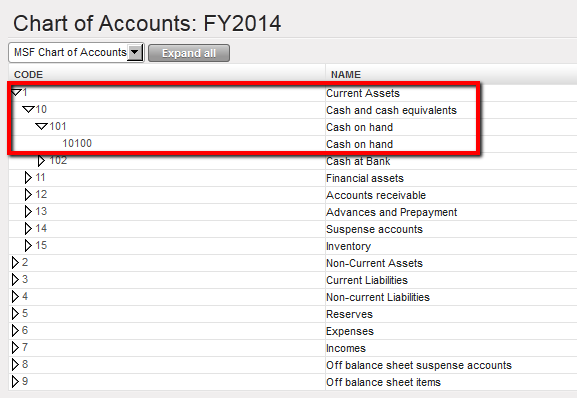
LUFI-20403 Chart of Financial Accounts
LUFI-20404 Account Mapping
LUFI-20405 Country Code Mapping

FINANCIAL ACCOUNTS

LUFI-20401 Account Properties

LU Introduction

Financial accounts classify, measure and record MSF expenses via the Chart of Accounts. In this LU we explain what the account properties are and how they should be set up in the financial account forms. In order to function well, a financial account needs a proper set up of parameters.

The Account Type defines the account category to which the financial account is related. It defines the nature of accounting entries booked under this account.

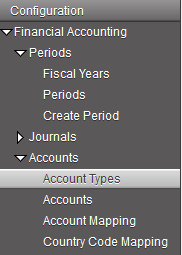
Go to Accounting/Configuration/Financial Accounting/Accounts/Account Types
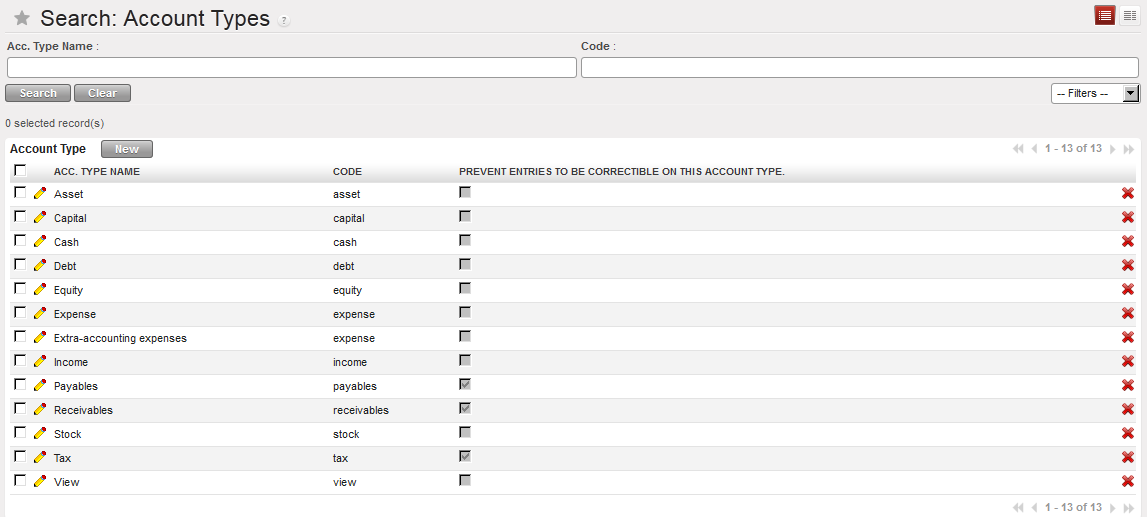

Account Type in UniField displayed in the Search Account Types view

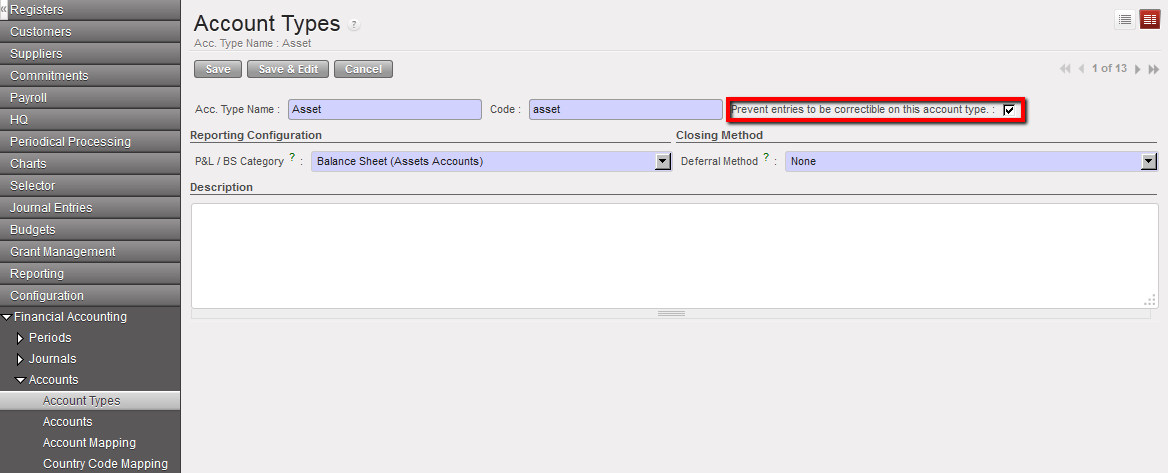
If you want to limit corrections on a specific account type, check the box of the attribute {Prevent Entries To Be Correctible On This Account Type}.

Select the {Edit} button to proceed.Account type Asset not correctible
Each financial account has Attributes or properties. These are:

  • Internal type,
  • Account type,
  • Type for specific treatment,
  • Accrual Account,
  • Prevent correction on account codes
  • Prevent correction on analytic accounts
  • Shrink entries for HQ export
  • Activation/Inactivation date
  • Reconcilable
  • Allowed Partner Types
  • End-year closing
  • Revaluation

Go to Accounting/Configuration/Financial Accounting/Accounts

The account properties can be found on the Account form itself.
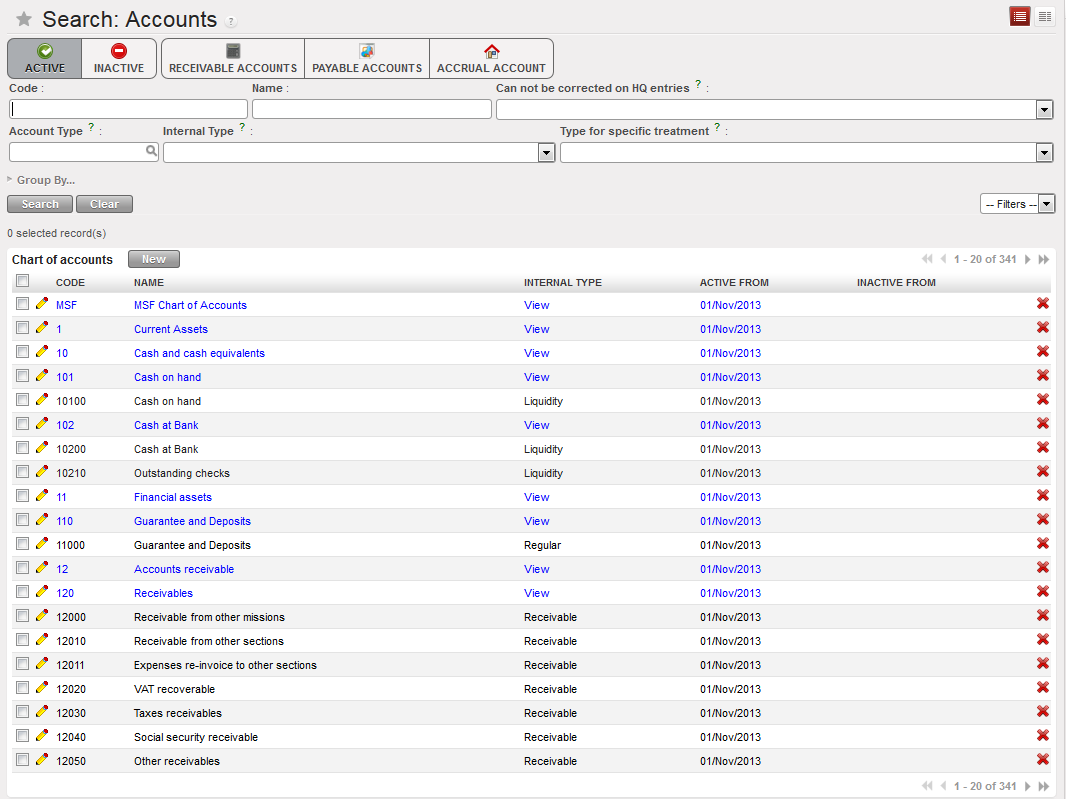
List of Accounts available in the {Search Accounts} view. The view offers a list of buttons to filter the accounts you search. In this view, only the active accounts are displayed as the Active button is checked.
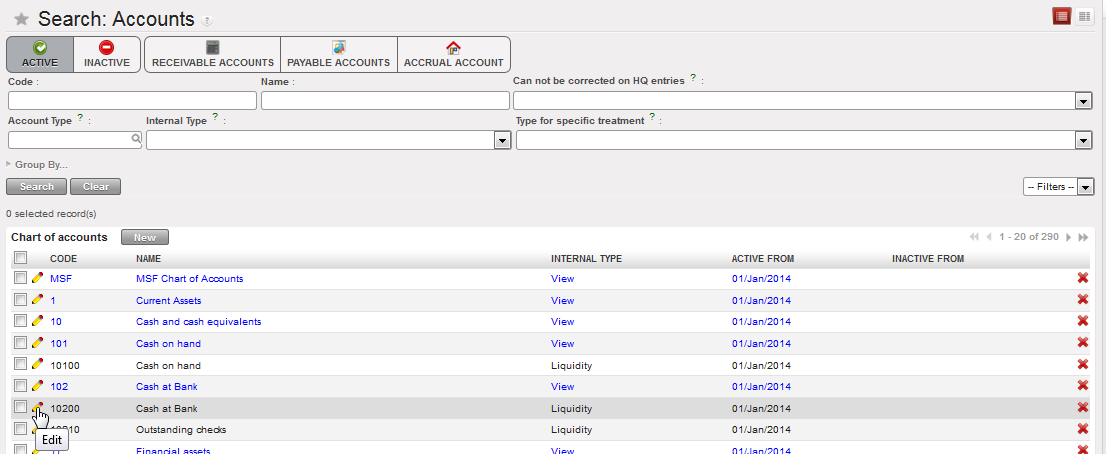
Select the pencil to open the Account form view to see or edit the account’s properties
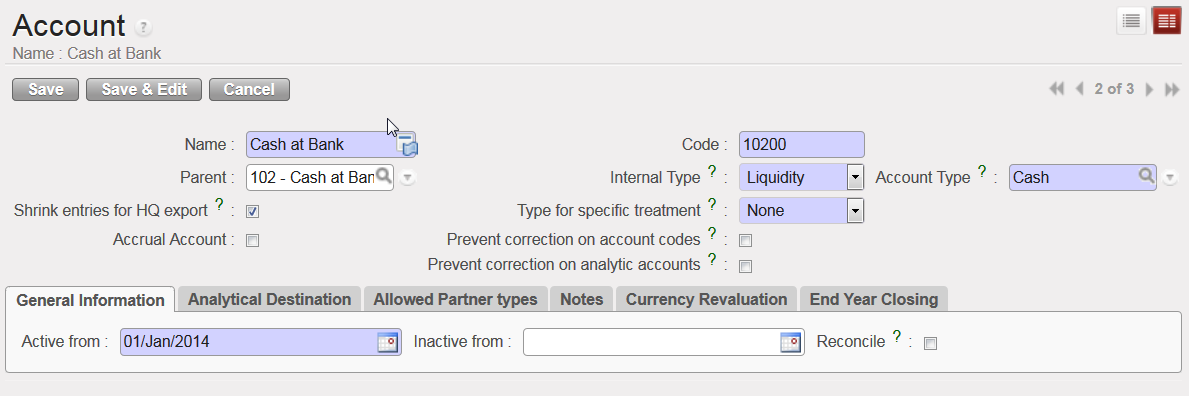
Account form view and corresponding attributes

The Internal Type specifies the account behaviour:

  • A {View} or parent account consolidates the regular (or children) accounts which are linked to it.
  • A {Regular} or child account does not have specific properties and is used to post entries.
  • {Receivable} and {Payable} accounts are used to book transactions with Third Parties. A third party can be a supplier, employer or a journal and the accounts are defined as {reconcilable}.
  • {Liquidity} accounts are used to book transactions every time there is a liquidity movement in the bank, cash or cheque register.
  • {Consolidation} accounts are not currently used in UniField.
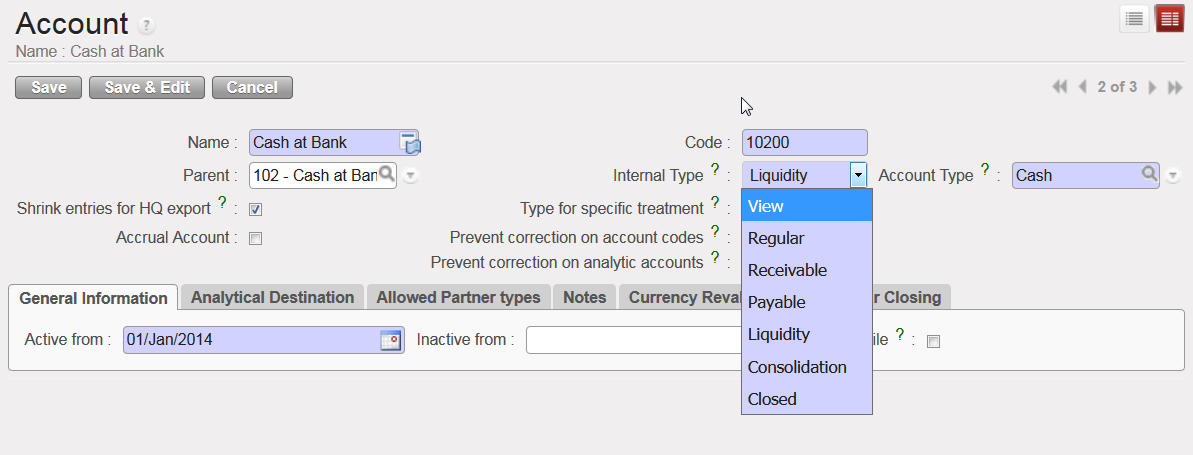
  • {Closed} accounts are not currently used in UniField.

Internal Type options for the accounts

The Type for specific treatment sets attributes triggering specific behaviours for well-defined use cases as detailed below:

  • {Internal Transfer} when booking an internal transfer on an account associated to this type for specific treatment, at time of selecting the third party, UniField will display the liquidity journal(s) that will be used as a counterpart and that are defined in a currency other than the register line being created.
  • {Internal Transfer (same currency)} when booking an internal transfer on an account associated to this type for specific treatment, at time of selecting the third party, UniField will display the liquidity journal(s) that will be used as a counterpart and that are defined in the same currency as the register line being created.
  • {Operational Advance} once the entry is posted in a register, it displays a button called {operational advance} which is a wizard used to close the advance. The third party in this case will be the employee the advance was delivered to.
  • {Third party required – Payroll} is used to record the counterpart elements of payroll entries (e.g social security, income taxes accounts) when validating the staff payroll in UniField.
  • {Down payment} will let user link an advance requested by a supplier with a purchase order. This function allows you to better track outstanding advance payments to external suppliers.
  • {Donation} is used to record donation entries in extra-accounting journals.
  • {Reconciliation – Disregard 3rd party} is used to enable reconciliation of entries booked on the same account code with a different third party.
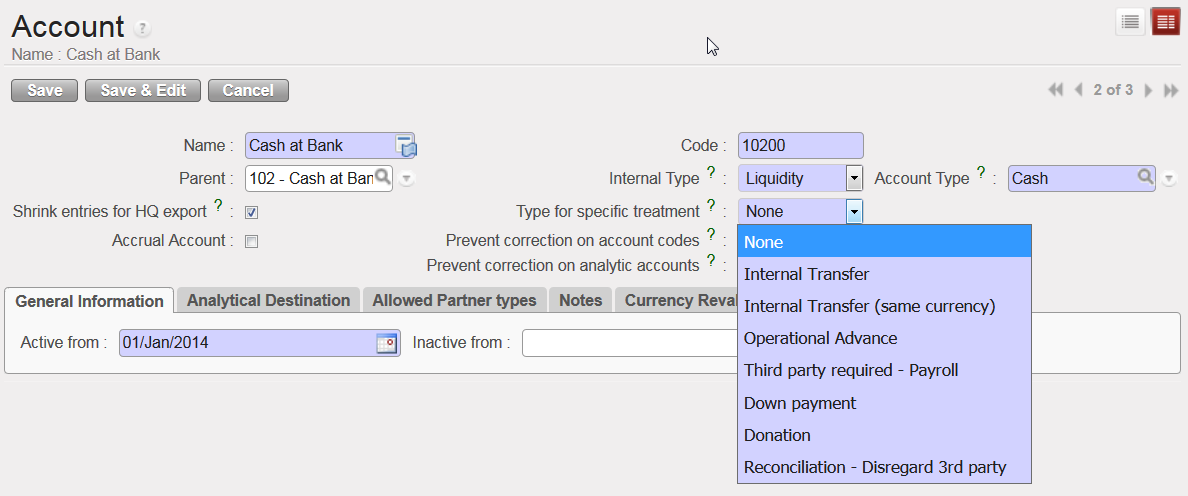
Types for specific treatment

UniField introduces the use of Accrual Accounting. It is a method that recognises economic events (expense or income) regardless of when cash transactions occur and the point of time at which supporting documents are received, with some uncertainty related to the booking (period, exact amount etc.). In UniField the {Accrual Account} attribute will help you semi-automate the creation of accrual entries at month or year-end cut-off. For more information on how to book accrual entries, see Chapter 5 – Searching, Correcting, Closing.

In the Account Form view, the {Accrual Account} box should be checked on balance sheet accounts if the account is used to record accruals. Only accounts with ticked {Accrual account} checkbox are available to be selected for accrual entries.
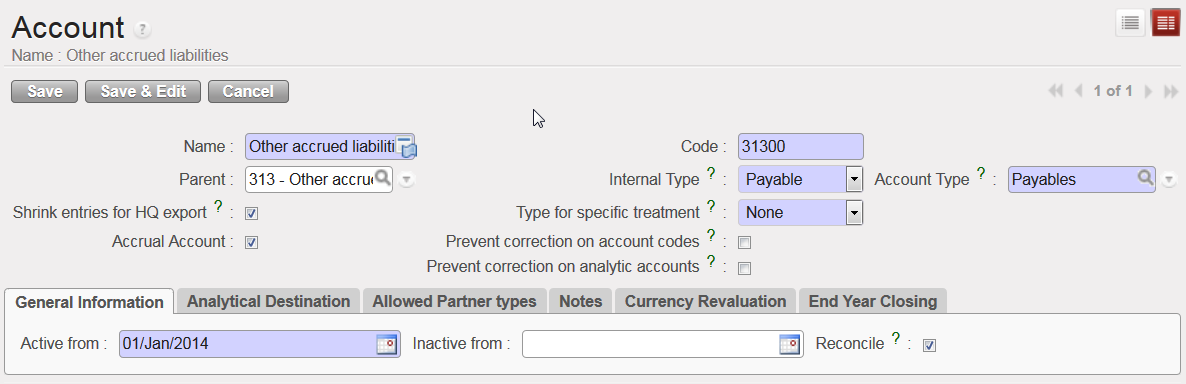

Accrual Account {31300 – Other accrued liabilities} and Accrual Account box checked

In order to easily retrieve accrual accounts when encoding a transaction, an {Accrual Account} filter is available in the G/L accounts list. If you select this button, it will only show a list of accounts that have the {Accrual Account} box ticked.
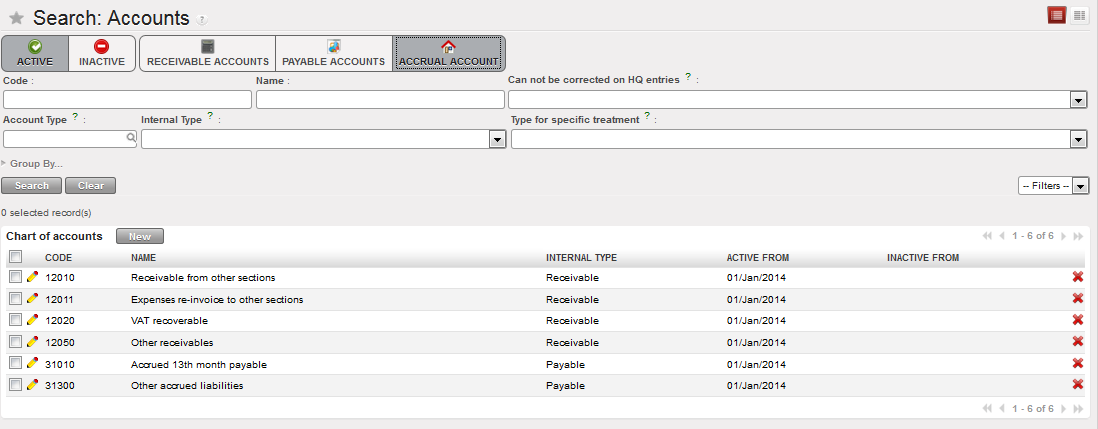
Accrual accounts listed when selecting the filter {Accrual Account}

Another account feature is linked to the accounting correction. In the Account Form view, there is a {Prevent correction on account codes} box that you need to select if the account must not be corrected at mission level when importing entries from HQ system. There is also a box {Prevent correction on analytic accounts} to tick to disable changes on analytical distribution. Please note if you tick box {Prevent correction on analytic accounts}, {Prevent correction on account codes} will be ticked as well. Check your section’s procedures to define which account codes should not be corrected in UniField at field level.
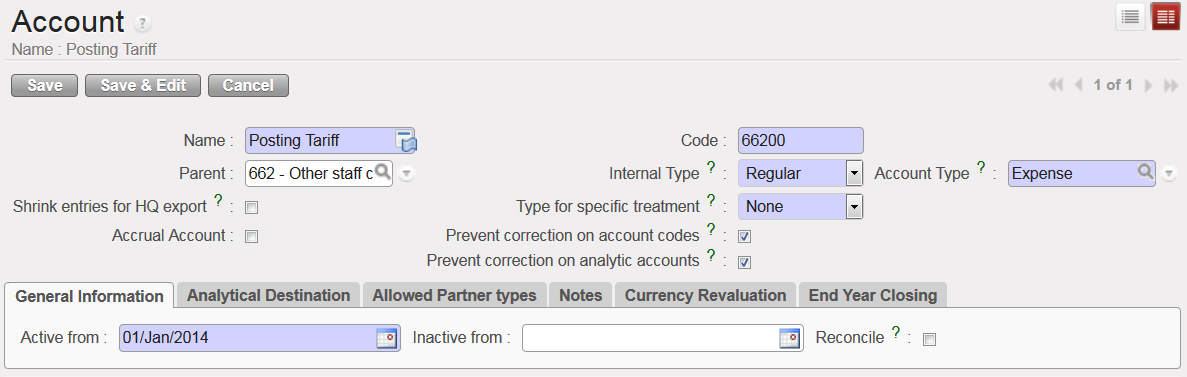

Account {66200} and Analytical Distribution not correctable

If you want to consolidate entries on an account before they are exported to the HQ system, you need to check the {Shrink entries for HQ export} box.
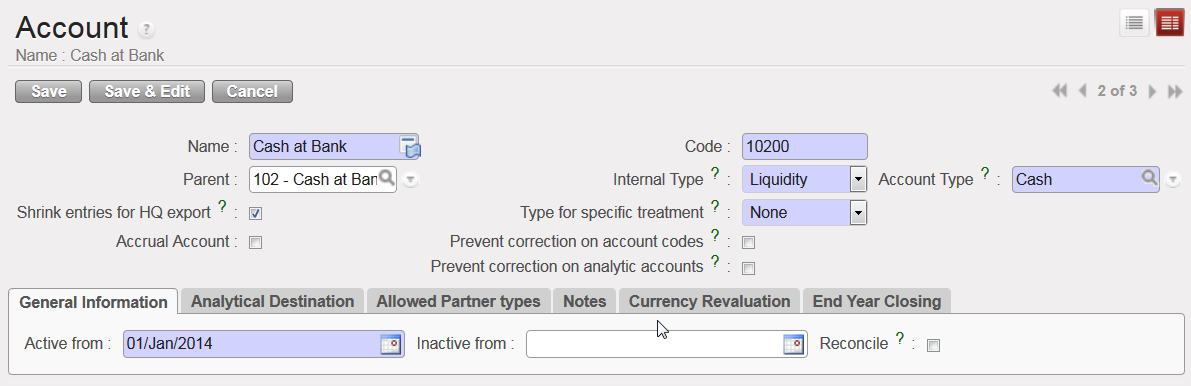
Entries on the account {10200} will be shrinked for HQ export

As soon as an account is created in your instance, it is automatically activated. The {Active from} date is visible in the {General Information} tab. When the account becomes obsolete, it can be inactivated. The {Inactive from} date must be the following day of the last day entries can be booked in this account, e.g. if an account is used until 31st December 2017, the {Inactive from} date is 1st January 2018.

Active date is taking automatically first day of the current month ,eg, if the account created today 20/06/2018 it will take automatically 01/06/2018.
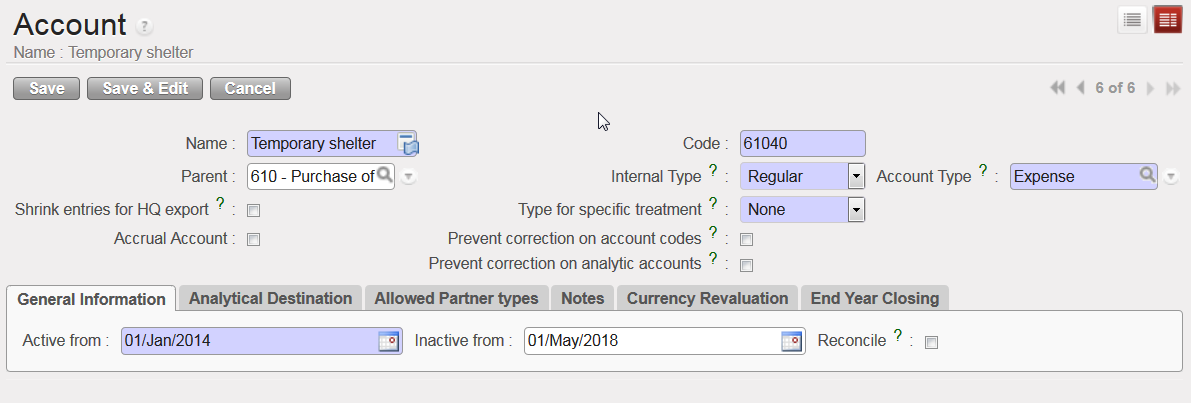
Account 61040 inactive from 1stMay 2018

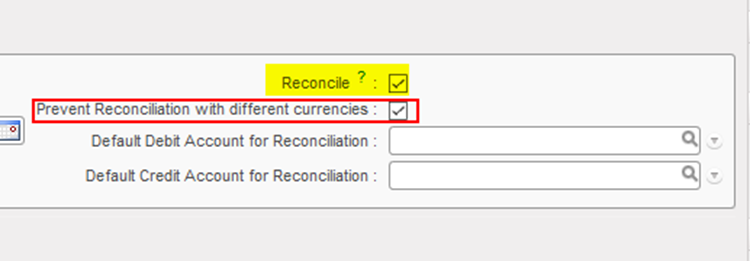
In the {General Information} tab, the {Reconcile} box should be ticked if entries on the account need to be reconciled. In UniField, accounting reconciliations are automatically done for some accounts but for other accounts the user will have to do a manual reconciliation. Account reconciliation is addressed in Chapter 5: Searching, Correcting, Closing.
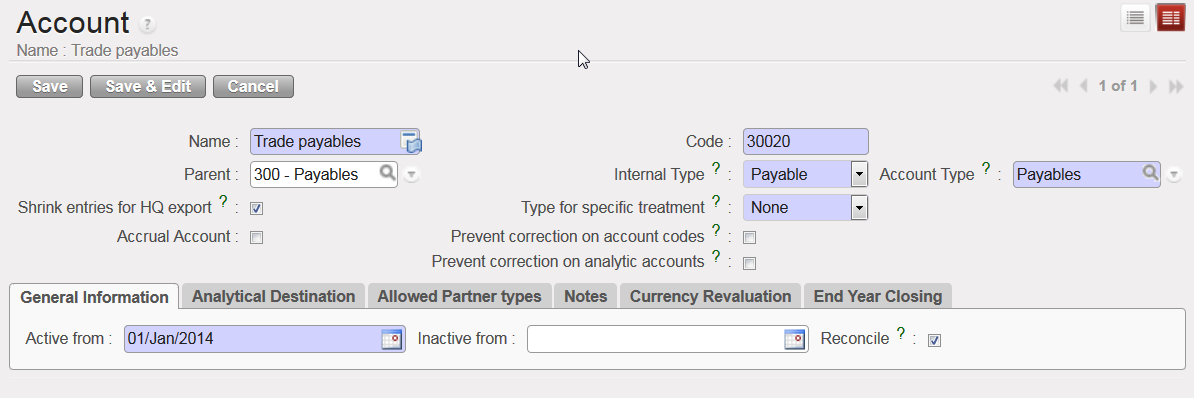

{30020 Trade payables} account, reconcilable

In {Allowed Partner Types} tab, the types of Partners allowed to be used for entries in each account can be edited. By default, all Partner types are selected for all accounts and any restrictions on Partners can be done by unticking the box for the specific Partner Type.

The restriction applies at the time of validating an entry: if a Partner/Account combination is not allowed, the entry cannot be validated. Please check your OCs procedure in regards to any Partner/Account restrictions.
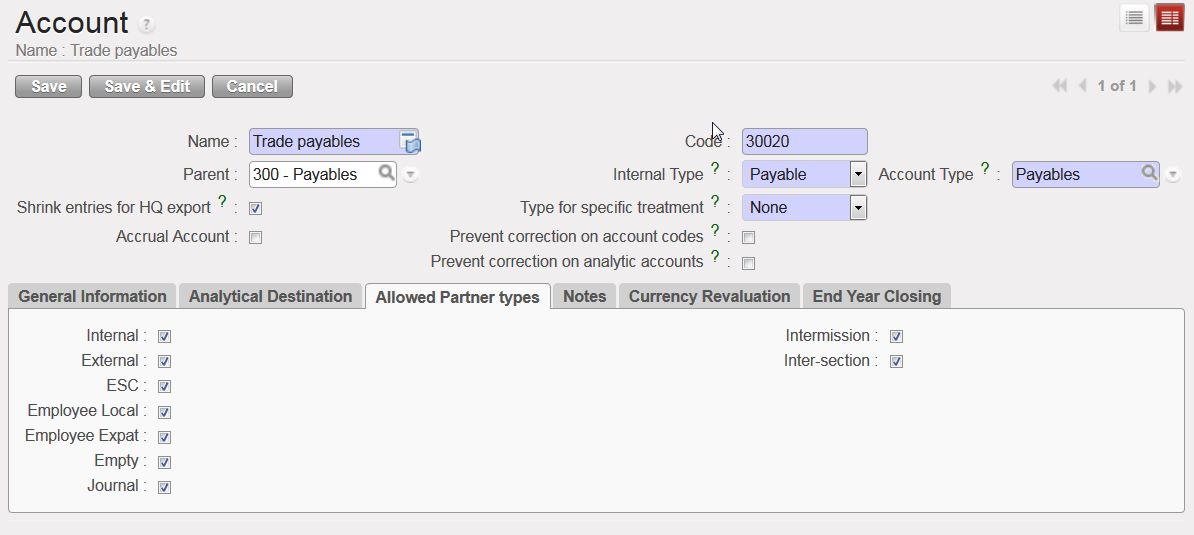
Allowed Partner Types for account 30020

The {End Year Closing} tab relates to a specific Action {Move regular B/S accounts to 0} of the Year-End closing. If the checkbox in this tab is ticked, the Account’s balance is set to 0 with a year-end entry at the time of closing the fiscal year. For further information on Fiscal Year closing, see Chapter 5 – Searching, Correcting, Closing.
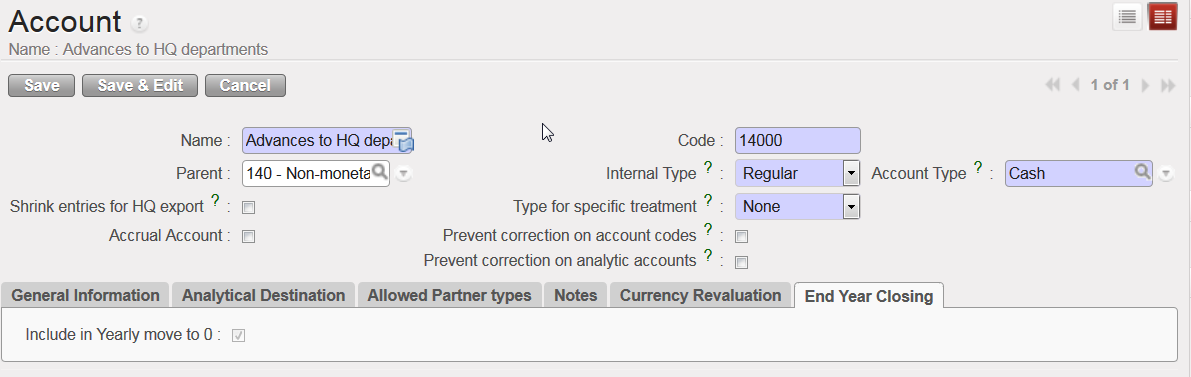
The Account {14000} balance is selected to be set to 0 at Fiscal Year closing

If the checkbox in the {Currency Revaluation} tab is ticked, the selected Account will be included in the month and/or year-end revaluation of the Account balances. Please refer to your OCs policies in regards to currency revaluation practices.
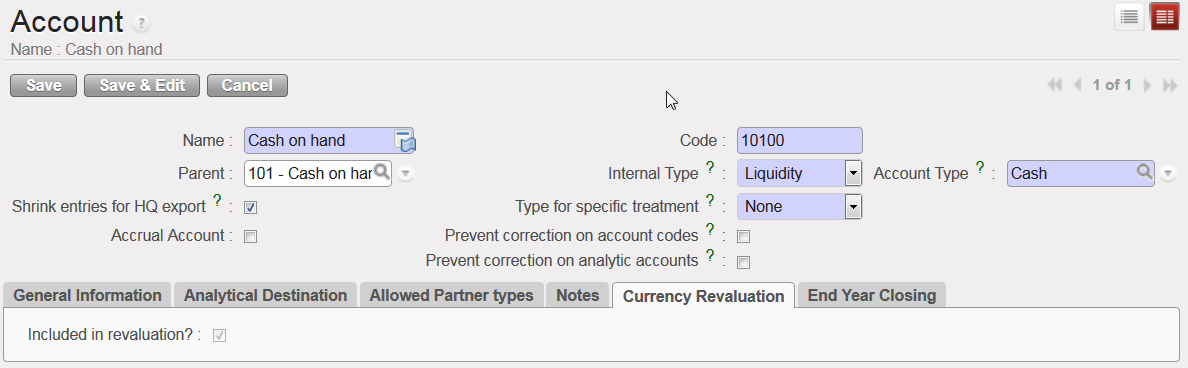
The Account {10100} is selected to be included in month and year-end currency revaluation

How to Manually Create a Financial Account

Manual creation of financial accounts should remain exceptional and based on the section procedures. Once again, it is handled at HQ level as it will synchronize down to all missions.

This example shows the manual creation of an expense account for a boat rental. You must link this new account to the parent account {Transport Freight, Storage} and analytical destination {operations}. Please note that the linkage between the expense accounts and analytical destination is normally done manually once the Chart of Accounts is uploaded and from the Analytic Accounts sub-module (for further detail, please check the UniField IT user manual).

The activation date is input manually in this case.

Go to: Accounting/Financial Accounting/Accounts/Accounts.

  1. Click on {New} to display a new account Form view.
  2. In the {Name} field enter {Boat rental} and in the {Code} field enter {65022}.
  3. In the {Parent} field, click on the magnifying glass and in the wizard Search Chart of Accounts type the code {650} in the {Code} field to link this account to the parent account Rental.
  4. Once you have typed the code, click on {Search} to bring up results.
  5. Select the code {650}.
  6. On the account Form view, select {Regular} in the field {Internal Type}.
  7. Select {Expense} in the field {Account Type}.
  8. Select {None} in the field {Type for Specific treatment}.
  9. Enter an activation date in the {General Information} tab.
  10. In the {Analytical Destination} tab, enter the default destination code {OPS}.
  11. Click Save button.

The financial account {Boat rental} is created and linked by default to the analytical destination {Operations}.
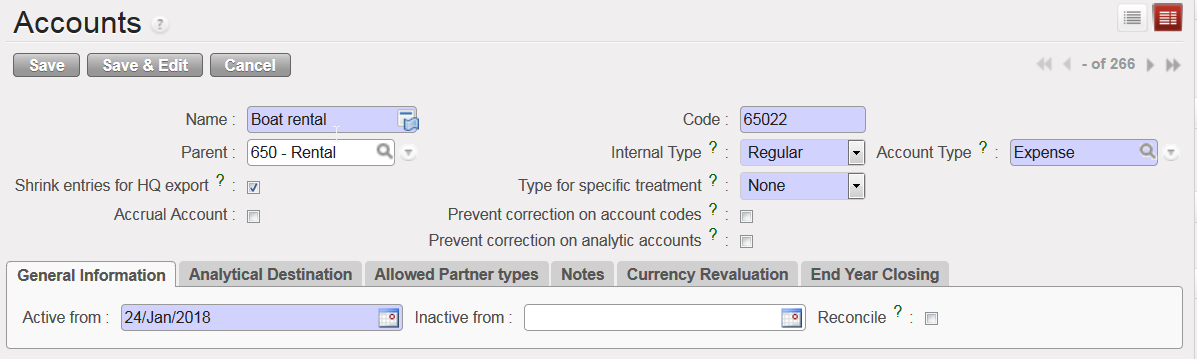
Account 65022 Boat rental Form view

LUFI-20306 Manual Currency Update

Finance User Manual ENG -> 2. Finance Configurations ->  2.3 Multi-Currency Management -> LUFI-20306 Manual Currency Update

LUFI-20306 Manual Currency Update

LU Introduction

Like creating currencies manually at the HQ instance, you can also change or add an FX rate manually. As MSF expects the same exchange rates to be used across all missions, the currency rate update should only take place in the HQ instance as it then synchronized downwards to all missions.

How to Update a Currency Rate for a Period Manually

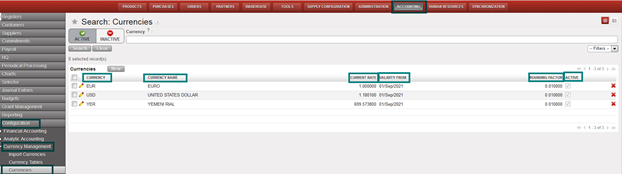
Go to Accounting/Configuration /Currency Management/Currencies

A list of active currencies appears

  1. Remove the default current filter {Active} by clicking on the button {Clear}.

A list of standard currencies appears (active and inactive)

In the currency field, type the code of the currency you want to edit.

2. Once the currency is retrieved click on the pencil icon of the currency line to edit the form
The currency form you selected is displayed

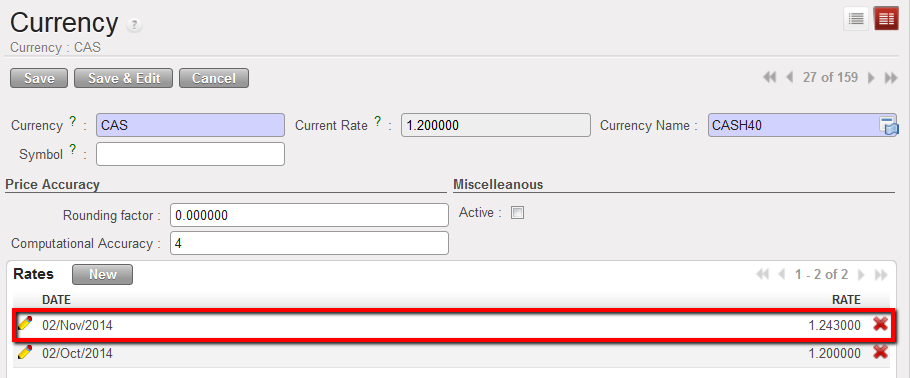
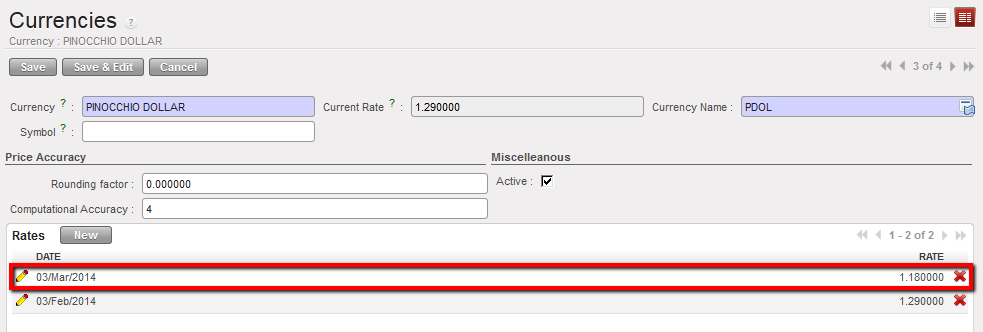
3. In the rates field, click on {New} to add a new rate. Remember to save the form .

4. Synchronize


FX rate updated


FX Rates list in the currency form

LUFI-20305 Manual Currency Creation

Finance User Manual ENG -> 2. Finance Configurations ->  2.3 Multi-Currency Management -> LUFI-20305 Manual Currency Creation

LUFI-20305 Manual Currency Creation

LU Introduction

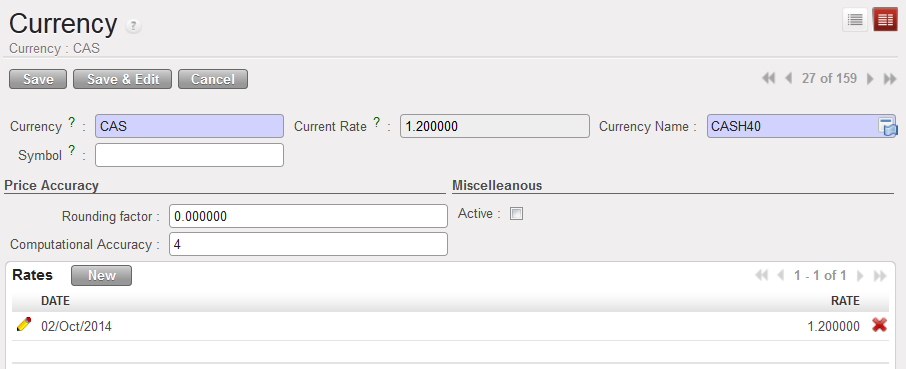
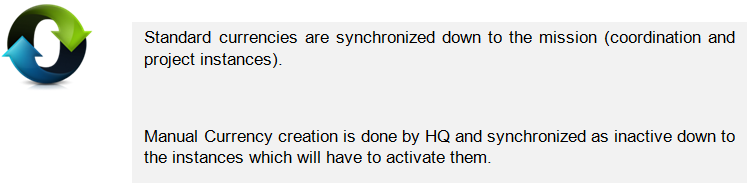
Most currencies used by MSF are based on the accepted ISO standard. However, on occasion it may be necessary to add a non-standard currency. If this is the case in your mission, you must request Headquarter (HQ) to create the currency. It will then synch down to your instance as inactive. You will have to activate it.

How to Create a Non-Standard Currency Manually

Go to: Accounting/Configuration/Currency Management/Currencies

A list of active currencies appears

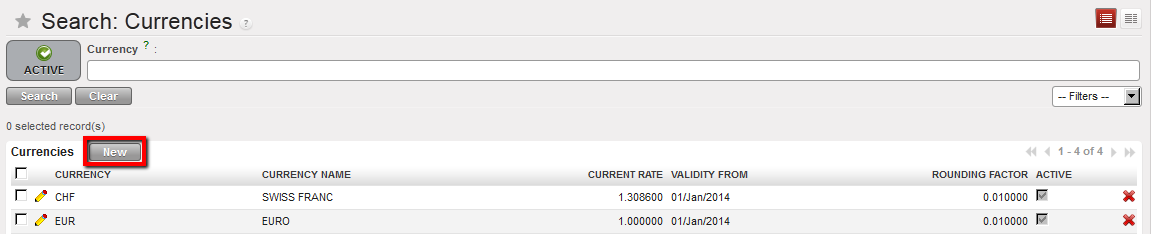
  1. In the {Currencies} Search view, click on {New} button.


Select {New} in the Search Currencies view to create manually a new currency

2. Complete the currency form as follows.

Field titleentry protocol: currency formSource for Information
Currency3-character code in capital letterHQ
Currency RateManual input.HQ
Currency NameCOUNTRY CURRENCY ALL CAPSHQ
SymbolNot requiredN/A
Rounding factorDefaults to 0.01000System
Computational AccuracyDefaults to 4System

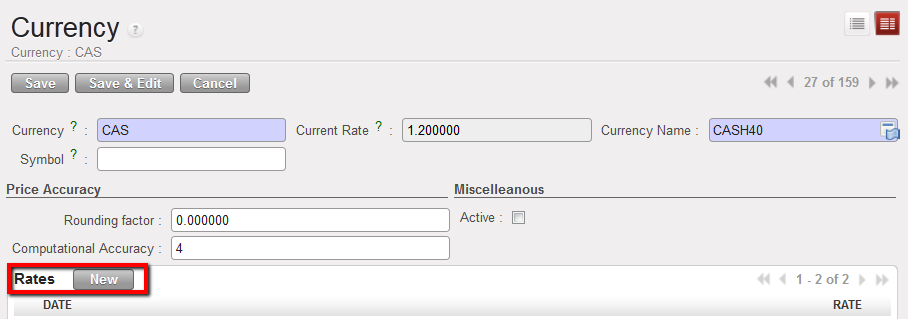
3. In the Rates field, click on {New} to add a new rate.

4. Enter the effective “as of” {Date} and the {Rate}. Click {Save & Close} if finished, or {Save & New} if adding more rates for additional periods.

The rate is saved in the currency form.

Title of fieldentry protocol: currency ratesSource for Information
DateThe effective start date of the rate to be used for converting entries to the functional currency. If no additional rates are added for subsequent dates, then this rate will prevail.Consider the earliest posting date for which you will have entries in this nonstandard currency.
RateThe exchange rate relative to the EUR or CHF, e.g. CUR/EUR.HQ

5. Remember to save the form.

6. Synchronize


Manual creation of a non-standard currency

LUFI-20302 Currency Activation

Finance User Manual ENG -> 2. Finance Configurations ->  2.3 Multi-Currency Management -> LUFI-20302 Currency Activation

LUFI-20302 Currency Activation

LU Introduction

Imported or manually created currencies need to be activated or the user will not be able to record entries in such currency. When a currency is not needed anymore (e.g. because it is not used locally anymore), it can be manually inactivated.

How to Activate a Currency

The Headquarter instance will synchronize downwards all currencies as inactive. In the mission instances, only the currencies used in the specific mission must be activated. The currencies to activate may be local currency for everyday bookings but also for example DKK if the mission employs a Danish expat whose salary is paid in DKK at HQ (the corresponding entry will be synchronized to the field using this currency).

Go to: Accounting/Configuration /Currency Management/Currencies

  1. Clear the default current filter {Active} by clicking on the button {Clear}.

A list of standard currencies appears (active and inactive)In the currency field, type the code of the currency you want to activate.

2. Once the currency is retrieved click on the pencil of the currency line to edit the form.

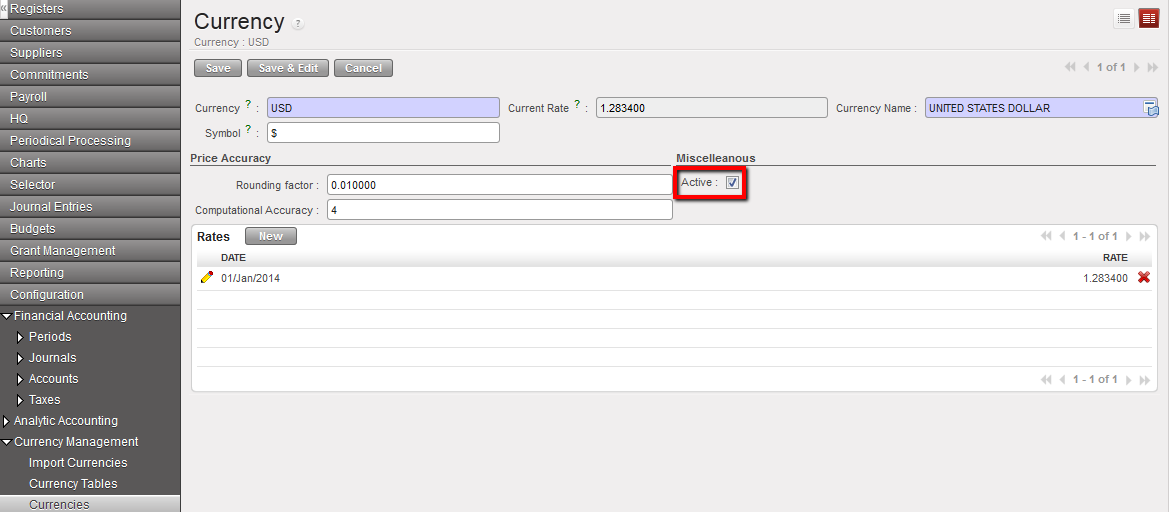
3. In the Form view, check the {Active} box and Save. In the below example, we activate the USD

The currency (USD) is activated. Entries can be recorded using this currency.


Checking the box “Active” to activate USD

How to Activate Multiple Currencies

You can activate multiple currencies by using the action Activate / Deactivate currencies by selecting currencies from the currencies list:

Go to: Accounting/Configuration /Currency Management/Currencies

  1. Clear the default current filter {Active} by clicking on the button {Clear}.

A list of standard currencies appears (active and inactive)

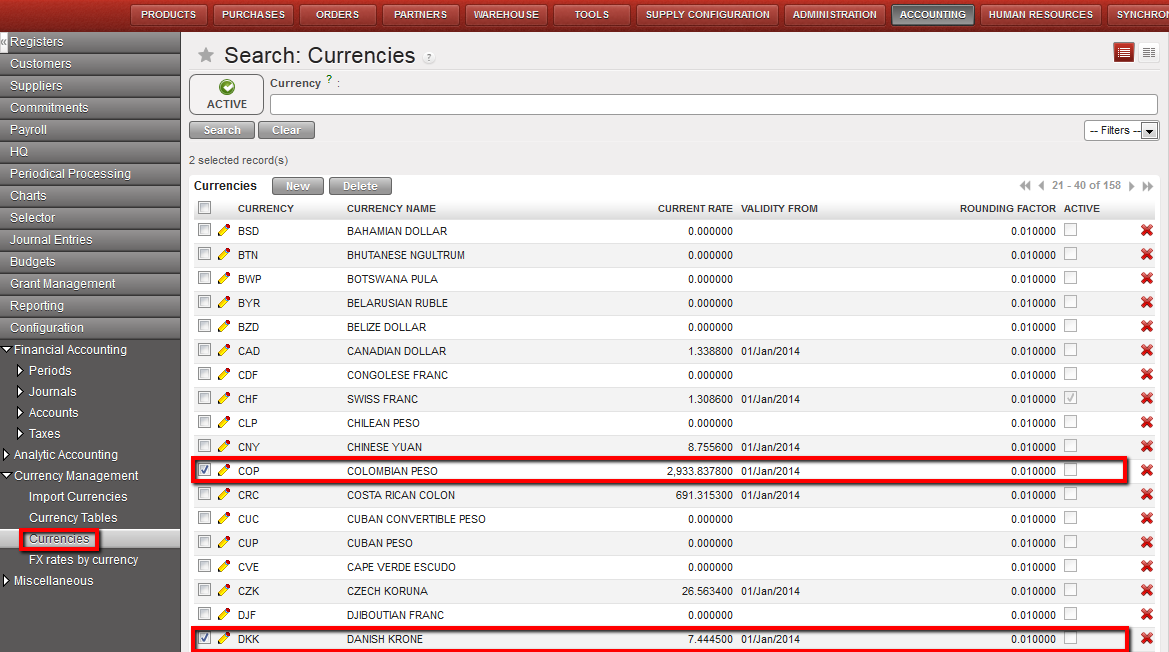
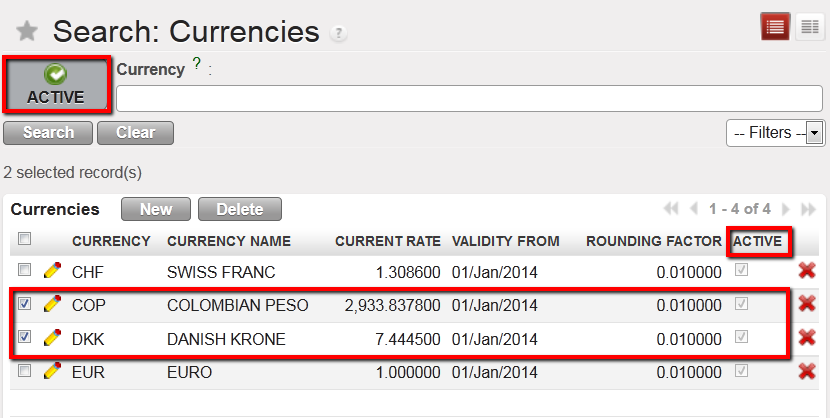
2. Select the currencies to activate. Here we want to activate DKK and COP.


DKK and COP selected for activation

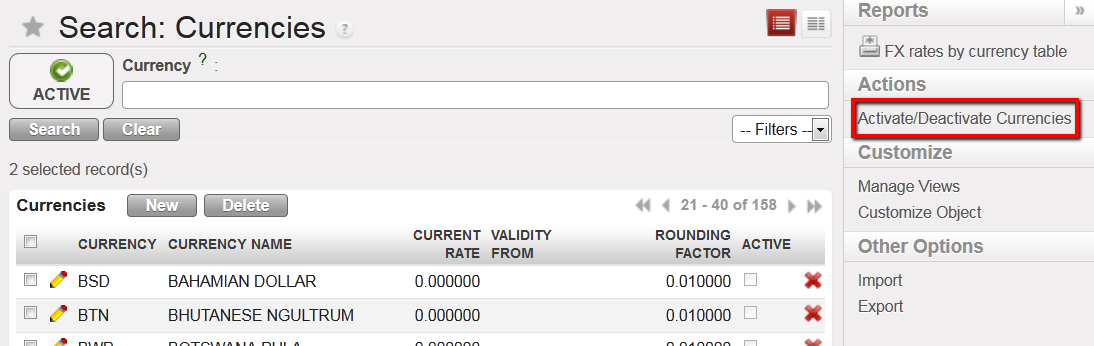
3. On the right side of the screen, select the action Activate / Deactivate multiple currencies


Action function to Activate / Deactivate multiple currencies

A windows pop-up to conform the action

Active / Deactivate Currencies window

  1. Select {Approve}
  2. Check whether the currencies were activated in the currencies search view by selecting the Active filter

DKK and COP are active

To track changes on the currencies:

Go to > Accounting/configuration/currency management/currencies

You will be able to track below:

  • the creation of the currency
  • The editions of every field, including the changes on the rates.
Display of track changes for “Currencies”

LUFI-20301 Currency Files Loading

Finance User Manual ENG -> 2. Finance Configurations ->  2.3 Multi-Currency Management -> LUFI-20301 Currency Files Loading

LUFI-20301 Currency Files Loading

LU Introduction

When a new mission is opened, a list of standard currencies is loaded at HQ level with current FX rates and then synchronized as inactive to the field. For specific use in the field, a non-standard currency can be created manually by HQ and synchronized to the field as inactive, too.

See LUFI-20204 Manual currency creation for further information.

How to Load Standard Currencies in an Instance

As MSF expects the same exchange rates to be used across all missions, currency creation should only take place in the Headquarter instance as it is then synchronized downwards to all missions.

Go to the following website to download the file:

http://ec.europa.eu/budget/contracts_grants/info_contracts/inforeuro/inforeuro_en.cfm

This link is just an example; please refer to your section procedures to find out which website you should use or create your own CSV file

CSV Currency Exchange Rate File

  1. Select the rate period as the reference period to display the FX rate and select {OK}.
  2. Click on {Download in csv format} and save the file.
  3. Check if rates were properly downloaded.
  4. Copy/paste them into your currency import file
  5. In UniField go to Accounting/Configuration /Currency Management/Import Currencies.
  6. Browse the file to upload and click on {Import}.
  7. Click on {OK}.
  8. In UniField go to Accounting/Configuration /Currency Management/Currencies

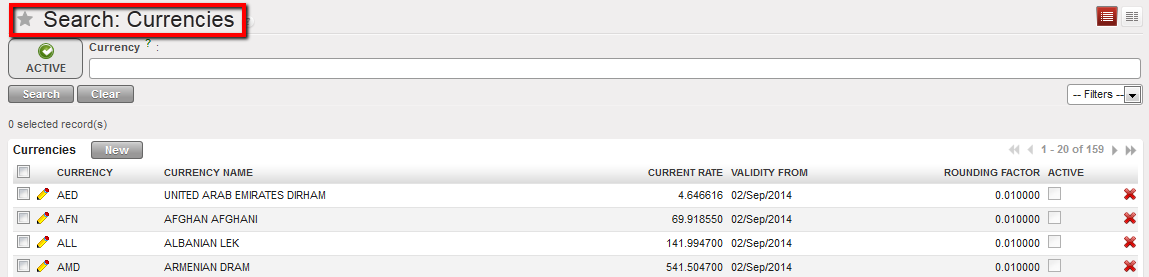
A list of currencies displays with their corresponding FX rate


Currencies List displayed in the Currencies Search view

9. Synchronize

2.3 Multi-Currency Management.

Finance User Manual ENG -> 2. Finance Configurations ->  2.3 Multi-Currency Management.

LUFI-20301 Currency Files Loading
LUFI-20302 Currency Activation
LUFI-20303 Currency FX Rate Update
LUFI-20304 Applied FX Rate over Multiple Periods
LUFI-20305 Manual Currency Creation
LUFI-20306 Manual Currency Update

2.3 Multi-Currency Management

MSF normally tracks cash movements in the local currency. We call these currencies the “Booking Currencies”. In addition, each OC has a consolidation currency. This currency is Euro for all sections except MSF Switzerland which consolidates its financial figures in Swiss Francs. We call these currencies the “Functional Currencies”. Monthly currency rates can be loaded into UniField in order to provide accurate values of accounting entries in functional currency.

In addition to monthly currency rates, specific currency tables can be used in various situations. There may be a case where an institutional donor defines a fixed or variable rate to be used for reporting purposes. With UniField, users are able to create currency tables and attach them to a grant in order to generate donor reports with compliant rates. Please see LUFI-60301 of Chapter 6 Donor management.

Specific currency tables can also be created to value actual budget rates and explain budget vs. actual discrepancies notwithstanding FX rates variation effects. In addition, specific currency tables can be used to revaluate balance sheet account balances at a year-end closing rate.

These tables must be created and imported in the HQ instance and once validated, they will synchronize to the field instances.

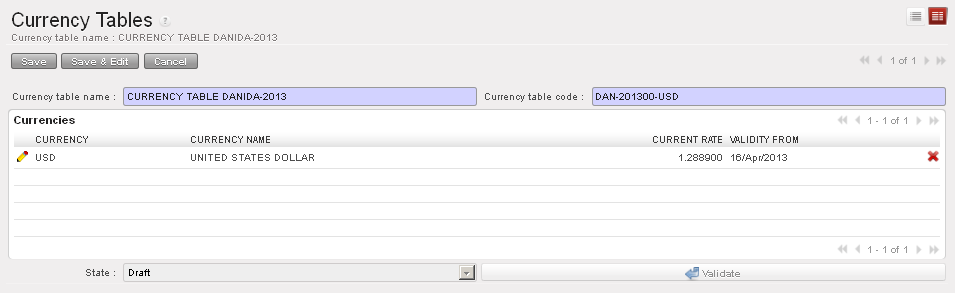
Search view of currency tables


Currency table Form view

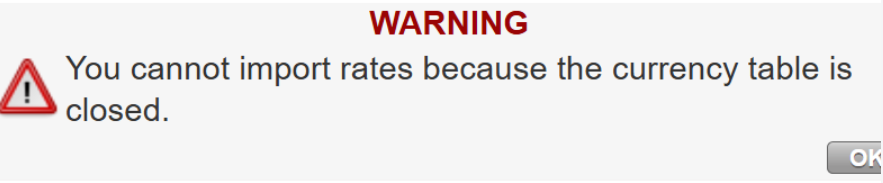
It is not allowed to import new rates on closed currency tables. A warning message will appear if we try to do it.

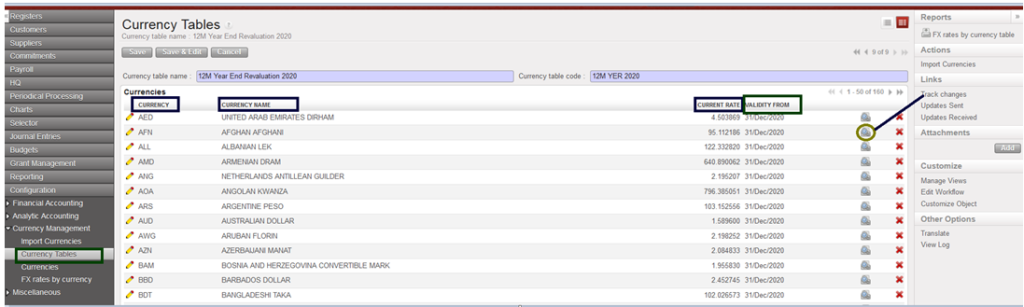
Track changes in the screen of  “Currency Tables” :

The track on “Currency Tables as below:

  • the creation of the currency table
  • the editions of the code, the name, the state, the addition and deletion of currencies
  • to see the changes on a currency itself: click on the button on the right of the currency line .
Display of track changes after editing one currency table from yellow pen

Further information on donor currency tables can be found in UniField Finance User Manual Chapter 6 Donors, Funding Pools and financing contracts.

In UniField you will be able to:

  • Manage a list of standard and non-standard currencies (manually or with a downloaded file)
  • Activate/inactivate currencies
  • Book and display automatic accounting transactions in booking and functional currency in the financial and analytical journals.
  • Manage several currency tables attached to budget, grant and revaluation
  • Automatically calculate and book exchange rate gain/loss

LUFI-20203 Configuration Fiscal Year Dates

Finance User Manual ENG -> 2. Finance Configurations -> 2.2 Fiscal Year and Accounting Periods -> LUFI-20203 Configuration Fiscal Year Dates

LUFI-20203 Configuration Fiscal Year Dates

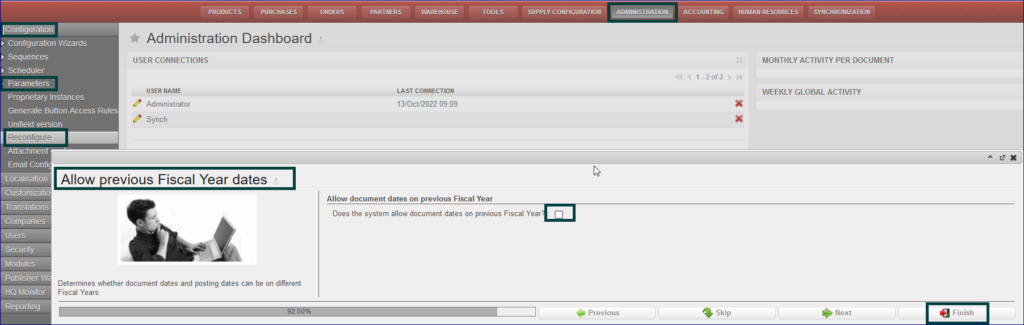
It is possible for any OC to choose whether to allow document dates from previous fiscal year or not. A new option is added in the Reconfigure “Allow document dates on previous Fiscal Year“. During instance creation, if you want to allow having documents dates from previous fiscal year then you need to tick the box. According to the current internal procedures on each OC, this box will be ticked only in OCB and OCP for the auto creation, the process as below:

Go to Administration> Configuration > Parameters > Reconfigure

It will open new window “Allow previous Fiscal Year dates

Tick on box with “Does the system allow document dates on previous Fiscal Year?

Click on “Finish

Reconfigure previous fiscal year dates

LUFI-20202 Accounting Period Opening

Finance User Manual ENG -> 2. Finance Configurations -> 2.2 Fiscal Year and Accounting Periods -> LUFI-20202 Accounting Period Opening

LUFI-20202 Accounting Period Opening

Go to Accounting/Configuration/Financial Accounting/Periods/Periods

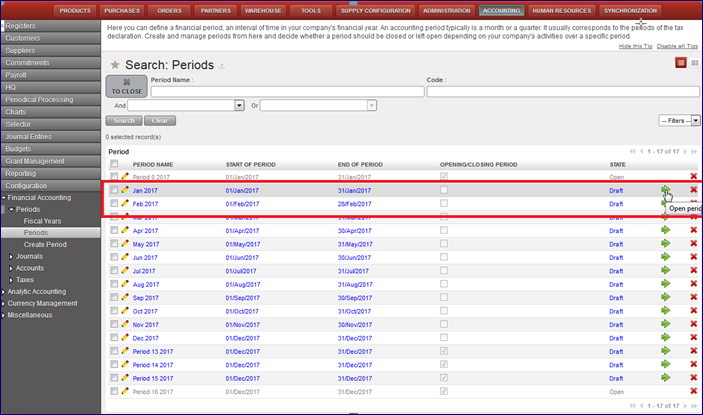
  1. Click on the green arrow  to open the relevant accounting period. In the below example, we want to open January 2017.

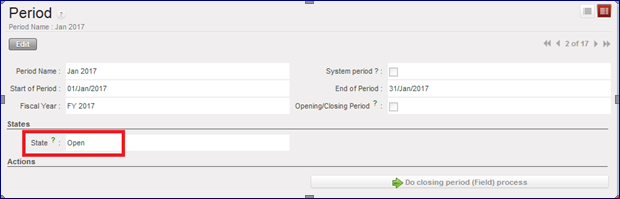
>>>  The accounting period is {Open}.

Green Arrow to select to open January 2017
Form view of the period January 2017 display the state {Open}

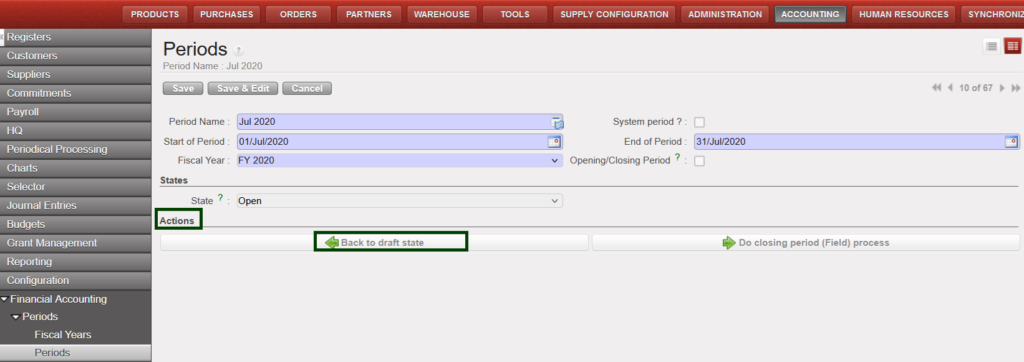
Possible to set period back to draft state in case the period opened in mistake and no JI line    created as below with example Jul 2024 period opened in mistake:

How to set period back to draft state

2.2 Fiscal Year and Accounting Periods

Finance User Manual ENG -> 2. Finance Configurations -> 2.2 Fiscal Year and Accounting Periods

LUFI-20201 Fiscal Year and Periods Creation
LUFI-20202 Accounting Period Opening
LUFI-20203 Configuration Fiscal Year Dates

LUFI-20201 Fiscal Year and Periods Creation

LU Introduction

Fiscal years and accounting periods have to be defined in order to establish a timeframe for all accounting entries. At MSF, the fiscal year corresponds to the calendar year starting from January 1st and ending on December 31st.

In UniField, creating accounting periods automatically generates the creation of the corresponding fiscal year in {Open} state. UniField creates 12 periods and 5 extra-accounting periods (e.g. for fiscal year opening balances, adjustments posting or corrections required by auditors) by default.

The fiscal year and accounting periods are created at HQ level and synchronized downwards to the mission (coordination and projects) in {Draft} status. The periods are in {Draft} status until an authorized user opens them.
Note! Periods 0 and 16 are automatically in {Open} status and their status cannot be manually modified.

How to set the configuration for Fiscal Year

To set the configuration setup related to FY closure, you go to HQ instance and follow the below steps:

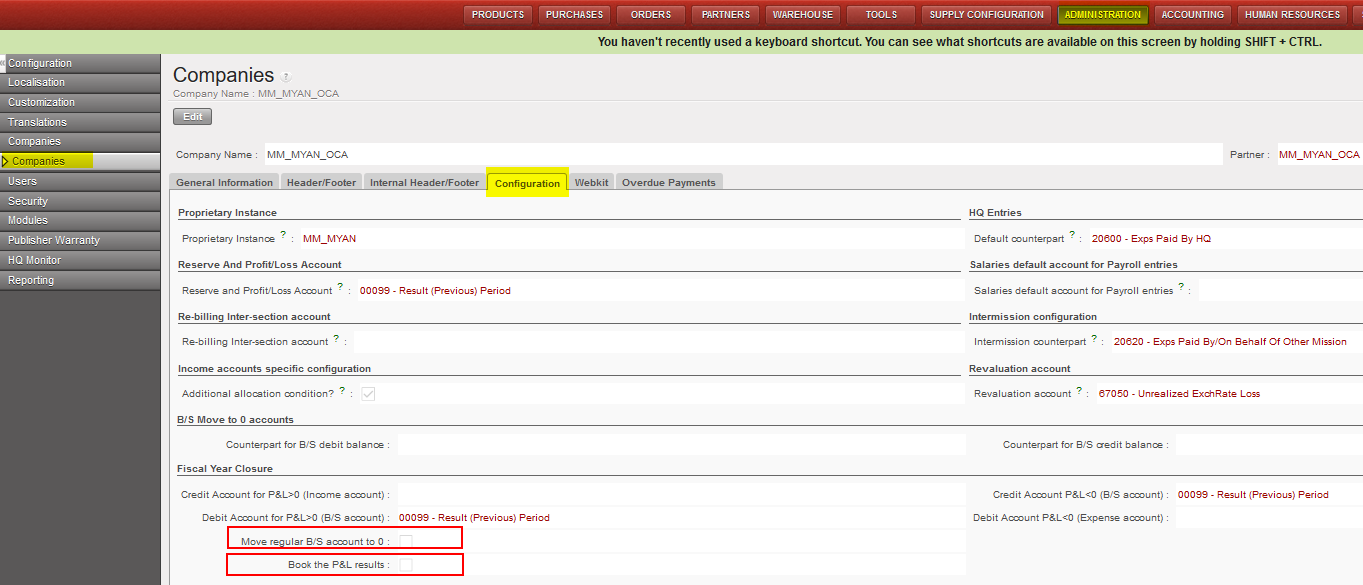
Go to Administration/Configuration/Select the instance/Configuration

  • You will have two main tick boxes for that “Move regular B/S account to 0” and “Book the P&L results”
  • When proceeding the yearly closure, system will check the company configuration to apply the option of (move regular B/S) and/or option of (Book the P&L).
  • The checkboxes which should be ticked must be effective just at coordination level.
  • The checkboxes which should be ticked will be anyway in the view at project, coordination and HQ level.

For each OC section, the selection should be done as below based on their internal procedures:

  • OCG:

Tick Move regular B/S account to 0

  • OCB:

Tick Move regular B/S account to 0

Tick Book the P&L results

  • OCA:

No tick in the checkbox

  • OCP:

No tick in the checkbox

How to Create a Fiscal Year and Associated Accounting Periods

The Headquarter instance will create the fiscal year and synchronize the information downwards to coordination and the projects.

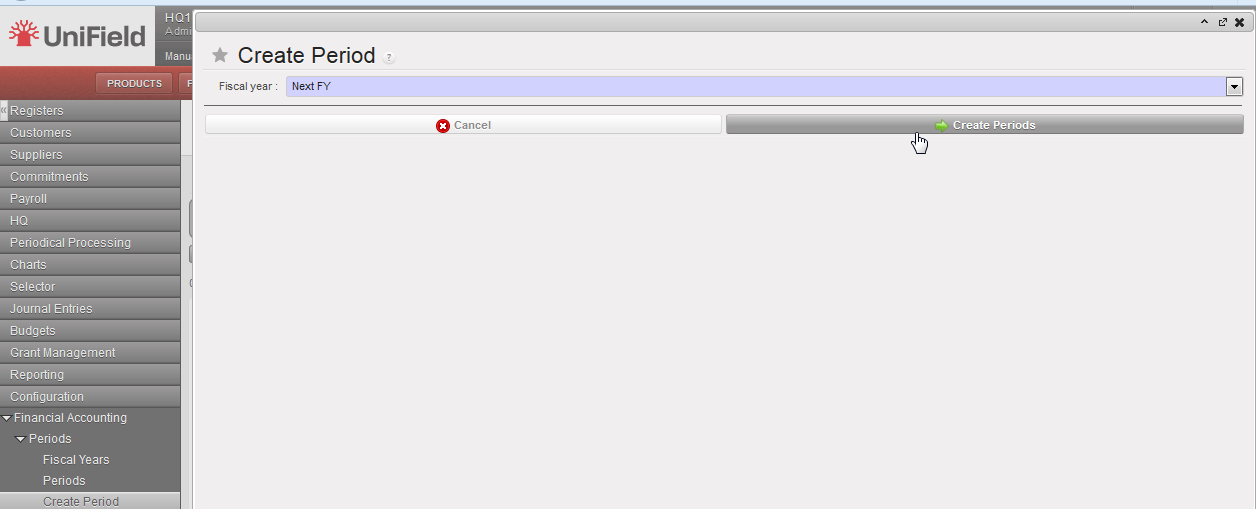
Go to Accounting/Configuration/Financial Accounting/Periods/Create Periods

  1. In the field {Fiscal year} select {Next FY} or {Current FY} if you want to create the current fiscal year. In the below example, we want to create the (next) FY 2017.


Fiscal Year selection: Current or Next FY

2. Click on {Create Periods} and go to Fiscal Years.

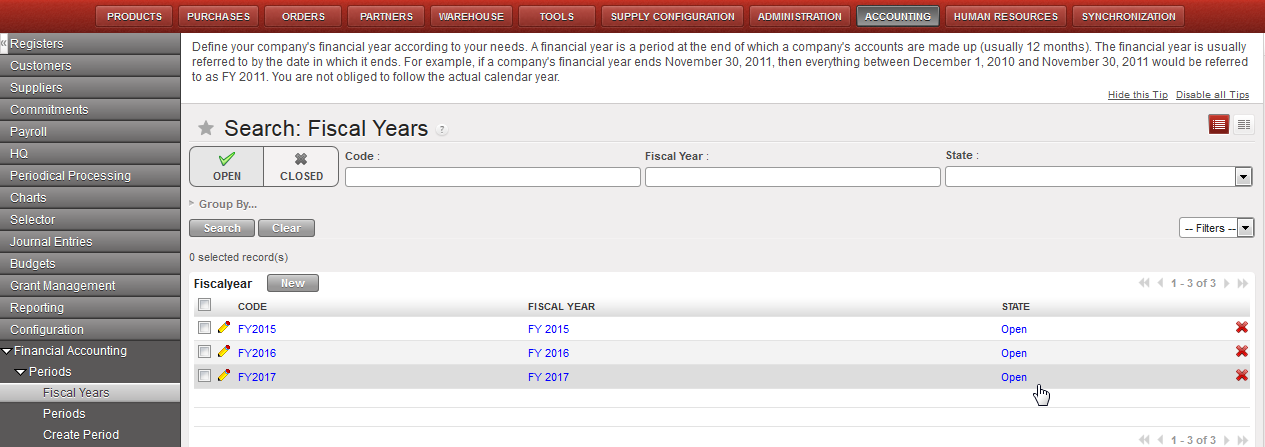
The fiscal year is created in {Open} state.


FY 2017 is displayed in {Open} state in the Search Fiscal Years view


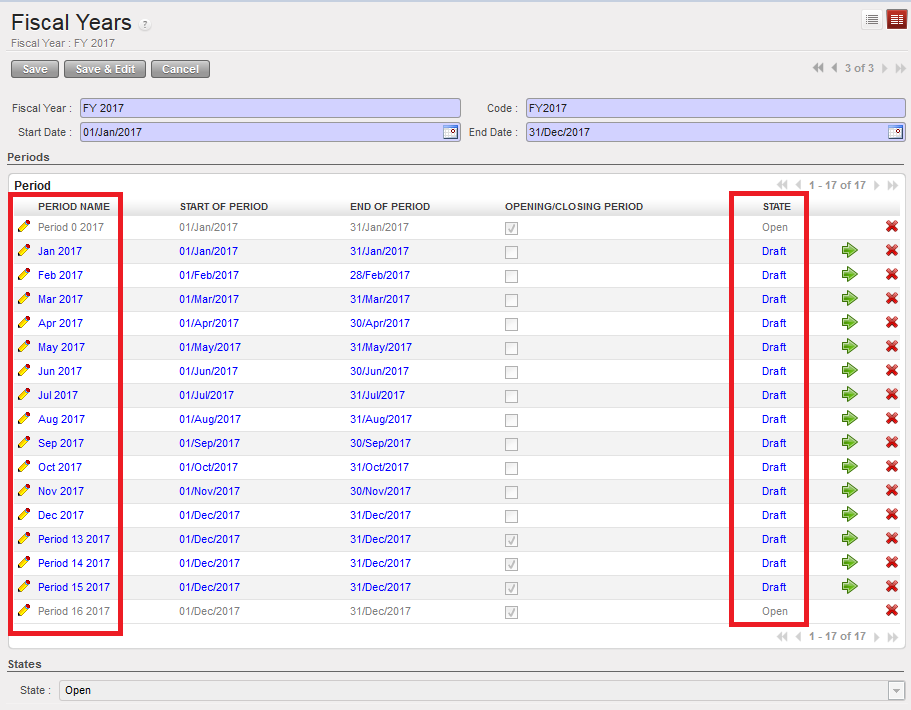
When the fiscal year is created, the accounting periods are in {Draft} status. Periods 0 and 16 are automatically in {Open} status and their status can’t be manually modified.

There are 12 periods plus 5 additional ones displayed in the Fiscal Years Form view.

Field titleentry protocol: fiscal years formSource for Information
Fiscal Year NameFY YYYY (e.g. FY 2017) automatic inputSystem
CodeFYYYYY (e.g. FY2017) automatic inputSystem
Start DateDD/M/YYYY (e.g. 01/Jan/2017) automatic inputSystem
End DateDD/M/YYYY (e.g. 31/Dec/2017) automatic inputSystem

2.1 Chapter Overview: Finance configurations.

Finance User Manual ENG -> 2. Finance Configurations -> 2.1 Chapter Overview: Finance configurations.

2.1 CHAPTER OVERVIEW

The Configuration module is the first module to complete before starting to use UniField. In order to function properly, UniField requires completing this module.

Most of the configuration of the instances is done in this module.

The initial configuration of a UniField instance is only done one time and it deals with data that cannot be undone later such as the Fiscal year and Accounting periods, Chart of Accounts, Financial and Analytical Journals, Currency, Internal and Intermission partners, ICT products and the Proprietary Instances. However during the project implementation, a need of introducing new financial items can arise for instance adjusting the project address, adding new cost centers to a proprietary instance, local suppliers, VAT, etc. These parameters can be added later on.

Most of the financial master data is set in the HQ instance. The data is then sent to Coordination and Project instances via the synchronization engine.

UniField introduces a new process which allows standardising the data exchange across different locations. It’s called the synchronization process. The data exchange follows a set of rules named synchronization rules which define the data exchange direction among the instances. Some data is sent downwards, from HQ to Coordination, other upwards from Project to Coordination or bi-directionally (downwards and upwards).

For instance, a liquidity journal (cash, bank or cheque) created in a project instance and then synchronized will be displayed in the list of liquidity journals in the coordination instance (upwards). This allows coordination to perform some checks on the project’s journals. Any corrections done at coordination level on a project posted journal entry will be reflected at project level via the synchronization (downwards).

At the end of the chapter, you will find a table which explains in which instance data is set and how it is synchronized.

The synchronization is an automatic process performed on a daily basis and scheduled by the IT staff. It is possible to launch the synchronization also manually at any point of time if needed.

Please remember that some UniField functionalities were developed to match certain OC’s procedures. They are highlighted with a star *.

After completing reading this chapter you will be able to:

  1. Understand which parameters are essential to set in UniField instances to properly record financial transactions
  2. Understand how these parameters are created in the instances
  3. Install the parameters either at HQ, Coordination or Project according to the nature of the data
  4. Manage the synchronization process manually and monitor the results