
Supply User Manual ENG -> 1. General Supply
1.1 UniField: an Enterprise Resource Planning (ERP) System
1.3 UniField Main Screens and Views
| Section reference | Name of the document | Path location in SharePoint |
| 2.3 Installation checklist | Installation_Checklist_OCX_XX1_to update.xls | here |
2.8.1 Import Group Types  | grouptype.csv | here |
| 2.9.1 Import cost centers | account.analytic.account_to update.csv | here |
| 2.9.2 Create Proprietary instances | Prop instances_to update.csv | here |
| 2.9.6 Import Analytic Journals | account.analytic.journal.csv | here |
| 2.9.7 Import GL Chart of Accounts | account.account_to update.csv | here |
| 2.9.8 Import GL Journals | account.journal.csv | here |
| 2.9.9 Import Product Nomenclature | nomenclature.csv | here |
| 2.9.10 Import Product Categories | product.categories.csv | here |
| 2.9.11 Import Products | Create Products v4.9.xls | here |
| 2.9.12 UniData products creation | procedure_UniData_V4.pdf | here |
| 2.9.13 Configure Destination/GL accounts link | destination.GL.link.csvDestination_GLaccountlink_example.csv | here here |
Since UniField version 14.1 (Jira ticket US-5918) there is an option to enable the “continuous backup” feature. This improves and optimize the way backups are sent to the OC’s specific OneDrive repository. Indeed the amount of data transferred is considerably reduced as only continuous backup are sent (except the first time for the base backup).
Please note that once activated the feature replaces the “Automatic instance backup to the Cloud” procedure. At the end of the process your backup are still sent to the same OC’s specific OneDrive repository.
Please DO NOT CONSIDER this feature as an agreed offsite backup solution. Local backups are still under your responsibility.
Note that Continuous Backup is only for production instances. Sandboxes cannot use this feature.
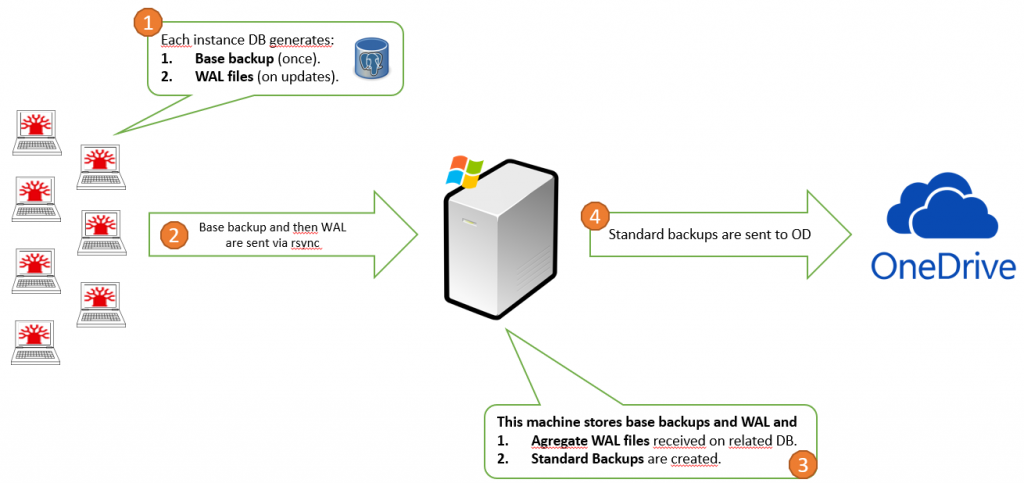
The PostgreSQL native tool is used to generate the backups. In a nutshell, a base backup is first generated and additional WAL files are generated locally on each instances.
Then it is sent to a dedicated Windows machine in which it stores the base backup and aggregates the WAL files. WAL files are basically the incremental back up produced every day.
The Windows machine then dumps the aggregated DB and sends it to OneDrive.
Below a graph showing how it works:
Note that the configuration can be done by the Support Team but we encourage each OCs IT referent to get the knowledge to be able to do it when restoring a newly created instance or when migrating an instance.
The process for newly restored instances or migrating instances is the same.
| Instance authentication to the Continuous Backup Windows Server is done via SSH key. This key is generated by the APM Support Team (coreteam IT) and there is one key per instance. The IT coreteam generates a zip file containing the private and public keys and send it to the OC IT Referent by email when a new instance is created. 1. Unzip the file ssh_config.zip and place the file SSH_CONFIG in C:\Program Files (x86)\msf | 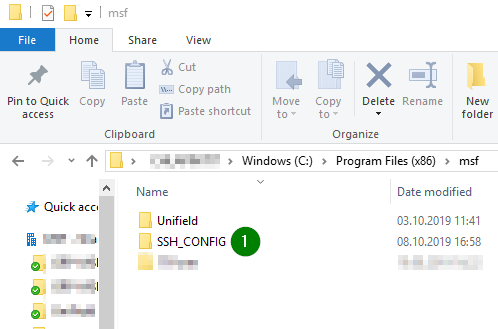 |
| 2. Choose a directory to store the WALs archive. D:\WAL is usually the case but according to the server configuration defined by OC, so it can be placed in the C D:\WAL. In our example, it is in the D drive. Note that the base back up is placed in a sub folder D:/WAL/base. Once sent, this sub folder is empty. All additional WALs are put in D:\WAL | 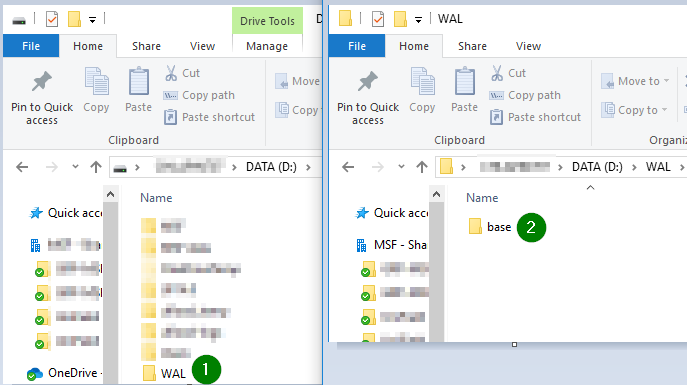 |
| 3. Edit pg_hba.conf in D:\MSF data\Unifield\PostgreSQL (or in the C drive if MSF data is placed in the C drive) Add or un-comment (#) these 2 lines to allow UF to request a base backup host replication openpg 127.0.0.1/32 md5NB: If both lines of host replication are already uncommented, there is no need to touch them. | 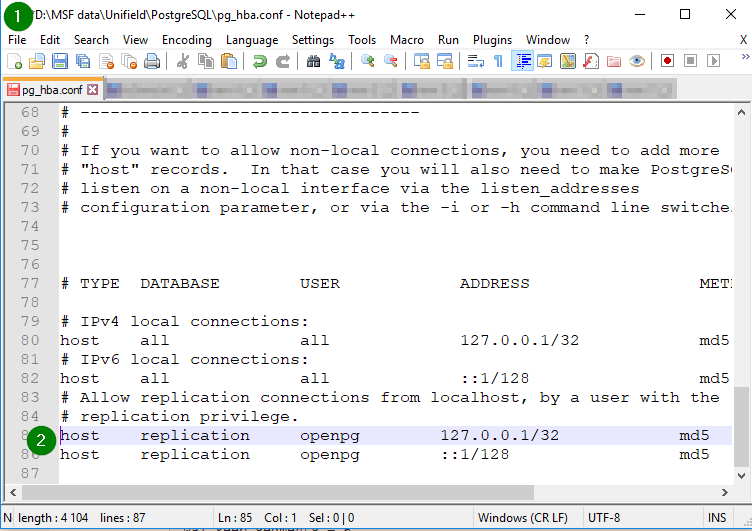 |
| 4. Edit postgresql.conf in D:\MSF data\Unifield\PostgreSQL At the end of the file, add: wal_level = replicaIn case your WAL folder is in your C drive, then add: wal_level = replicaNB: you have to edit the lines to add to the file depending of where is based your MSF data and WAL folder using C or D. | 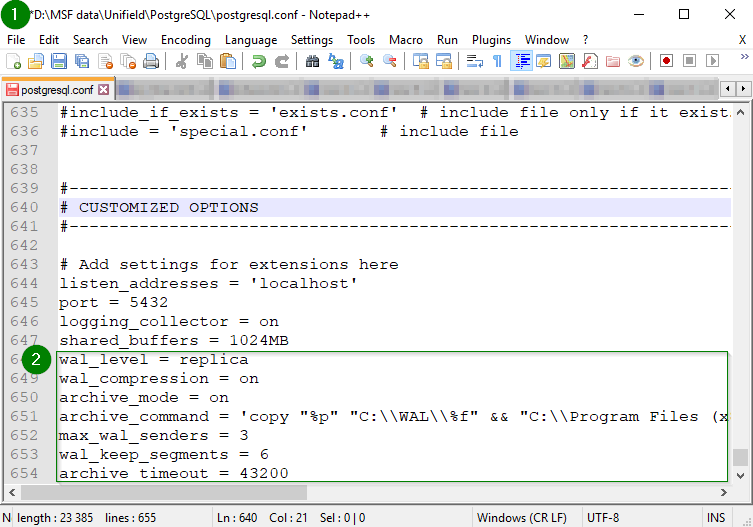 |
| 5. Restart services. Open Services and restart – o penerp-server-py3– Postgres Before, restarting services, ensure no user is using Unifield. You can check with the following method: Go to ADMINISTRATION > Users > Users Click on column “ LAST CONNECTION” to see the active one. | 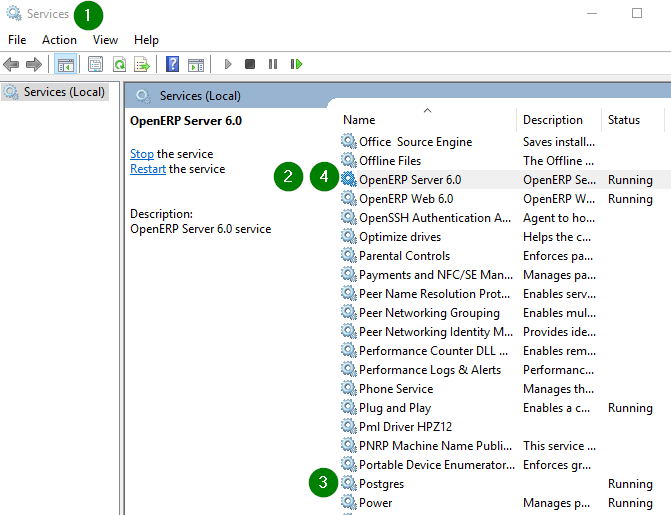 |
| 6. Log in UniField – Click on menu Synchronisation/Backup/Backup config – In “Type of Back up”, select “Continuous backup” – Set “Path to back up to” with D:\WAL (or C:\WAL) to define the local Path to set the WALs. Note : In case many instances hosted in one server : 1. There should one instances to be configured with “Continuous backup” ,the rest of instances to be configured with type “Direct push to sharepoint“ 2. In Connection manager > Silent upgrade should be unticked | 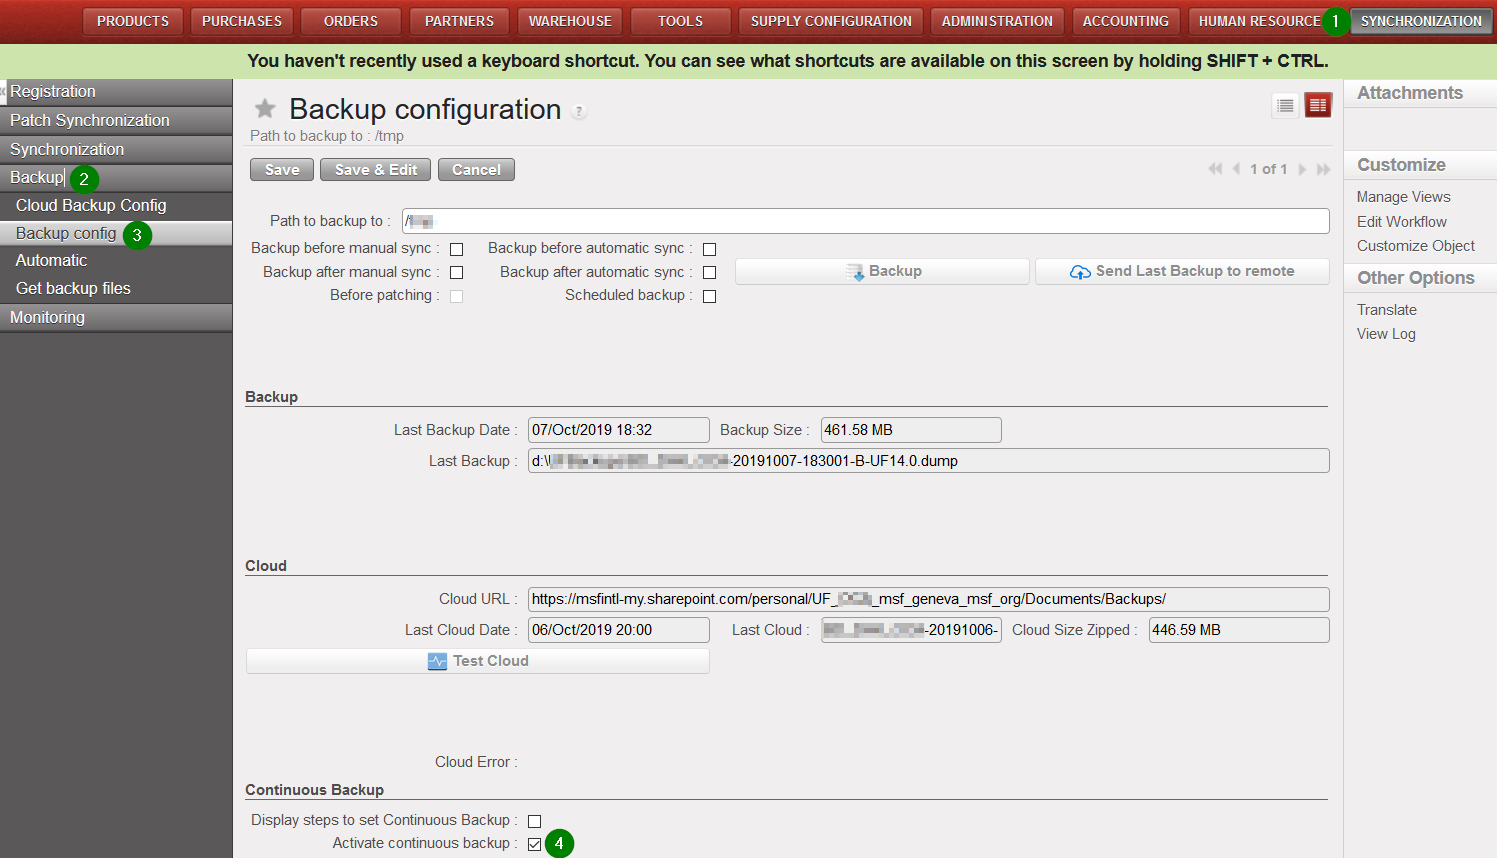 |
| 7.a Click on Generate Base Backup => PostgreSQL will create D:\WAL\base\base.tar (or C:\WAL\base\base.tar) and Unifield will 7z the file. Make sure that WAL files are generated in the WAL folder (D:\WAL or C:\WAL): after the creation of \WAL\base\base.tar a special WAL file XXX.YYY.backup.7z must have been generated, if not check the archive_command directive in the postgresql.conf file and go back to step 4. If successful a new date will fill in ‘Date of base backup’ 7.b Click on Send Wal/Base Backup to remote => rsync will push the content of D:\WAL (or C:\WAL) to the Continuous Backup Server. If successful, a new date will fill in ‘Date of last rsync’ Successfully sent files are removed from D:\WAL (or C:\WAL) Please note that by default the port 8069 would be used to send the backup via rsync | 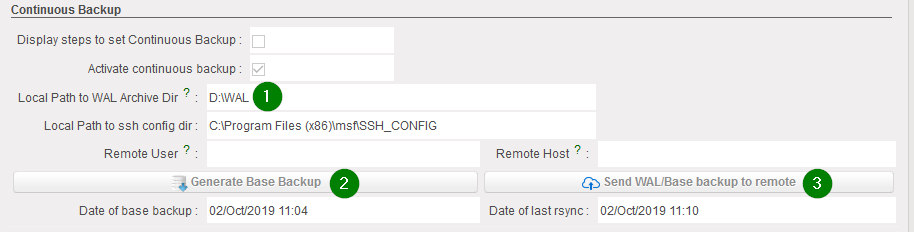 |
| A scheduled task to sent files to remote is added on Administration/Configuration/Scheduler/Scheduled Actions The task is called Send Continuous Backup and nothing is to be touched | 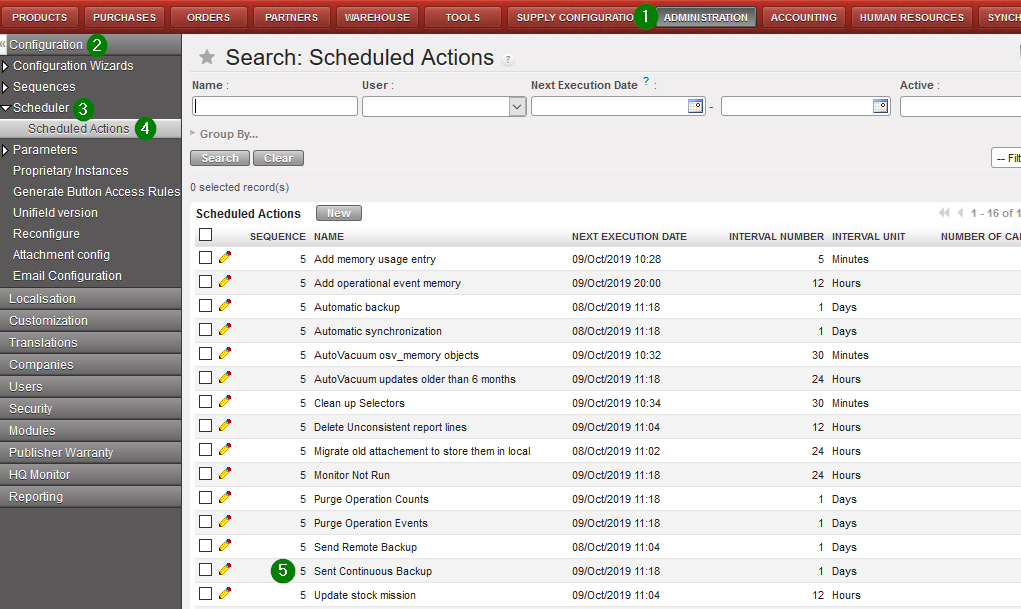 |
This feature has been developed in order to ease our work and decrease human error mistakes during the instance creation phase. In a nutshell it will create new instances from scratch (Coordination and project instances only) according to a configuration file (previously filled and approved by the Support team) and csv files needed for its initial configuration.
In C:\Program Files (x86)\msf\Unifield create a folder named UFautoInstall and insert the following files/folder:1. A folder named import with the following files:
2. A file named | 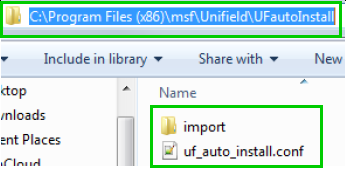 |
| Open Services Right click on OpenERP Server6.0 and restart | 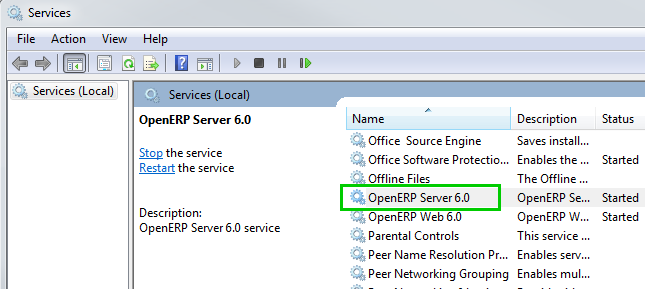 |
| Refresh the UniField page in your browser and you would be redirected to the following page Read the instructions Fill in you Super admin password 1 Click on Start auto creation 2 | 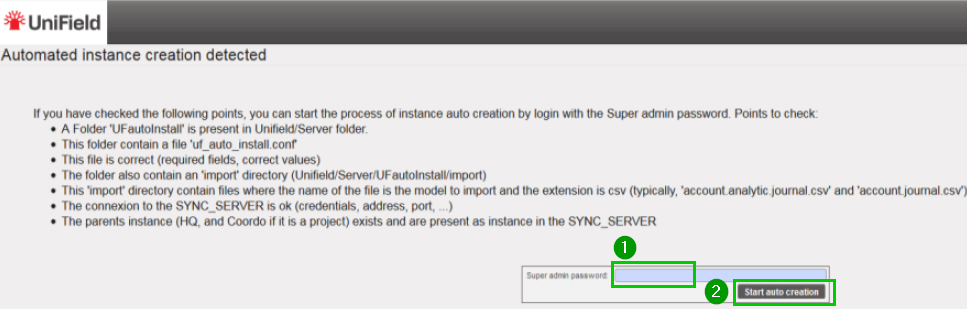 |
Example of an uf_auto_install.conf file.Please note that the information you will have to provide remain the same as if you were doing an install from scratch following the step by step procedure in this IT manual. Fill the different line as per your OC specific configuration and according to your checklist validation Data showed in this print screen is for an example purpose.
Each
sync_port =
functional_currency = |
[instance] [backup] [autosync] [stockmission] [silentupgrade] [reconfigure] [partner] [company]
|
In UniField you have the possibility to configure and manage the scheduled actions in a single place. Some are important to configure when you create a new instance such as Update stock mission in order not to be launched during the working business hours.
| Click on Menu Administration 1, Configuration 2, Scheduler 3, Scheduled Actions 4 Click on the edit button 5 to open a scheduled action | 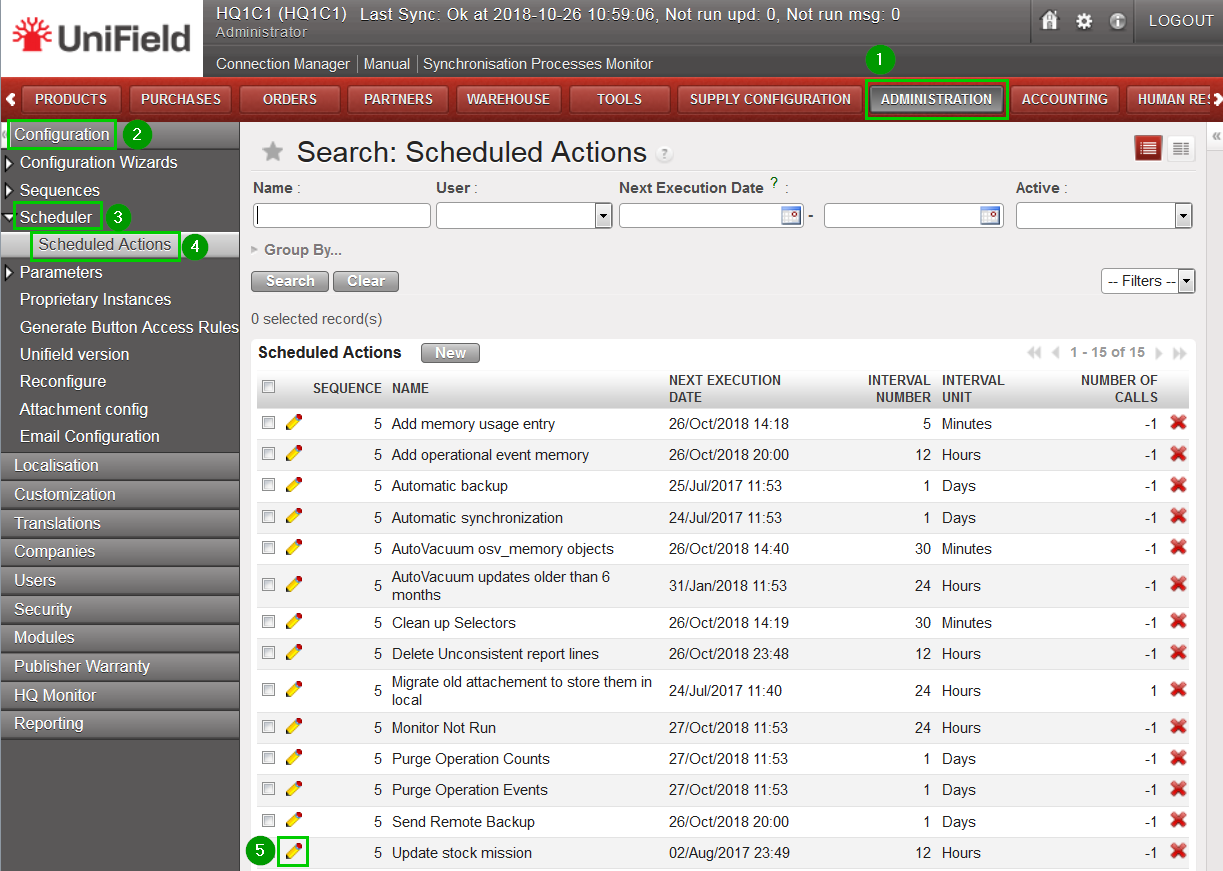 |
Please note that some actions are active by default when you create a new instance and its execution time is set automatically at the creation time of your instance. We recommend checking the configuration and update the execution time of the scheduled actions in the system. In this way they won’t start in the middle of the day and use unnecessary resources while your end-users are working.
Currently all the attachments are saved in the database. This feature allows you to send all your attachments in the File System.
Before configuring and enabling it please have a quick look at your database size. Is it big? Is it because it contains a lot of attachments? If it’s the case you could activate the external storage.
Please be aware that it’s under your responsibility to put in place a backup solution for your attachments in the file system.
Before enabling this option please liaise with your team on site to warn them.
| Click on Menu Administration 1, Configuration 2, Attachment config 3 Fill Path to save the attachments to 4 Set Next migration date by clicking on the calendar icon 5 | 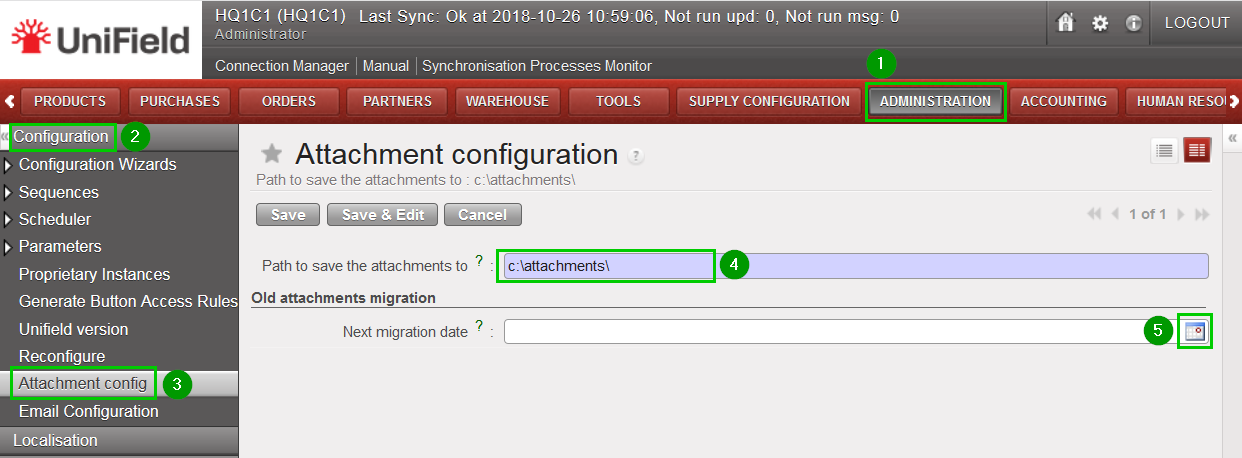 |
Please note the initial migration will copy all your attachments in the File System (only if the migration goes well). In theory once the first migration is done it is not possible to revert it
The backup/management of your attachments will be then of your responsibility.
It is strongly recommended to send a copy of your backup automatically to OneDrive. Your latest backups (last 7 days) would be available at any time and would increase the speed of the Support Team to analyze any bugs with your latest backup. This off-site backup feature is not to be considered as an official one. It is each OC’s responsibility to put in places their own backups plan according to their policies.
You have the possibility to configure from your HQ only the cloud backups for your HQ and each children instance. There is also the possibility to monitor all children instances cloud backup status.
The initial configuration has already been done for all instances, you would have to set up only for the new instances.
Note that this procedure is only availble for production instances.
Configuration:
| Log in your HQ and click on menu SYNCHRONISATION 1, Backup 2, Cloud Backup Config 3 In this view you have an overview of your HQ and all children instances cloud configuration. Please note the one in red are the instances that are not yet configurred configured. Click on the pencil edit icon 4 to edit an instance. | 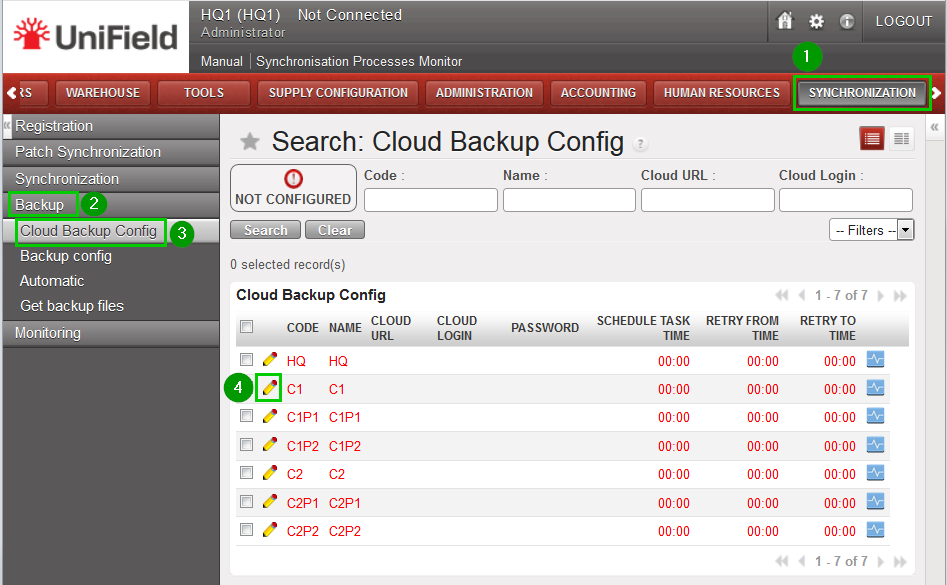 |
| Fill in the information 1 Click on the save floppy disk icon 2 | 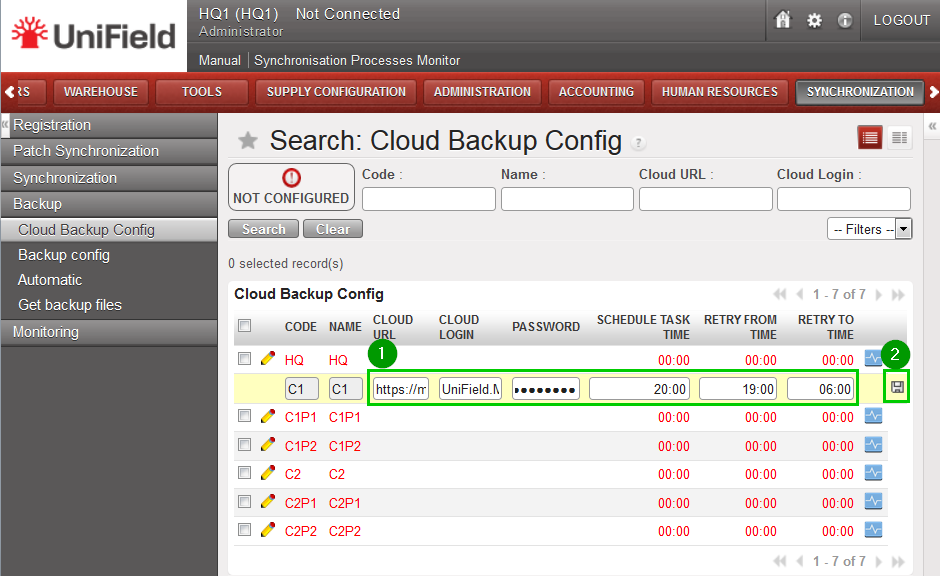 |
| Once saved the line of the instance configured turn into black. Continue the cloud configuration for the instances highlighted in red. | 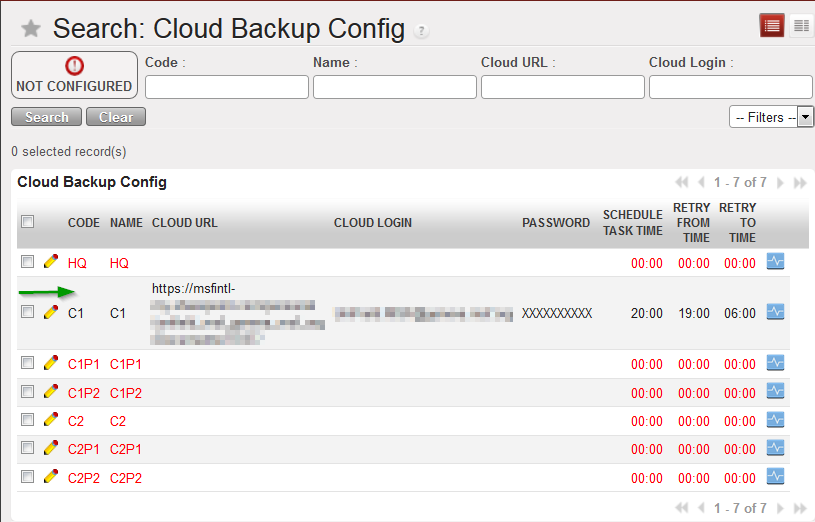 |
| You have the possibility to test the cloud connection by clicking on the blue icon 1 If the connection is ok you will have the following message 2 Once all your instances are configured perform a synchronisation | 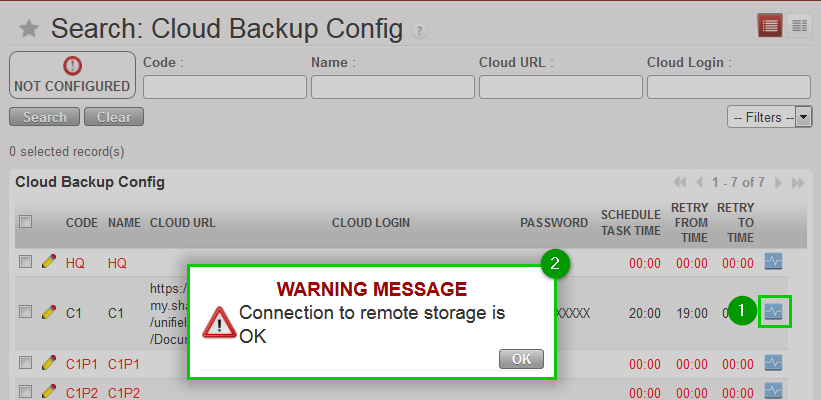 |
| Log in to one of the children instance you just configured at HQ (e.g HQ1C1) Perform a synchronisation to retrieve the updates Click on on menu SYNCHRONISATION 1, Backup 2, Cloud Backup Config 3 All the information 4 about the cloud backup configuration appears in this page Please note that at children instance there is no possibility to update the cloud backup, it’s only done at HQ. | 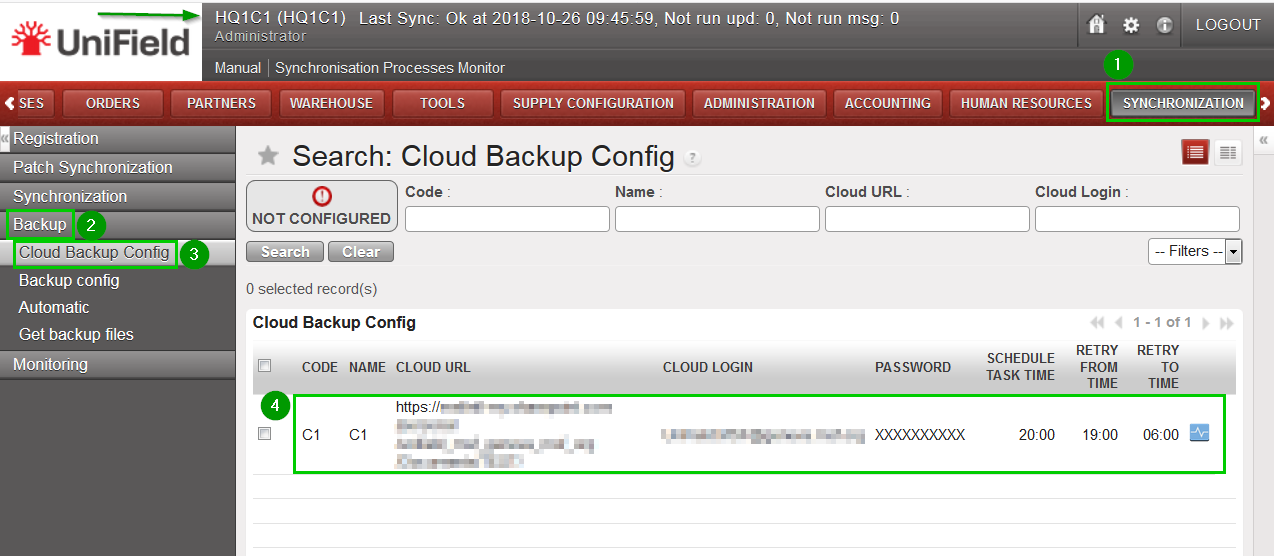 |
Monitoring:
| At HQ level Click on menu ADMINISTRATION 1, HQ Monitoring 2, Version Instance Monitor 3. You will have the list of your HQ and children instances that have backed up in the cloud 4 from their last synchronization | 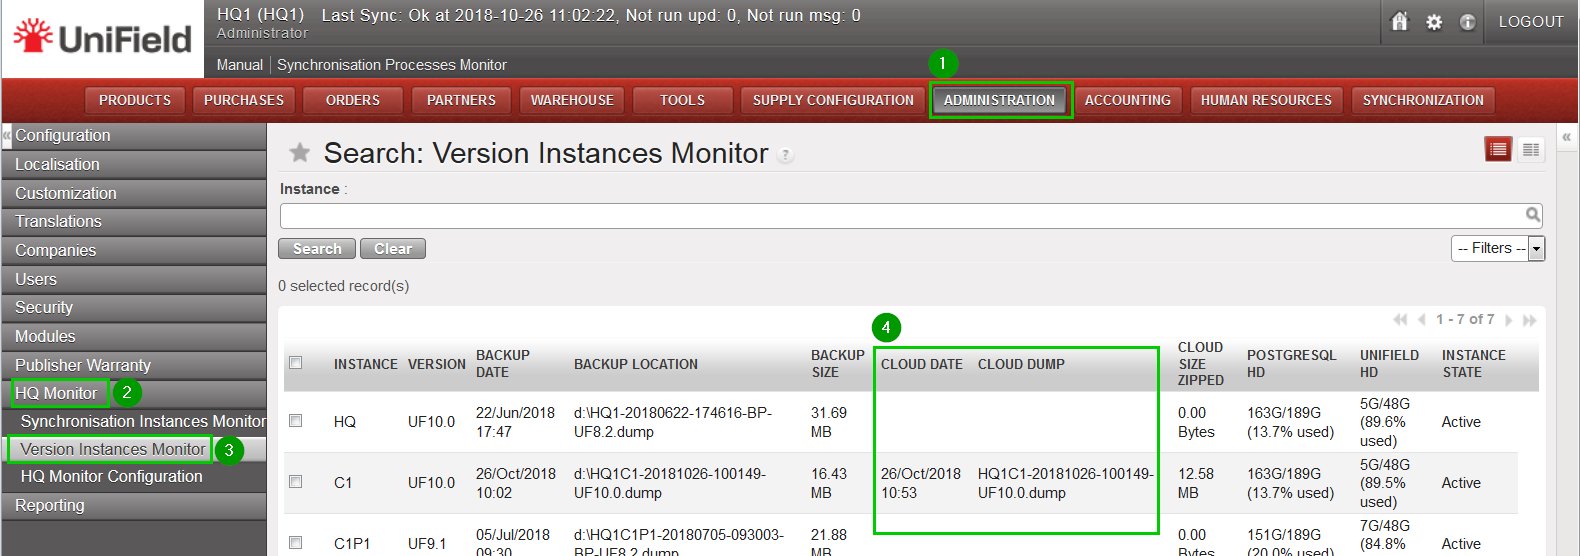 |
| At instance level Click on menu SYNCHRONISATION 1, Backup 2, Backup config 3 All the latest info about the cloud back is under the Cloud section 4 | 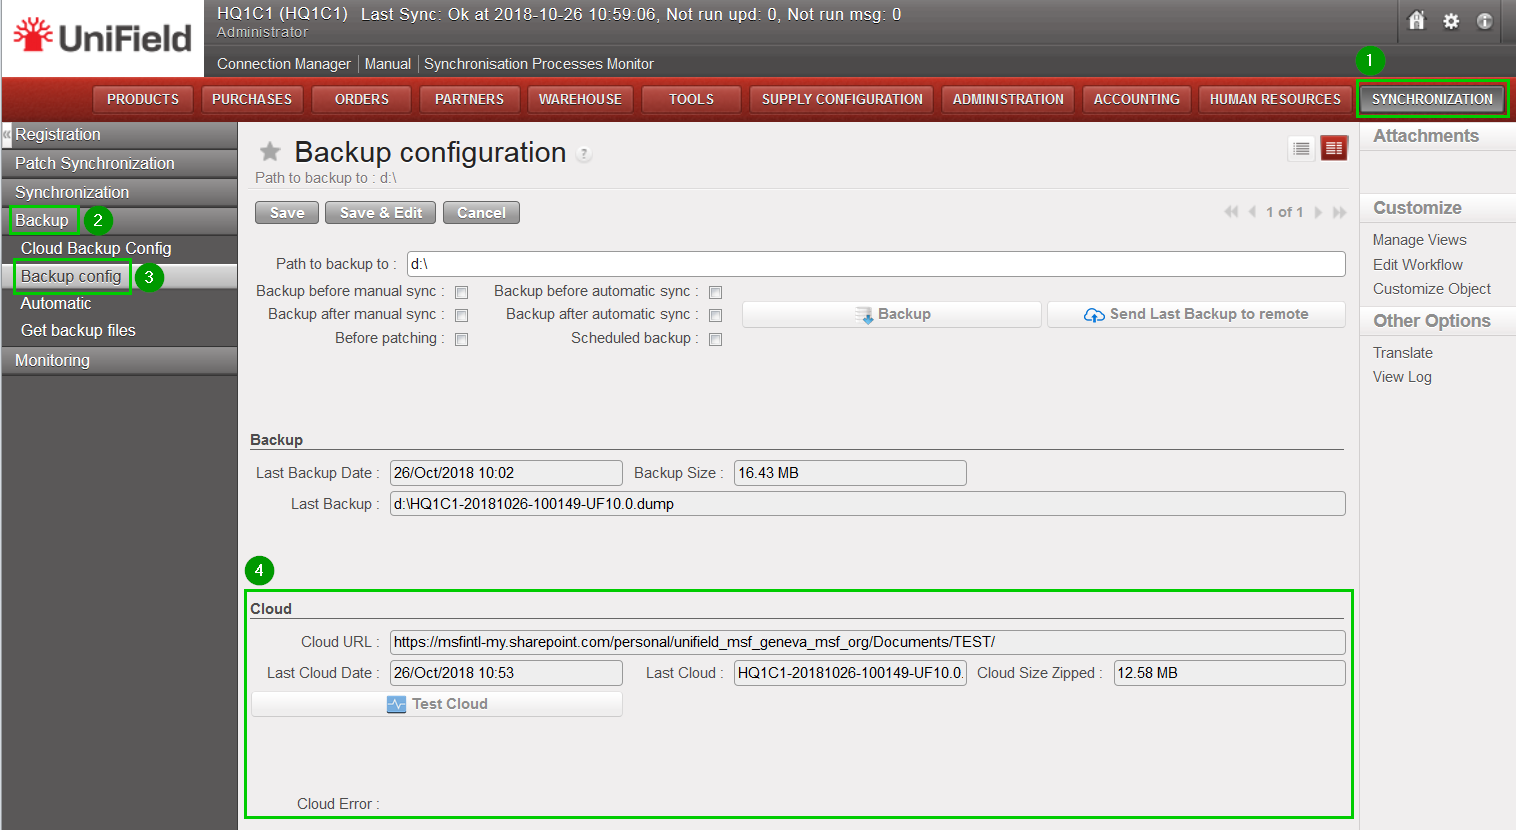 |
This feature helps importing automatically files from other existing applications to UniField.
This is already part of the UniField package.
You will find the procedure Automated_File_import_functional_documentation.pdf in the UniField SharePoint site here.