11.3 Automatic instance backup to the Cloud

11.3 Automatic instance backup to the Cloud

It is strongly recommended to send a copy of your backup automatically to OneDrive. Your latest backups (last 7 days) would be available at any time and would increase the speed of the Support Team to analyze any bugs with your latest backup. This off-site backup feature is not to be considered as an official one. It is each OC’s responsibility to put in places their own backups plan according to their policies.
You have the possibility to configure from your HQ only the cloud backups for your HQ and each children instance. There is also the possibility to monitor all children instances cloud backup status.
The initial configuration has already been done for all instances, you would have to set up only for the new instances.
Note that this procedure is only availble for production instances.

Configuration:

Log in your HQ and click on menu SYNCHRONISATION 1, Backup 2, Cloud Backup Config 3
In this view you have an overview of your HQ and all children instances cloud configuration.
Please note the one in red are the instances that are not yet configurred configured.
Click on the pencil edit icon 4 to edit an instance.
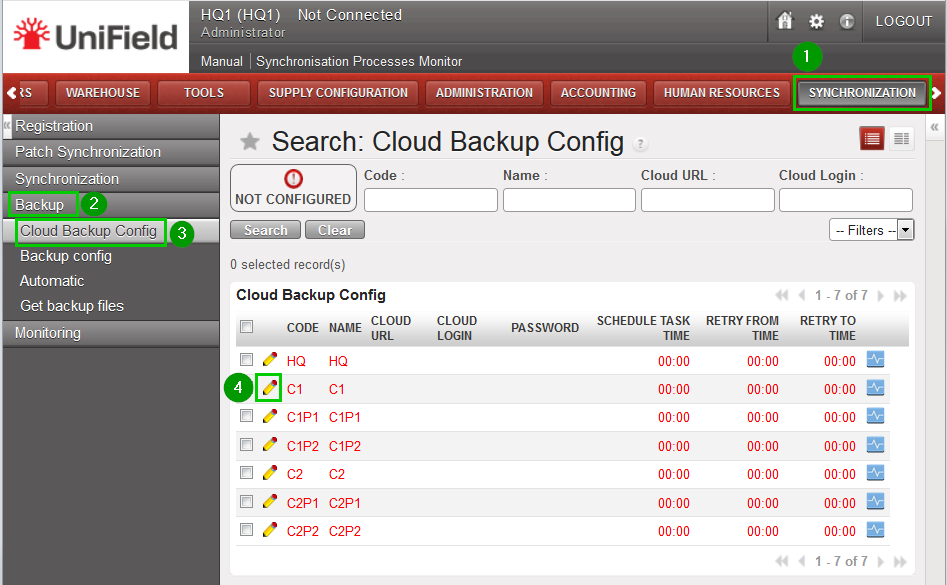
Fill in the information 1
Click on the save floppy disk icon 2
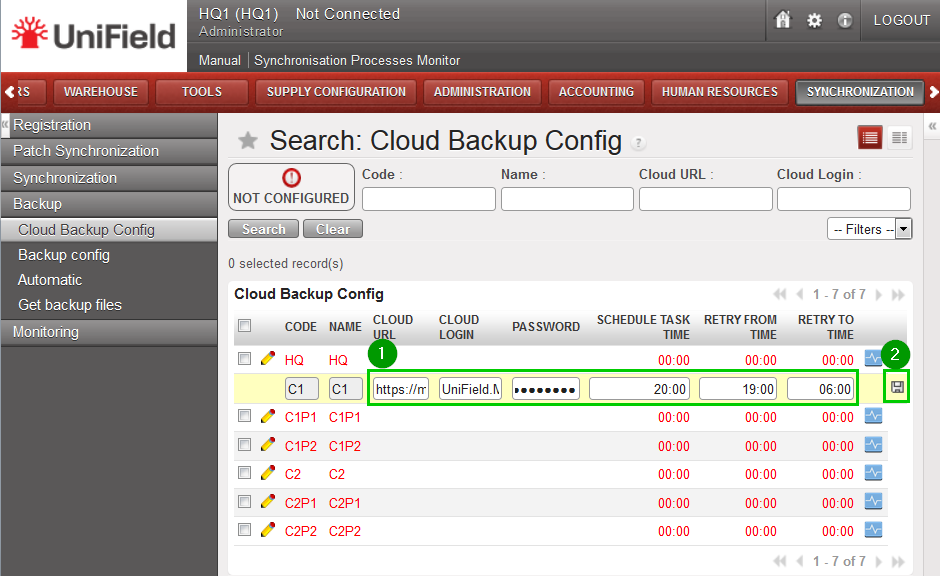
Once saved the line of the instance configured turn into black.
Continue the cloud configuration for the instances highlighted in red.
You have the possibility to test the cloud connection by clicking on the blue icon 1
If the connection is ok you will have the following message 2
Once all your instances are configured perform a synchronisation
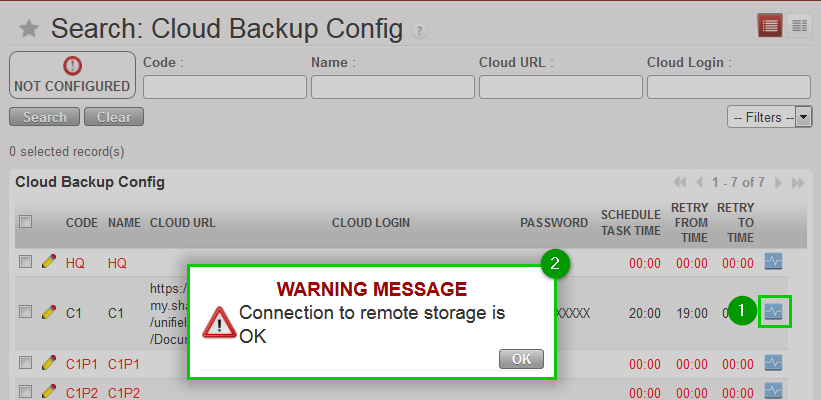
Log in to one of the children instance you just configured at HQ (e.g HQ1C1)
Perform a synchronisation to retrieve the updates
Click on on menu SYNCHRONISATION 1, Backup 2, Cloud Backup Config 3
All the information 4 about the cloud backup configuration appears in this page
Please note that at children instance there is no possibility to update the cloud backup, it’s only done at HQ.
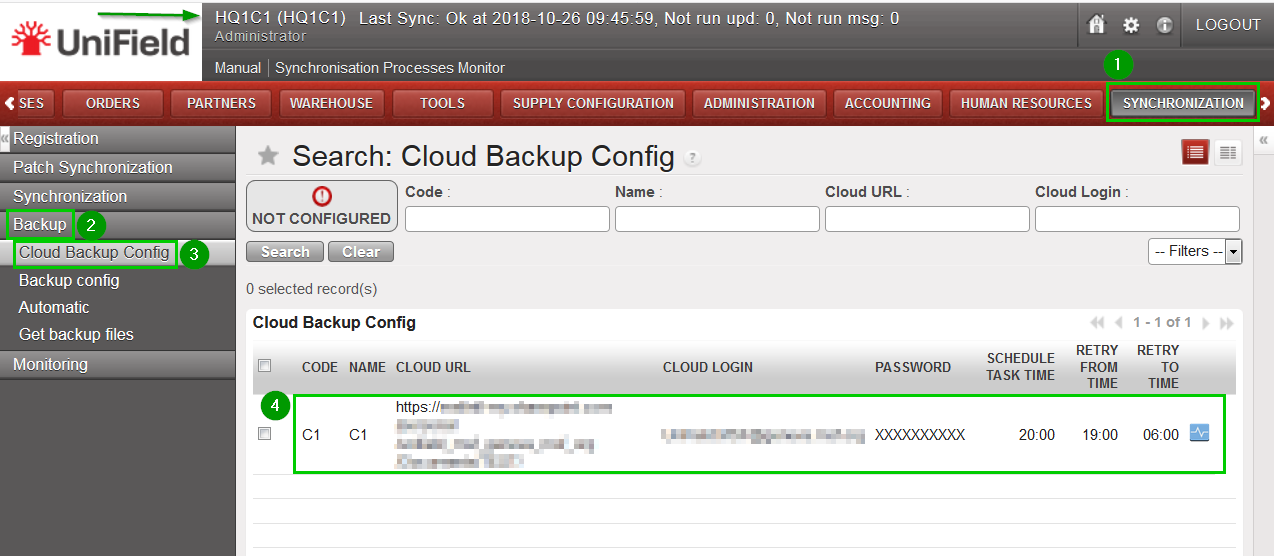
Monitoring:

At HQ level
Click on menu ADMINISTRATION 1, HQ Monitoring 2, Version Instance Monitor 3.
You will have the list of your HQ and children instances that have backed up in the cloud 4 from their last synchronization
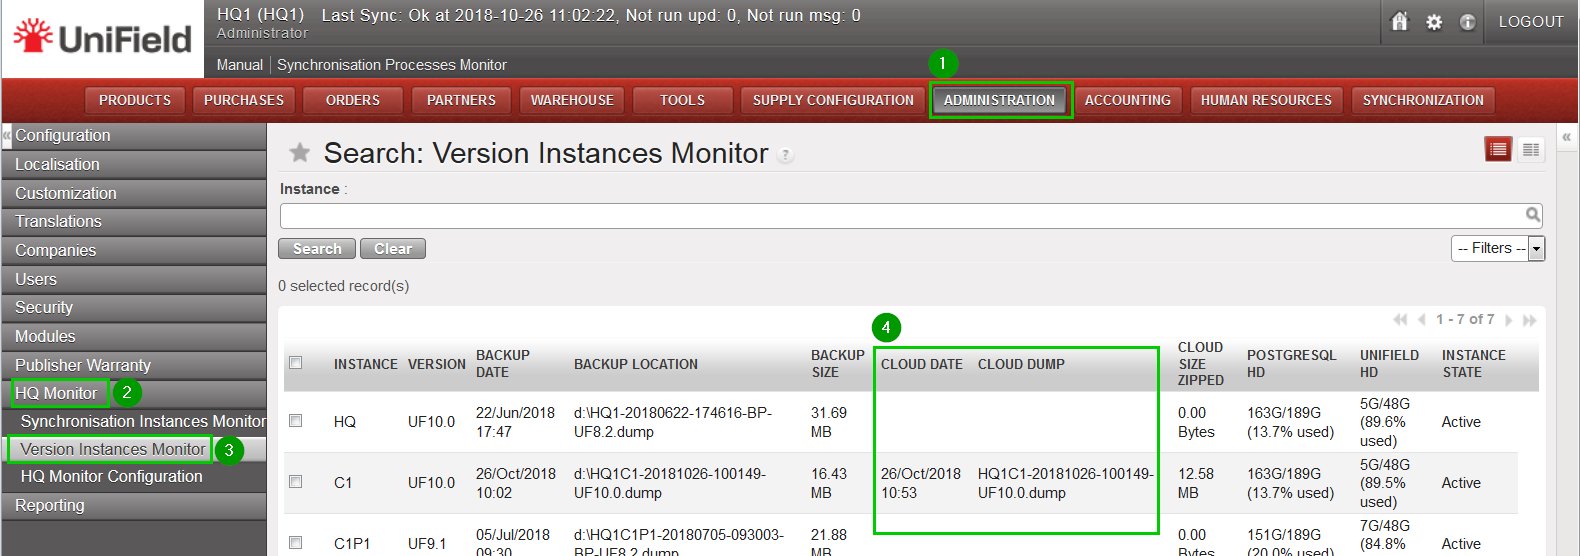
At instance level
Click on menu SYNCHRONISATION 1, Backup 2, Backup config 3
All the latest info about the cloud back is under the Cloud section 4
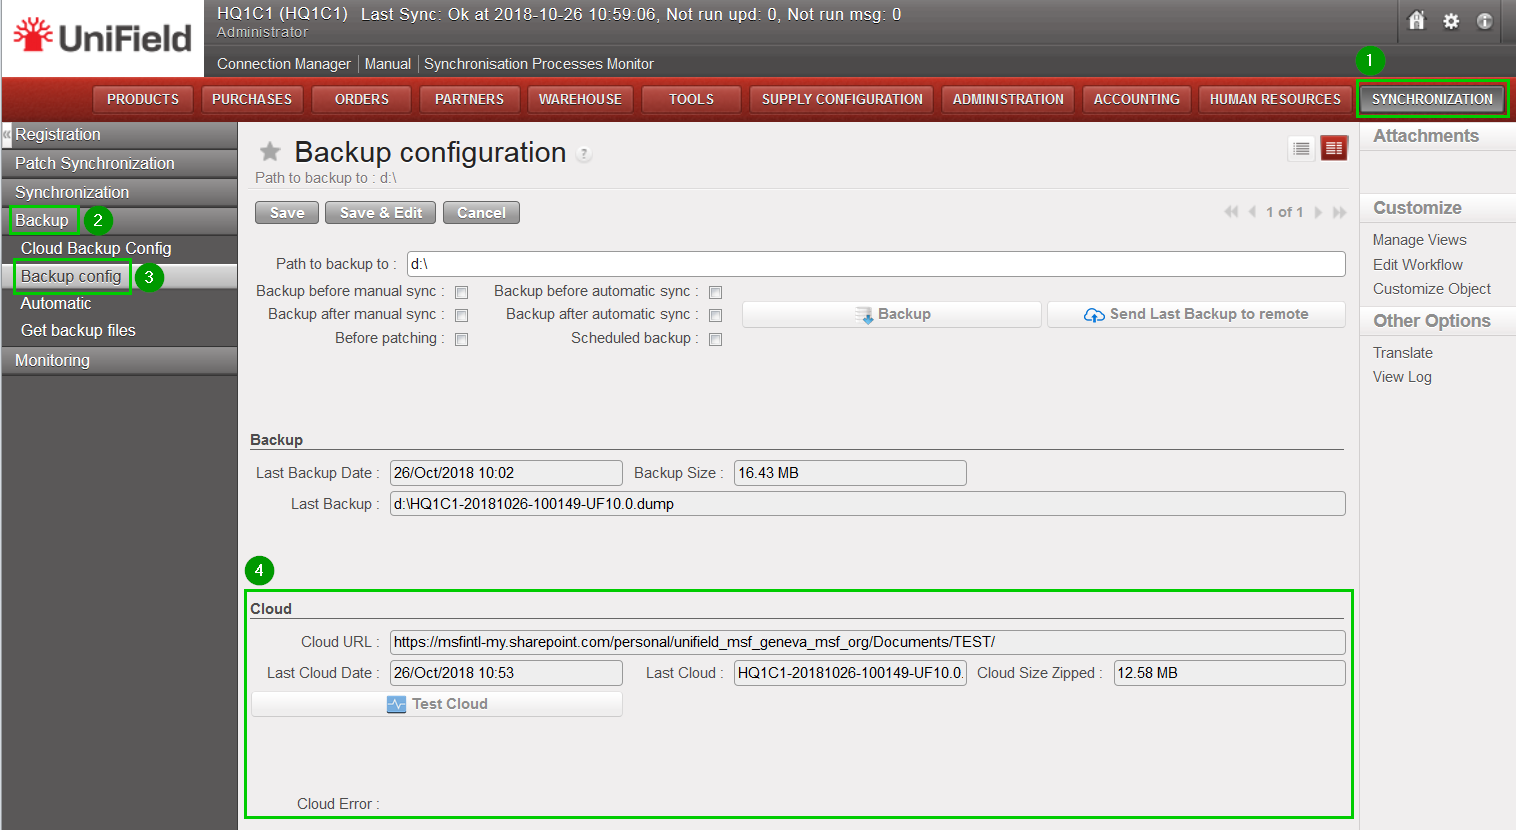
11.2 Automated Vertical Integration

11.2 Automated Vertical Integration

The system is able to automatically import supply data from predefined locations, and update the corresponding records in UniField. This was designed to automate the data transfer between the ESC and UniField: existing Purchase Orders (state: Validated) and Incoming Shipments will be updated if data is valid.

Configuration:
Log in your instance and click on menu TOOLS 1,Automated Imports 2
Click on New 3 to create a new scheduled import
Fill the following fields
Name 1: provide a name to the import job
Functionality 2: choose one. All import features are listed here, but so far Vertical Integration is supposed to rely on Import Purchase Order and Confirm or on Import Incoming Shipment only.
If you want to retrieve the files from an FTP server, check the box and type your FTP host and credentials on the FTP server section 3
Set the paths under the Paths configuration section 4:


  • Source path 5: where to look for files to import
  • Destination path (success) 6: where to store the file if import succeeds
  • Destination path (failure) 7: where to store the file if import fails
  • Report path 8: where to write log files

Paths can be located on an FTP server or locally on the UF server
Configure the scheduler 9 (refer to 11.5 Scheduled actions configuration)
Click on Activate 10

FTP servers are not provided by UniField and must be hosted either by the OC or its ESC.
The same paths can be used for both POV and IN import jobs: the system relies on filenames to recognize what file it is processing. Expected patterns are:

  • POV

POV_XXXX_YYYY_MM_DD.xml
POV_XXXX_YYYY_MM_DD.xls
where:
XXXX is the UF PO Reference (parts separated by “_” e.g. 17_NL_SL001_PO00251)
YYYY_MM_DD is the year, mointh and day (e.g 2018_10_05)
E.g of POV: POV_17_NL_SL001_PO00251_2018_05_15.xml

  • IN

SHPM_XXXX_ZZZZ_YYYY_MM_DD.xml
SHPM_XXXX_ZZZZ_YYYY_MM_DD.xls
where:
XXXX is the UF PO Reference (parts separated by “_” e.g. 17_NL_SL001_PO00251)
ZZZZ is the serial number
YYYY_MM_DD is the year, mointh and day (e.g 2018_10_05)
E.g of POV: POV_17_NL_SL001_PO00251__0528_2018_05_15.xml
Please note that a file that has already been processed will not be processed again, unless its checksum is different. So it is not possible to import the exact same data twice.

Monitoring:
You can see the history of imports by clicking on menu TOOLS 1, Automated imports 2, Import job reports 3
You’ll get a list of all past executions. You can filter the list by status, import function, date and time or Import File name.
Click on any line 4 to get more information


The form view gives you more details about a specific execution of the import:


  • Import function 1
  • Start and End date and time

Import file Name
  • File size 3
  • Number of processed/rejected records 4
  • Errors and exceptions 5 (if any)

You can download the result file 6 in the top right corner

*** Automated imports/Automated export

Import job reports / Export job reports, the job reports can be searched by using the existing filters (Automated import or export functionality, start time, End time and Name of imported or exported file).

11. Automated tools

11. Automated Tools

11.1 Automatic File import

10.7 Escalation Process and Bug Report.

10.7 Escalation Process and Bug Report.

If the problem could not be fixed, you need to escalate the problem according to the documentation See remote support document
The problem you are experiencing may be a simple problem but could also be a bug. In both cases, you need to address your problem with the maximum amount of details possible. The It does not work description is not enough information to diagnose.
You must describe:

  • The environment (Windows 7 Pro 64 Bits, something else?)
  • the UniField version
  • the instance name
  • what you were doing
  • what you wanted to do
  • the detailed steps to reproduce the problem
  • the error messages (a screenshot is always a plus)

Depending on the nature of the problem, a database backup may be useful, especially if the problem needs to be escalated to the UniField team.

10.6 Synchronization.

10.6 Synchronization.

In the Connection Manager menu, I clicked on Connect and got the warning “Unable to connect to the distant server with this user!”
First of all, check if the login and password are correct.
Second of all, if the computer has restarted, the synchronization password is wiped from the memory for security reasons. One must enter it each time the computer starts. Beware! It is the computer running UniField, not the computer from which one connects to the UniField machine with a browser.
In the Connection Manager menu, I clicked on Connect. It has been loading for several minutes without changing the connection state to Connected and I finally got an error message “A request to send or receive data was disallowed because the socket is not connected and (when sending on a datagram socket using a send to call) no address was supplied”.
Check the host address, port and protocol as the server cannot be reached. The parameters may be wrong. Check if a firewall does not block the connections to the synchronization server.
In the update received monitor (or in the update sent monitor), when I activate the “Not Run” filter, there are some lines, what should I do?
Gather more information by clicking on them and try to run them manually. Some lines may be stuck as “Not Run” because the first lines in the list could block them. Therefore if you can identify the model blocking you could unblock the next lines others with a different model by running them manually.
Ask your functional officers on site to help you. If you need to escalate the issue, then you must export the lines to a Microsoft Excel document.
Examples of Not Run lines
Click on the arrow on the right 1 to expand the hidden menu and Click on Export 2
Export Type field: select Export all Data 1
Format: select Excel 2
Under Available fields 3 list select the one you need and Add 4 it to the Fields to export 5 list. You also have the possibility to Remove 6 fields form the Field to export 5 list
When finish click on Export to File 7
A pop up window opens.
Click on Save file 1
Click on OK 2

10.5 Transfer the UniField instance from one computer to another.

10.5 Transfer the UniField Instance From One Computer to Another.

The project is small, so I have had UniField on a computer that is not very powerful, but now the project is going to grow. How can I transfer my instance from one computer to the other?
  • You ask all the users to stop working on the instance (or you cut the instance from the network).
  • You need to backup the database and the following configuration files:
    • openerp-server.conf in C:\Program Files (x86)\msf\Unifield\Server
    • openerp-web-oc.cfg in C:\Program Files (x86)\msf\Unifield\Web\conf
    • copy the directory “C:\Program Files (x86)\msf\SSH_CONFIG” to the new computer
    • pg_hba.conf and postgresql.conf in D:\MSF data\Unifield\PostgreSQL
  • You need to install UniField on the new computer.
  • You restore the configuration files from the old instance on the new instance.
  • You reboot the computer.
  • You restore the database using the UniField password from the old instance.
  • You login as an admin and enter the synchronization password.
  • You connect the instance to the synchronization server.

The new instance keeps its old instance ID and thus is already validated at synchronization server side. The users can now continue with their work.
If the UniField machine gets its IP address from a DHCP server, you may consider updating the latter as the machine is different, so is its MAC address.

10.4 Web page

10.4 Web page

How do I connect to the UniField interface?
Use a web browser like Firefox, and enter in the address field, the IP of the machine running UniField and the port 8061: e.g. http://IpAddress:8061
I know the UniField address and port of the local instance, I can connect locally using localhost instead of the IP address but I cannot connect remotely.
Check if the Web port 8061 is opened in Windows Firewall. Refer to the installation procedure to know how to open it.
I cannot connect locally to UniField with http://localhost:8061, what should I do?
Maybe the default port has been changed by your OC. Check the value of “server.socket_port = PPPP” in the file C:\Program Files (x86)\msf\Unifield\Web\conf\openerp-web.cfg
If instead of PPPP there is a value such as 80, then try to connect to http://localhost:80
If it still does not connect, check if the OpenERP services are running: click on the Windows logo.
In the “Search program and files” field, enter “services” and click on “services” in the options suggested
Check the status for OpenERP Server, OpenERP Web and Postgres. If they are not started, start them.
I know the web port of my local instance is correct and the firewall authorized the access to that port and yet, I get an error “Unable to connect. Firefox can’t establish a connection to the server at […]”
The web service may be down. Check if the OpenERP services are running:
Click on the Windows logo
In the “Search program and files” field, enter “services” and click on “services” in the options suggested
Check the status for OpenERP Server, Postgres. If they are not started, start them.
I’m connected to the UniField interface but when I try to log in, no database appears in the drop down list
It seems the OpenERP server process cannot connect to the database. On Linux, it needs a local user while on Windows OpenERP needs a login and a password to connect to PostgreSQL. Have they been changed since the installation? If you backed up the configuration files right after the installation, you could have a look in those. Otherwise, if you did change the password intentionally, you need to update the OpenERP server configuration file. The path can be found in the “Backing up and Restoring” documentation.
Can I make certain users log in to certain instances by default?
You can help them to make a bookmark on their computer that makes their preferred instance the default. First, have them log out from Unifield. Navigate to the login page, and note that in the URL bar there is something like http://unifield/openerp/login?db=&user=
You can edit this to include the database name you want between the db= and the &, for example:
http://unifield/openerp/login?db=HQ1&user=finref
Hit return to test that the database popup is set like you want. Then make a bookmark. The bookmark will include the preferred database that you just set in the URL.

10.3 Installation

10.3 Installation

When I start the UniField installer, a Windows screen prompted me for a login and password, what should I enter?
You need to enter the Windows credentials of an account with administrative rights to be able to install UniField.
I just installed UniField and I successfully connected to the web page but I cannot see any databases.
You’re not done with the installation process. You need to create the database and then set-up the instance. Refer to the installation documentation and the initial set-up documentation
I would like to change the groups of my instance. How should I do?
Beware that the instance will not be able to synchronize as long as the modifications are not validated on the synchronization server. Start the registration process in the synchronization menu, do NOT change the uuid, select the groups and register. You must now inform the rightful persons to validate the changes.