2.12 Summary of Actions / Files to be Uploaded
2.12 Summary of Actions / Files to be Uploaded
HQ Instance
- Install modules: msf_profile THEN sync_so | sync_client_web | update_client
- Import cost centers –
analytic.account_to update.csv
- Create proprietary instances
- Reconfigure
- Configure Cost Centres in Coordination Proprietary Instances and in Project Proprietary Instances
- Import analytic journals –
analytic.journal.csv - Import chart of accounts –
account_to update.csv - Import GL journals –
journal.csv - Import Product Nomenclature –
nomenclature.csv - Import product categories –
categories.csv - Import products –
productn.csv - Import Destination / GL link –
destination.GL.link.csv - Import user rights –
User Rights Menus Groups.xml - Import record rules –
Consolidated Record Rules XXX.csv - Import access controls list –
Consolidated ACL.csv - Import field access rules –
Consolidated Field Access Rules.csv and Consolidated Field Access Rule Lines.csv - Import button access rules –
Finance.csv|IT.csv|Supply.csv - Connect and register to synchronization server
- Validate instance at synchronization server level
- Configure automatic backups
- Perform initial synchronization
Coordination Instance
- Connect and register to synchronization server
- Validate instance at synchronization server level
- Configure automatic backups
- Perform initial synchronization
- Reconfigure
- Import analytic journals –
analytic.journal.csv - Import GL journals –
journal.csv - Configure internal and intermission partners
- Perform validation synchronizations
Project Instance
- Connect and register to synchronization server
- Validate instance at synchronization server level
- Configure automatic backups
- Perform initial synchronization
- Reconfigure
- Import analytic journals –
analytic.journal.csv - Import GL journals –
journals.csv - Configure internal partners
- Perform validation synchronizations
- Install module sync_remote_warehouse (only if included in the checklist)
- Setup the remote warehouse (only if included in the checklist)
Synchonization Server 
- Install modules: msf_profile THEN sync_remote_warehouse_server | sync_so | update_server
- Import Group Types –
grouptype.csv - Create Groups
2.11 Project Instances
2.11 Project Instances
All steps described in this section are to be performed with the admin user. It is also important that the coordination’s validation synchronizations described in step 2.10.9 are finished before starting setting up Projects. Log in your Project instance.
2.11.1 Connect and Register to Synchronization Server

Connect Click on Menu Synchronization 1, Registration 2, Connection Manager 3
Click on the edit icon (4) and to edit the Current Connection
Host:
* Production instance: sync.unifield.net
*Sandbox: Address of the machine where your Sync Server is installed (localhost if installed on the same machine)
Port:
*Production: 443
*Default or Sandbox: 8069
Protocol:
*XMLRPC
*secured compressed XMLRPC
Database Name:
*Production: SYNC_SERVER
*Sandbox: Your_sync_server_name
Login on synchro server:
*Production: provided by the Support Team
*Sandbox: Your_sync_server_login
Password:
*Production: provided by the Support Team
*Sandbox: Your_sync_server_password
Max Packet Size: 500
Timeout:600 – The number of seconds the instance will wait during a sync before raising a timeout error
XmlRPC retry: 10 – The number of retry during a sync when the instance don’t receive the acknowledge from the sync server with the XmlRPC protocol.
Silent upgrade: The instance will patch automatically during the time slot defined if an automatic synchronisation is performed. It is strongly
recommended to activate it
Click on Connect 5 the State switches to connected
Click on Save
| Register: Click on Menu Synchronization 1, Registration 2, Register 3 A new wizard will open Check that the instance name matches the Project database name as defined in the installation checklist Enter contact email 4 wwwClick on Next 5 | 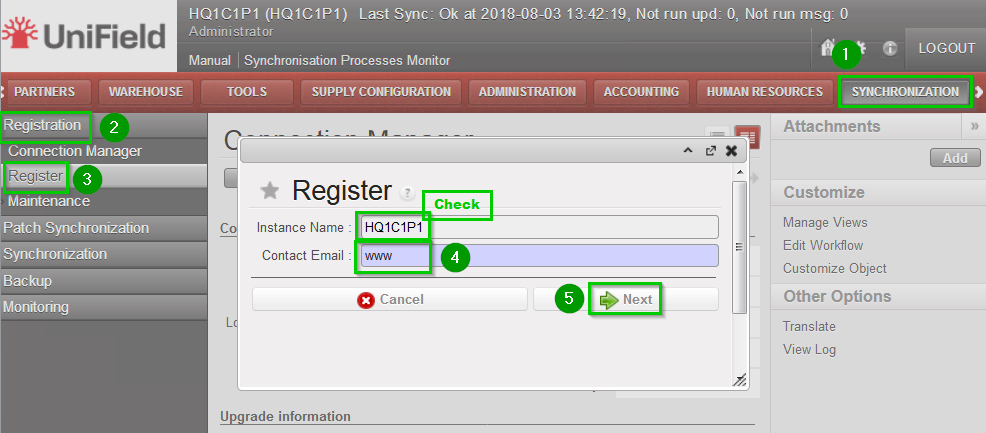 |
| Select your Coordination Parent Instance 1 Select your Operational Center 2 Click on Next 3 | 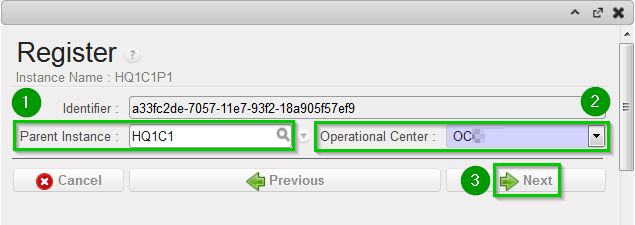 |
| Click on Add 1 Choose groups 2:
Click on Select 3 | 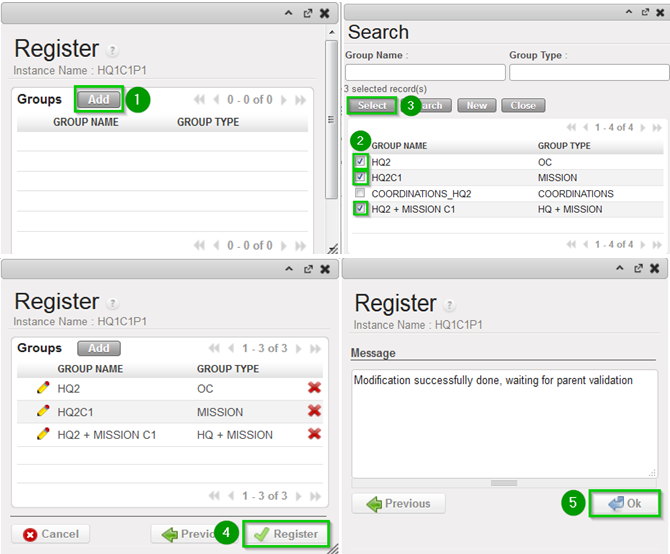 |
2.11.2 Validate Instance (only at sync_server side)
For Production instance this step is done by the Support Team.
For Sandbox instance login in your_Sync_Server instance with the admin user.
| Click on Menu Administration 1, Synchronization 2, Configuration 3, Instance 4 Click on the edit icon 5 of the Project instance created in previous steps | 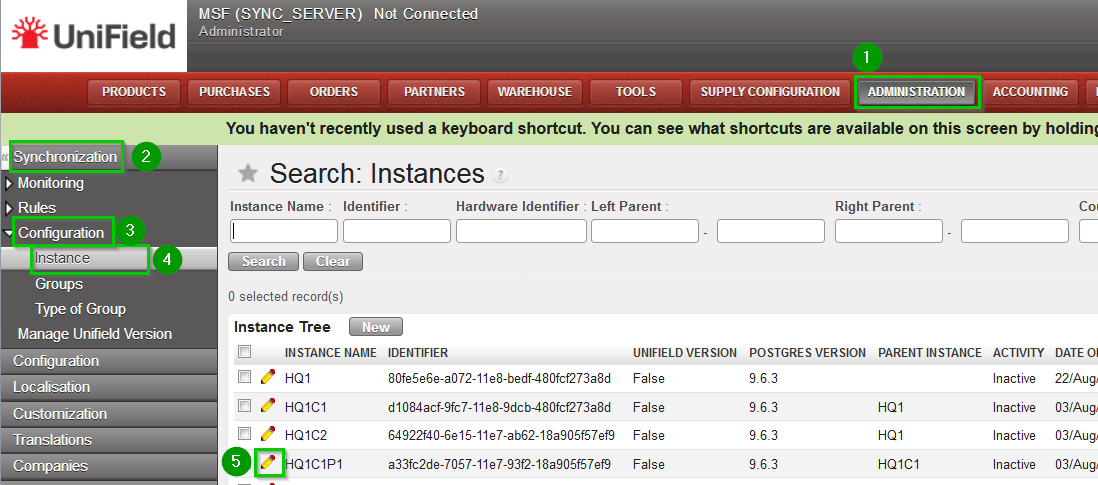 |
Check the following is correct:
Note that at this stage, it is normal that no children appear in the list, they will appear later on when Coordinations are created and defined as children of the HQ. | 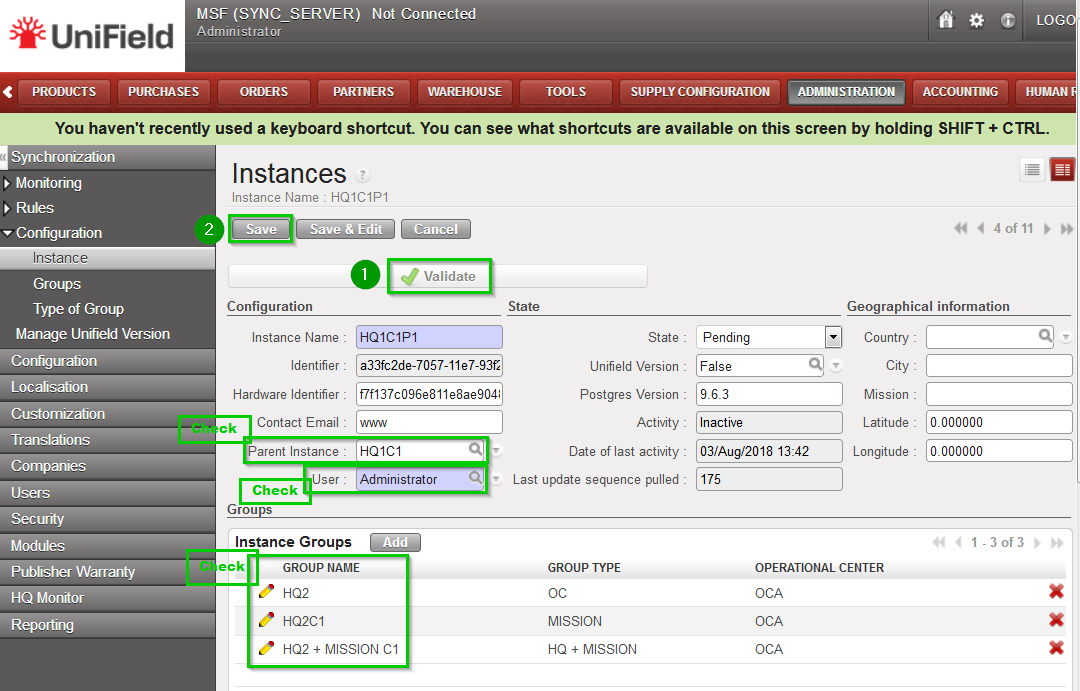 |
2.11.3 Configure Automatic Backups
It is strongly recommended to schedule automatic backups and to save it in another location than the server instance.
| On your HQ instance, click on Menu Synchronization 1, Backup 2, Backup config 3 You must enter an existing path 4 to save backups. The following options 5 are available to run automatic backups, please ensure the backup path exists as the sync. may fail:
Click on Save 7 |  |
| To schedule an automatic backup click on Menu Synchronization1, Backup2, Automatic3 Edit the following fields 4:
Tick the Active box 5 |  |
It is possible to send your latest backup to OneDrive. This is STRONGLY RECOMMENDED, refer to section 12.2 Automatic instance backup to the Cloud to configure it. the configuration is done from the HQ for the HQ and its children instances.
Please note that this IS NOT to be considered as a offsite backup solution (this is for Support Team debbuging, support and BI purpooses)
2.11.4 Perform Initial Synchronization
| Click on Menu Synchronization 1, Synchronization 2, Manual 3 A new wizard opens. Click on Start All Synchronization In Background 4 You should wait until the synchronization is finished before starting to configure the Projects. |  |
| In order to perform this check: Click on Menu Synchronization 1, Monitoring 2, Synchronization Processes Monitor 3 Check 4 that the last synchronization is Done |  |
2.11.5 Perform Reconfigure
| Click Menu Administration 1, Configuration 2, Reconfigure 3 A new wizard will open and you would then navigate to various screens. | 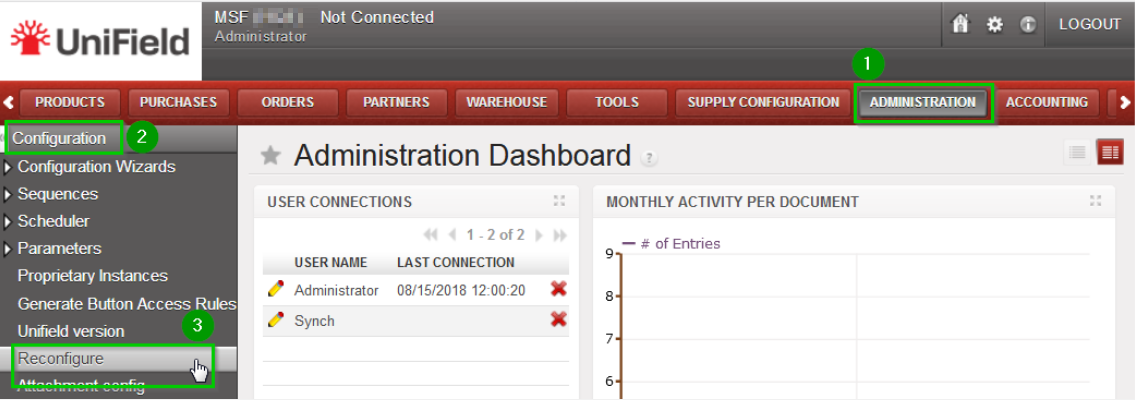 |
| Instance Configuration: Choose the proprietary instance corresponding to the project1 (as created in step 2.9.2). This step cannot be re-done; if the wrong proprietary instance is chosen, the database needs to be dropped and re-created. Choosing a proprietary instance already in use in your OC could lead to corruption of other instances. Most of the time the proprietary instance’s name and the instance’s name will be the same. Click on Next 2 | 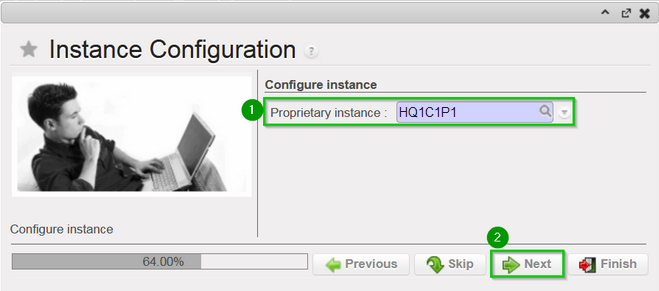 |
| A confirmation message window opens asking you to confirm the choice of the proprietary instance. If its correct click on Next 1, if not click on Previous | 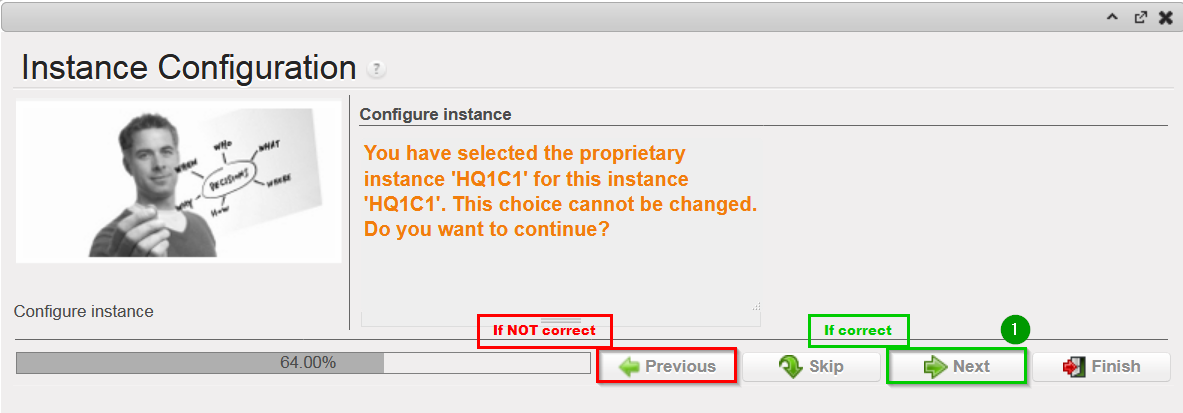 |
| Most of the time the property instance’s name matches the instance’s name. If it’s not the case a warning message is displayed. The only exception applies to instances at HQ level. Please be extremely cautious before proceeding after this warning message. |  |
Activate the International Commitments Import
Click Next 2 | 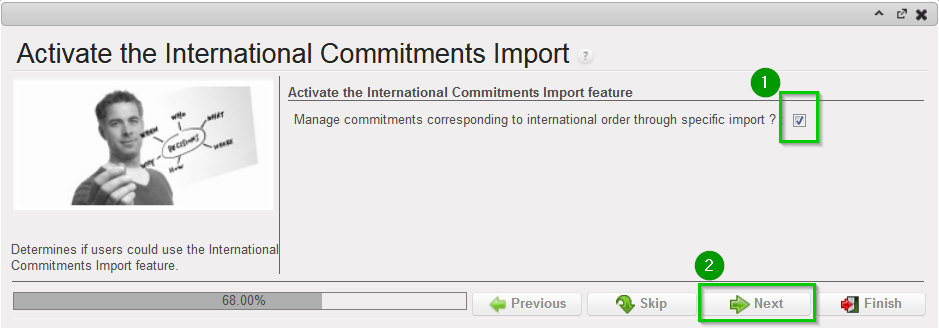 |
| Activate the Fixed asset configuration Leave default options. Click Next 1 | 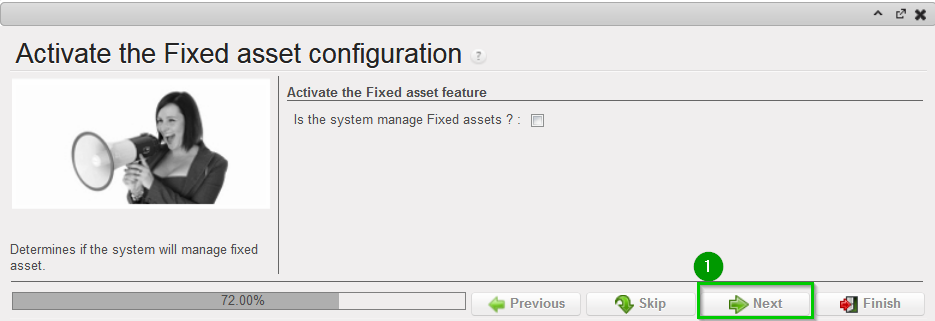 |
| Activate the Payroll configuration Check the box if you use Homere “Does the system manage Payrolls import from Homere?” Click Next | 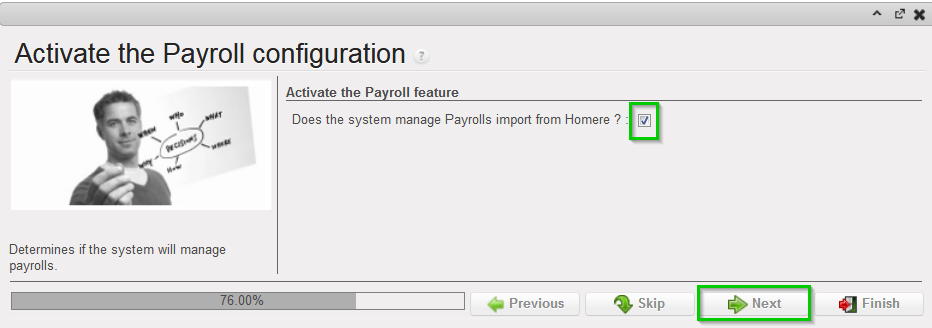 |
Currencies Configuration
Click Next 2 | 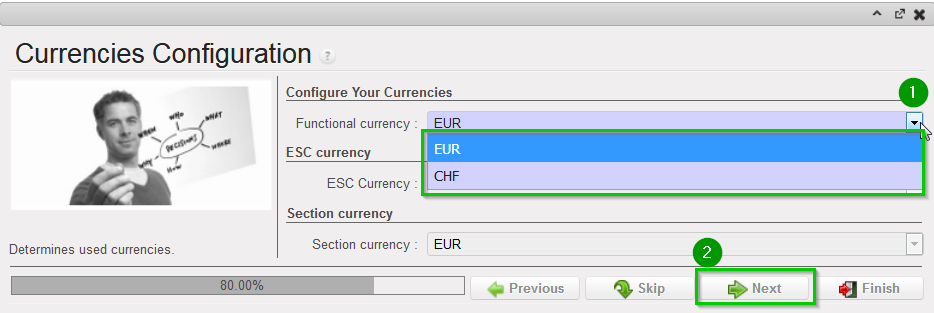 |
| Company Configuration Fill in the different values 1 2 3 Click Next 4 | 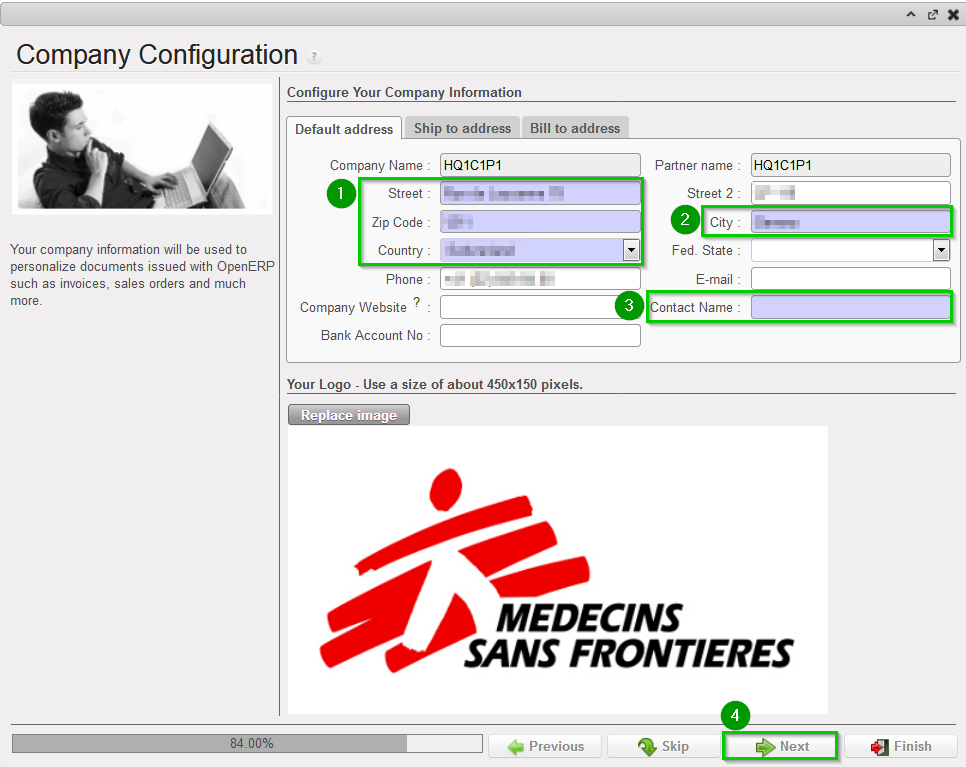 |
| Delivery Process Configuration: Choose the appropriate shipping method 1 (you may leave the default value). Click Next 2 | 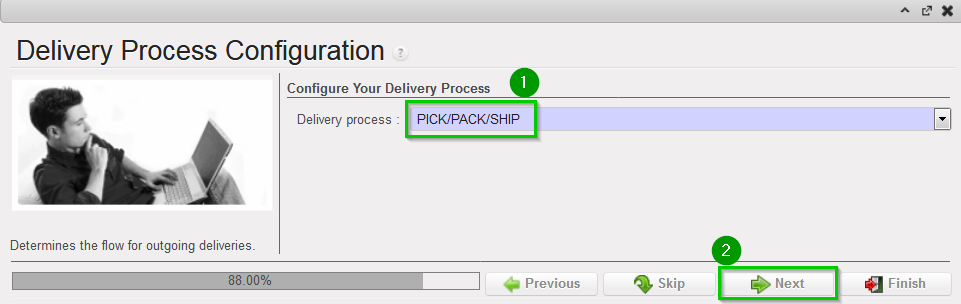 |
| Allocation Stock Configuration Leave default values. Click Next 1 | 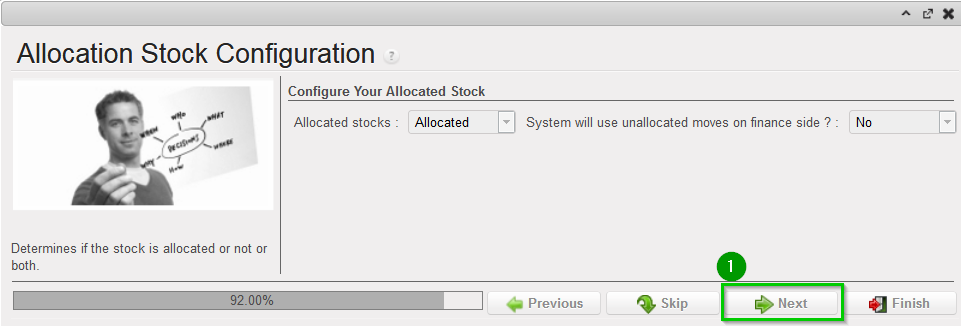 |
| Country restrictions Configuration Leave default values Click Next 1 | 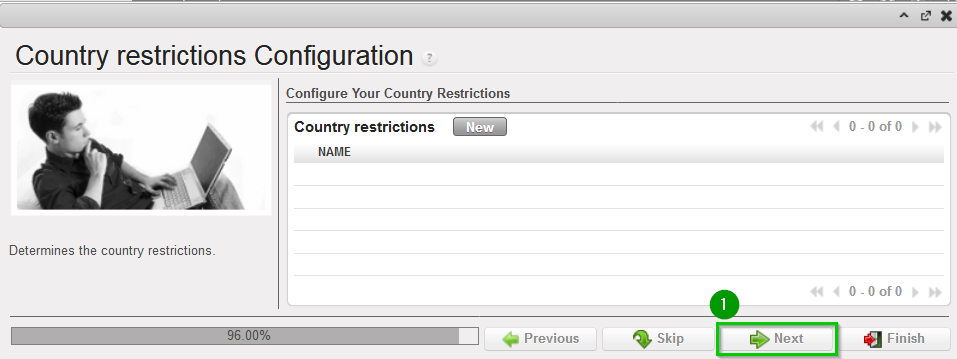 |
| Allow previous Fiscal Year dates Does the system allow document dates on previous Fiscal Year?: 1
Click Next 2 | 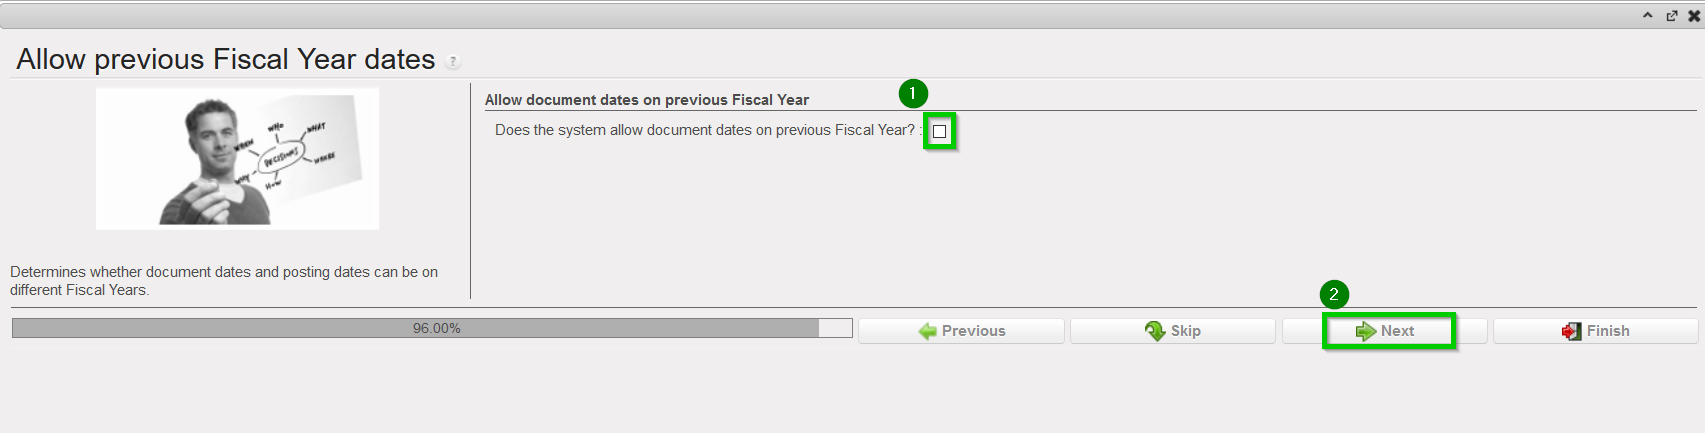 |
2.11.6 Import Analytic Journals
| Click Menu Accounting 1, Configuration 2, Analytic Accounting 3, Analytic Journals4 Click on the double arrow icon 5 and import file account.analytic.journal.csv Note: this is the same file as the one used at HQ level. |  |
2.11.7 Import GL Journals
| Click Menu Accounting 1, Configuration 2, Financial Accounting 3, Journals 4, Journals 5 Click on the double arrow icon 6 and import file account.journal.csv Note: this is the same file as the one used at HQ level. |  |
2.11.8 Perform Internal Partner Configuration
| Click on Menu Partners 1, Suppliers (2), Suppliers 3 You should see one partner named “Local Market”. Edit this supplier 4 | 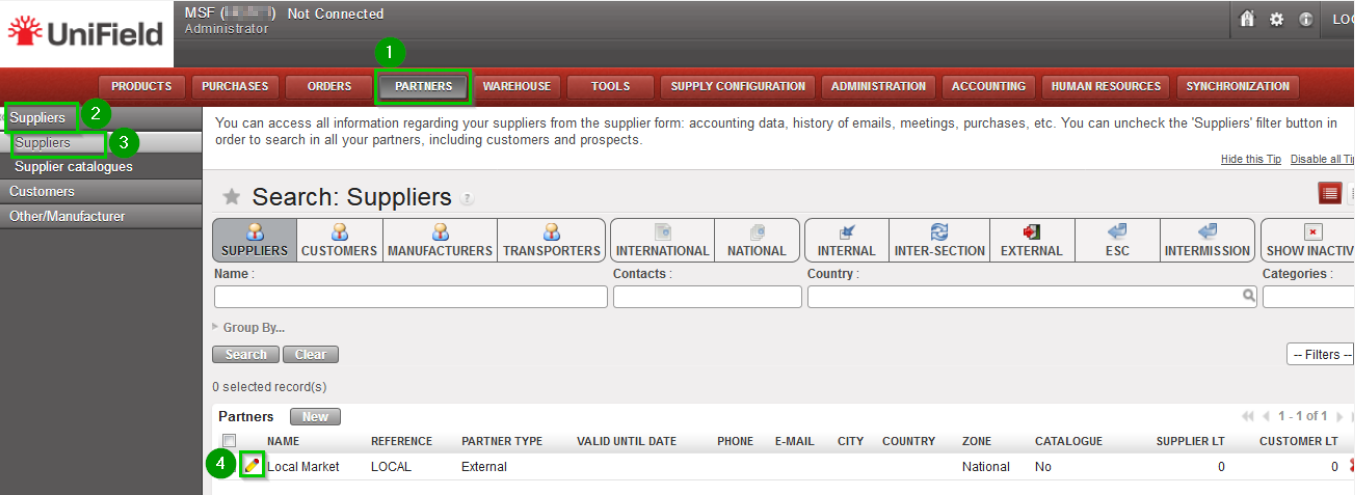 |
Click on tab Accounting 1 and enter the following codes:
Click on Save 4 | 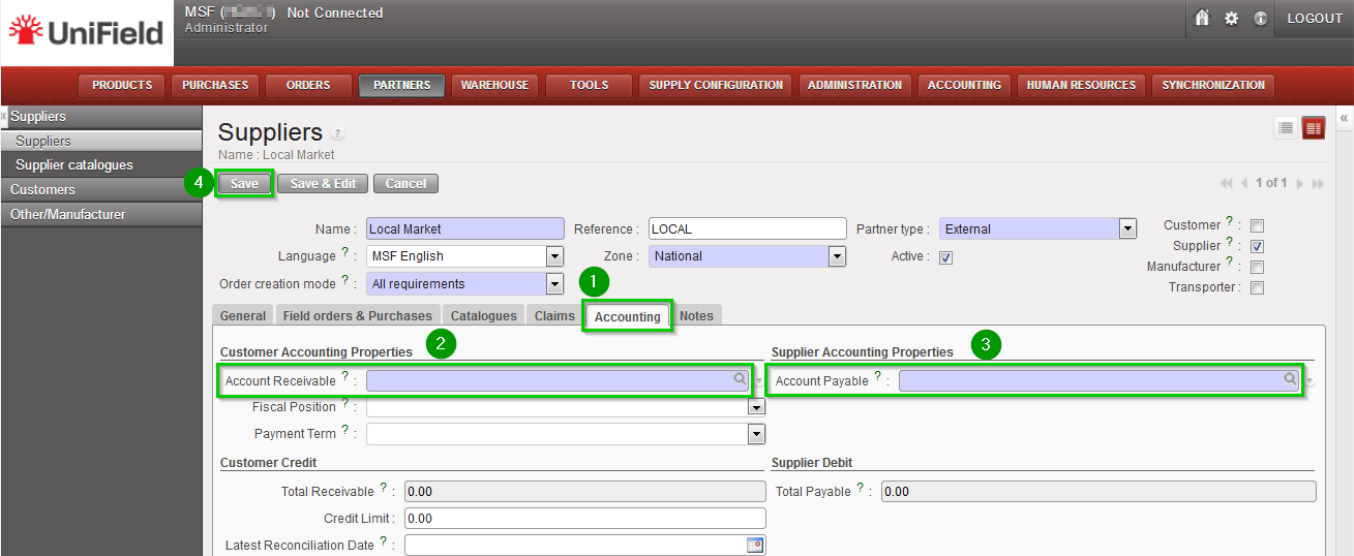 |
| Click Menu Partners 1, Suppliers 2, Suppliers 3 Uncheck filter Supplier 4, check filter Internal 5 You should see 1 partner with the same name as the instance. Edit this supplier 6 | 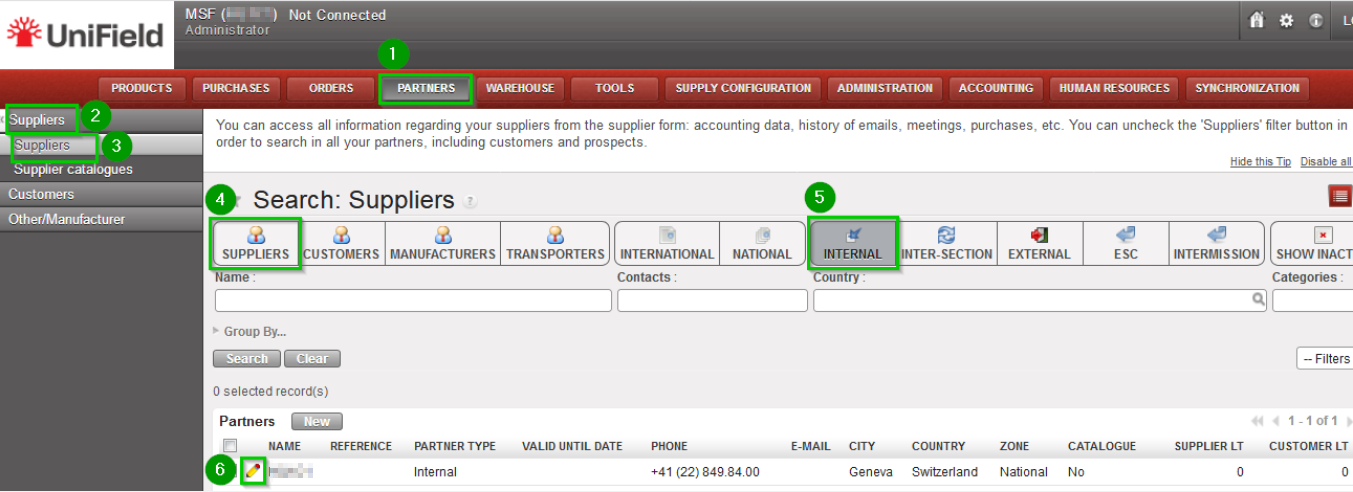 |
Click on tab Accounting 1 and enter the following codes:
Click on Save 4 | 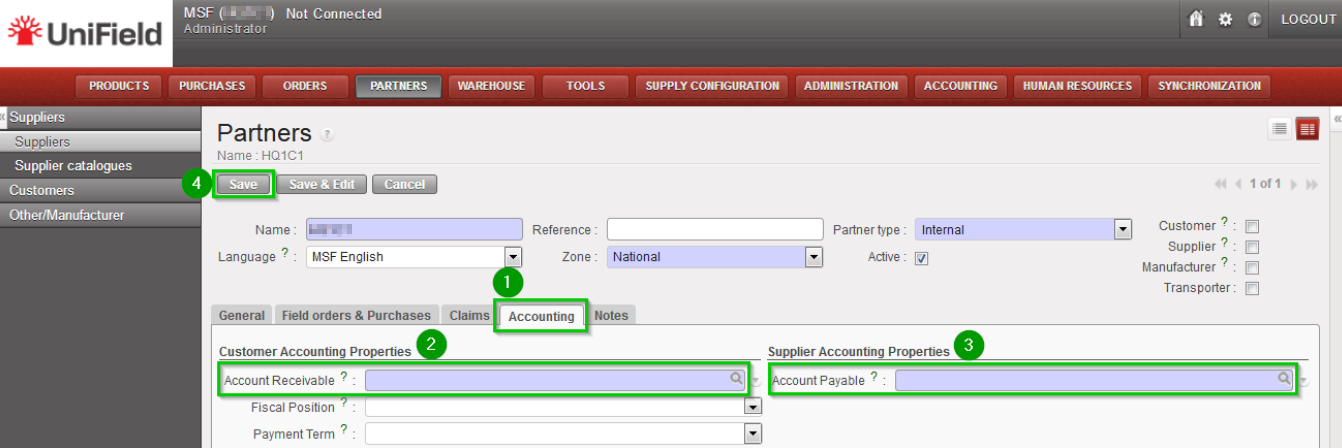 |
2.11.9 Perform validation synchronization
Synchronise your instance (as done in step 2.11.4) to send imported data to the SYNC_SERVER. If UniField tells you that you are not connected, follow steps 2.11.1 (only the “Connection” part) and try to synchronize again.
Important note: at this stage, the configuration of the Project instance is finished but the Cost Centers have not yet been received from the HQ due to the mechanism used for validating the Proprietary Instances. In order to finish 100% the installation, it is necessary to:
- Perform synchronization at HQ level (as described in 9.23)
- Once finished, perform a final synchronization at Project level
2.11.10 Project Companies Configuration
| Click on Menu Administration 1, Companies 2, Companies 3 Click on the edit icon 4 of the company | 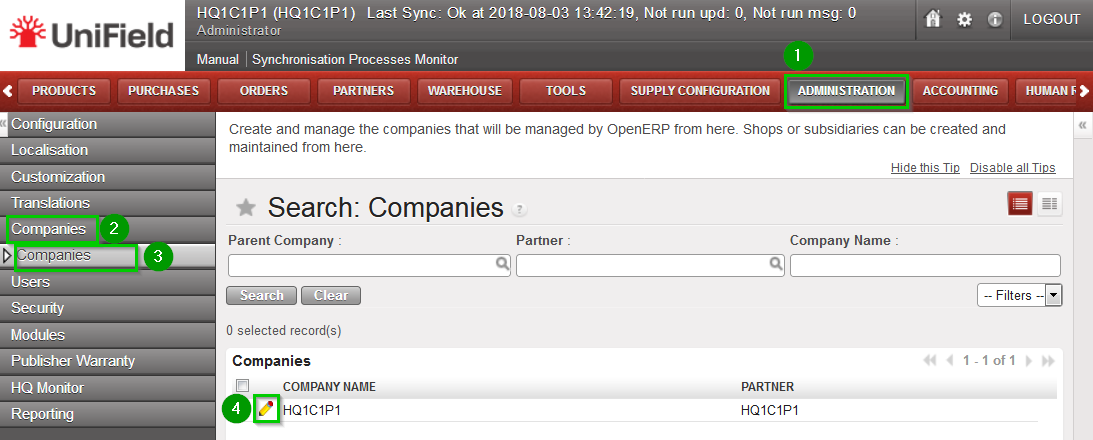 |
| Check first with your finance department the accuracy of those accounts. Click on the tab Configuration 1 Depending of your OC procedure, fill in:
Click on Save 4 after you made all the modification needed. | 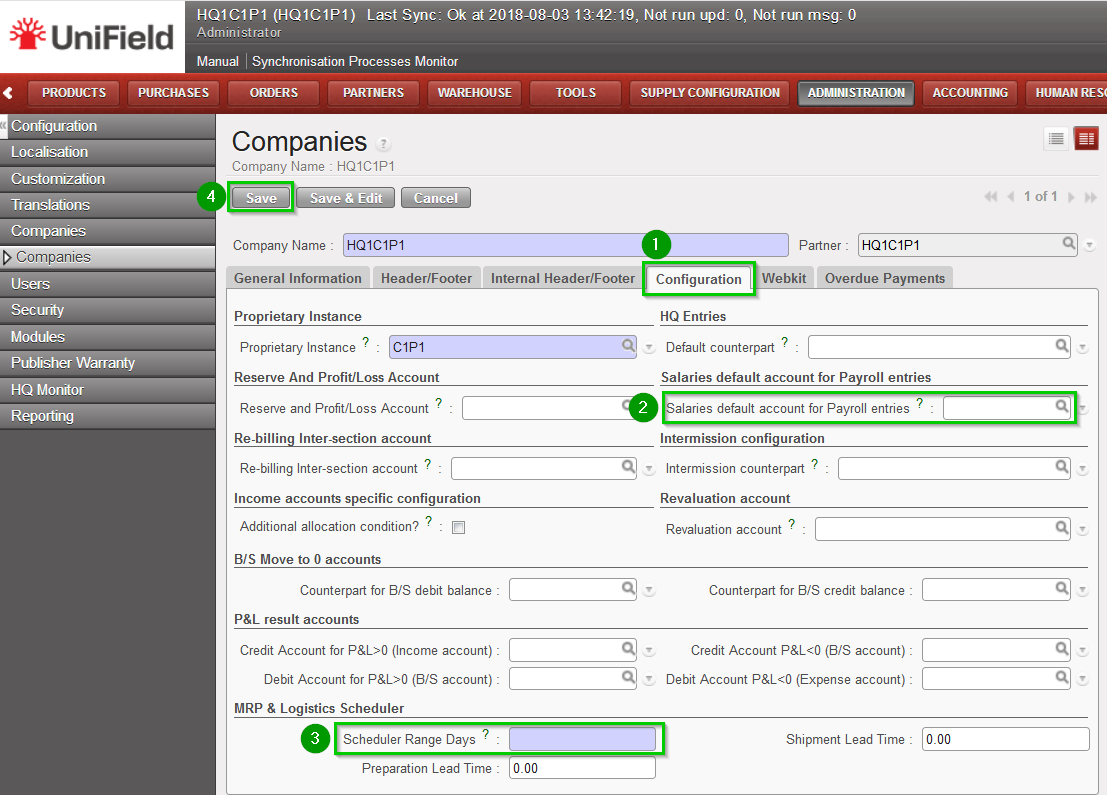 |
2.11.11 Cost Center For FX Gain/Loss
| Allocate the cost center for the FX exchange rate. Click on Menu Accounting 1, Configuration 2, Analytic Accounting 3, Analytic Accounts 4 Edit the Cost Center 5 defined by your Finance OC procedure | 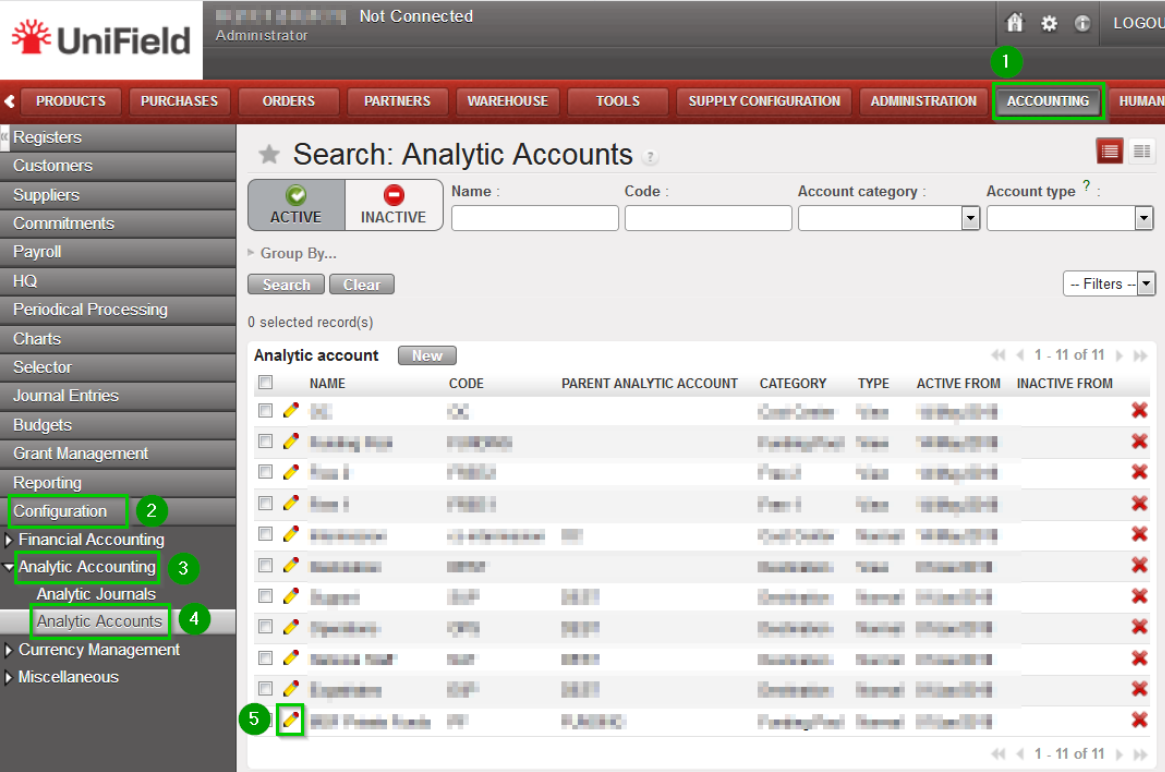 |
| Click the tick box “For FX gain/loss?” 1. Click on Save 2 NB: it has to be the coordination cost center. i.e for OCG= the coordination SUPZZZ cost center | 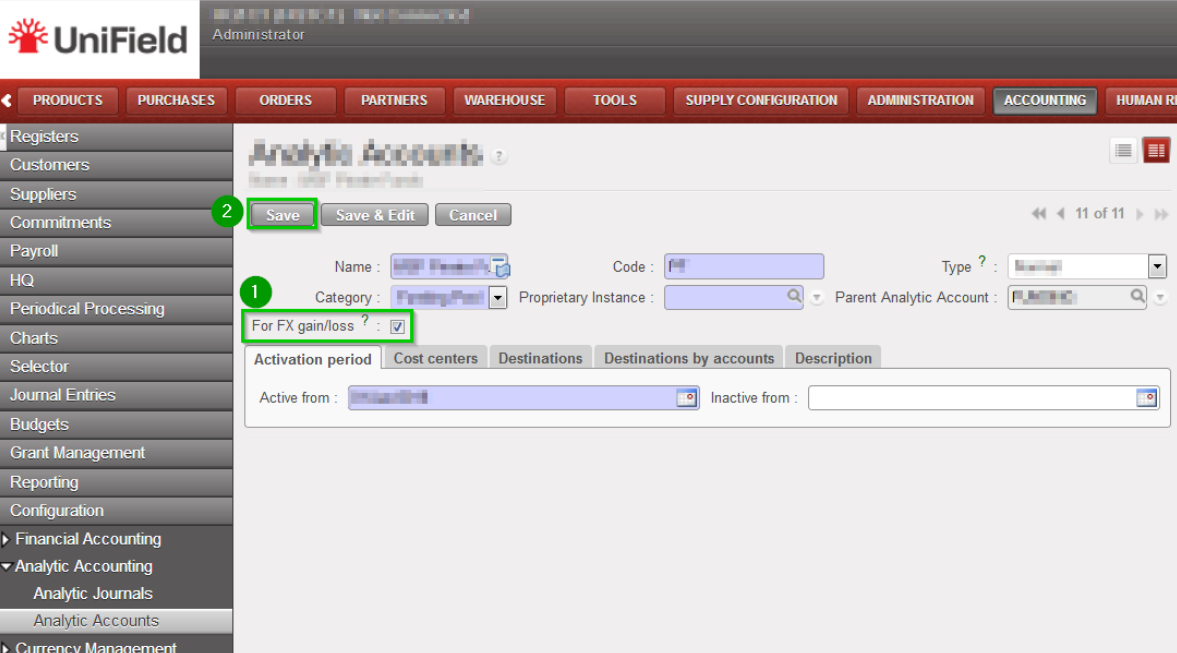 |
2.11.12 Creation of the Intermission Partner
The ProjectIntermission partners need to be created at the HQ level. Please refer to Section 2.9.25 Configuration of the Intermission partners.
2.10 Coordination Instances
2.10 Coordination Instances
All steps described in this section are to be performed with the admin user. It is also important that the HQ initial synchronization described in step 2.9.17 is finished before starting setting up Coordinations. It is also recommended to configure all Coordinations before starting to configure Projects.
Log in your Coordination instance!
2.10.1 Connect and register to the Synchronization Server
| Connect: Click on Menu Synchronization 1, Registration 2, Connection Manager 3 Click on the edit icon 4 Edit the connection and upgrade information: Host:
Port:
Protocol:
Database Name:
Login on synchro server:
Password:
Max Packet Size: 500 |  |
| Register: Click on Menu Synchronization 1, Registration 2, Register 3 A new wizard will open Check that the instance name matches the Coordination database name as defined in the installation checklist Enter contact email 4 wwwClick on Next 5 |  |
| Select your HQ Parent Instance 1 Select your Operational Center 2 Click on Next 3 | 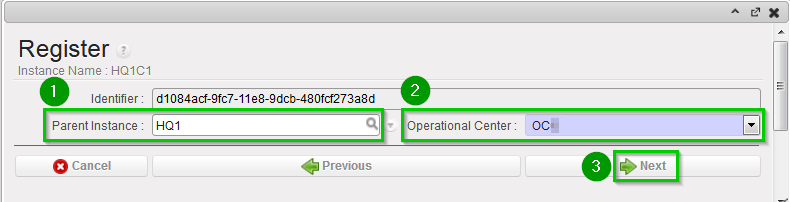 |
| Click on Add 1 Choose groups 2:
Click on Select 3 | 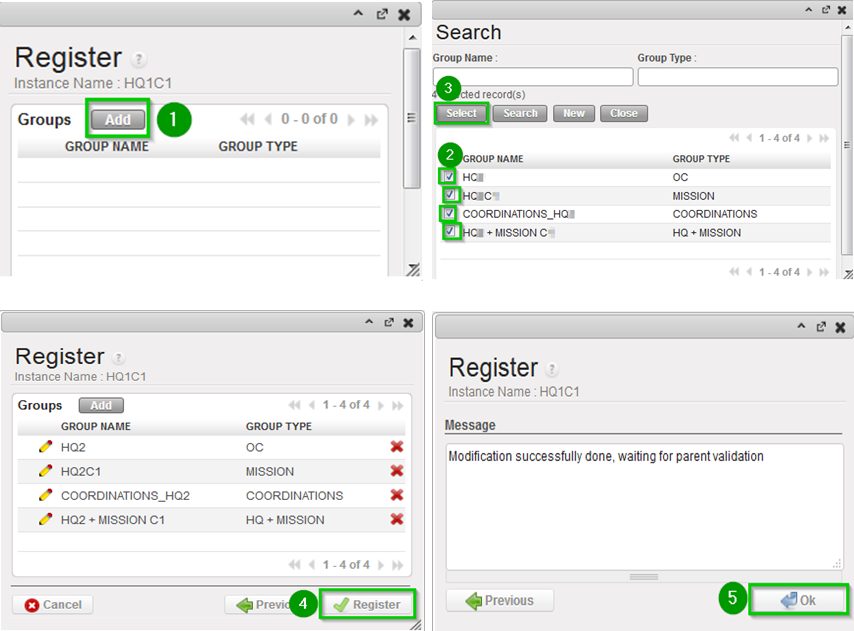 |
2.10.2 Validate instance (only at sync_server side)
For Production instance this step is done by the Support Team.
For Sandbox instance login in your_Sync_Server instance with the admin user.
| Click on Menu Administration 1, Synchronization 2, Configuration 3, Instance 4 Click on the edit icon 5 of the Coordination instance created in previous steps | 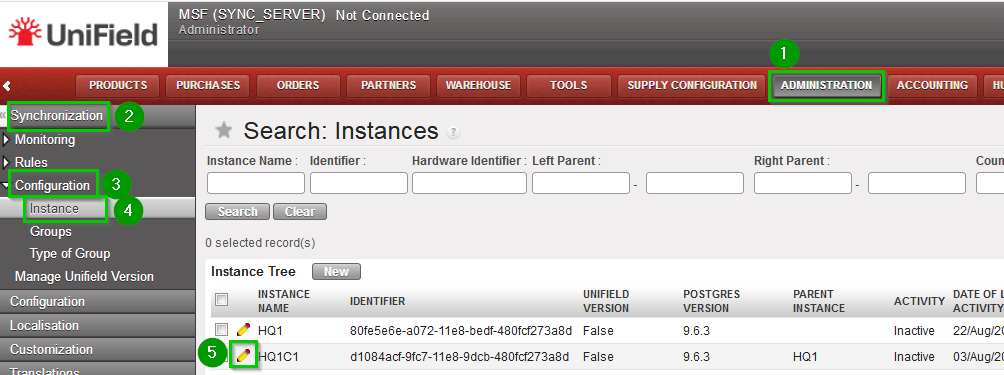 |
Check the following is correct:
Note that at this stage, it is normal that no children appear in the list, they will appear later on when Coordinations are created and defined as children of the HQ. | 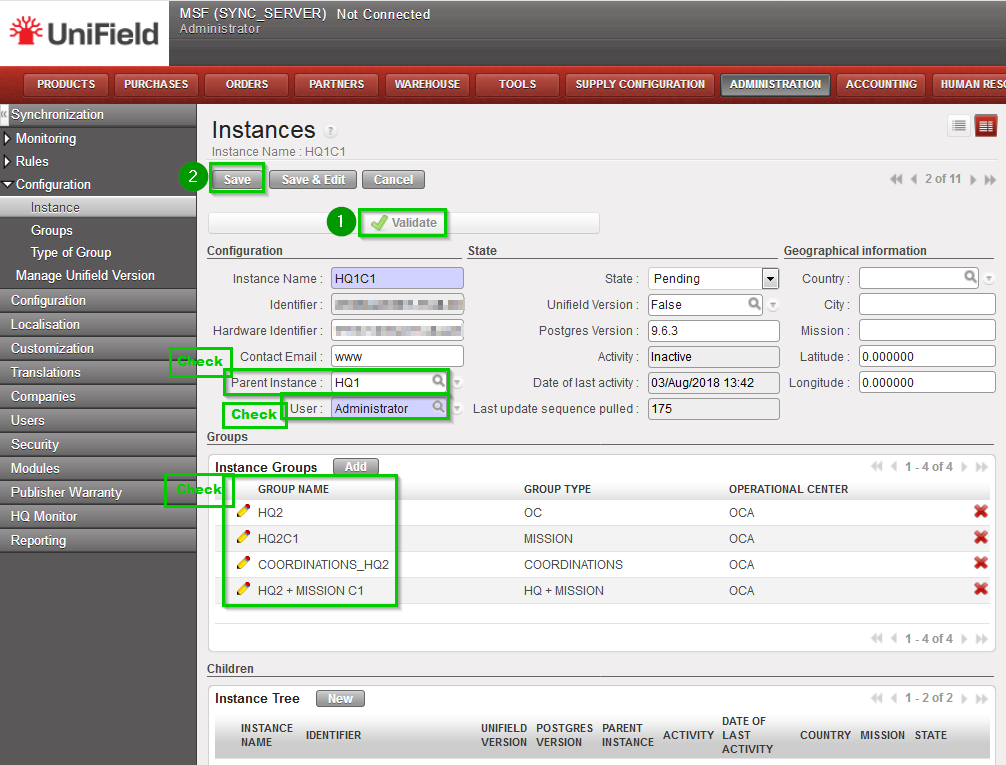 |
2.10.3 Configure automatic backups
It is strongly recommended to schedule automatic backups and to save it in another location than the server instance.
| On your HQ instance, click on Menu Synchronization 1, Backup 2, Backup config 3 You must enter an existing path 4 to save backups. The following options 5 are available to run automatic backups, please ensure the backup path exists as the sync. may fail:
Click on Save 7 | |
| To schedule an automatic backup click on Menu Synchronization1, Backup2, Automatic3 Edit the following fields 4:
Tick the Active box 5 | |
It is possible to send your latest backup to OneDrive. This is STRONGLY RECOMMENDED, refer to section 12.2 Automatic instance backup to the Cloud to configure it. the configuration is done from the HQ for the HQ and its children instances.
Please note that this IS NOT to be considered as a offsite backup solution (this is for Support Team debbuging, support and BI purpooses)
2.10.4 Perform initial synchronization
| Click on Menu Synchronization 1, Synchronization 2, Manual 3 A new wizard opens. Click on Start All Synchronization In Background 4 You should wait until the synchronization is finished before starting to configure the Projects. | |
| In order to perform this check: Click on Menu Synchronization 1, Monitoring 2, Synchronization Processes Monitor 3 Check 4 that the last synchronization is Done | |
2.10.5 Perform Reconfigure
| Click Menu Administration 1, Configuration 2, Reconfigure 3 A new wizard will open and you would then navigate to various screens. | |
| Instance Configuration: Choose the proprietary instance corresponding to the coordination 1 (as created in step 2.9.2). This step cannot be re-done; if the wrong proprietary instance is chosen, the database needs to be dropped and re-created. Choosing a proprietary instance already in use in your OC could lead to corruption of other instances. Most of the time the proprietary instance’s name and the instance’s name will be the same. Click on Next 2 | 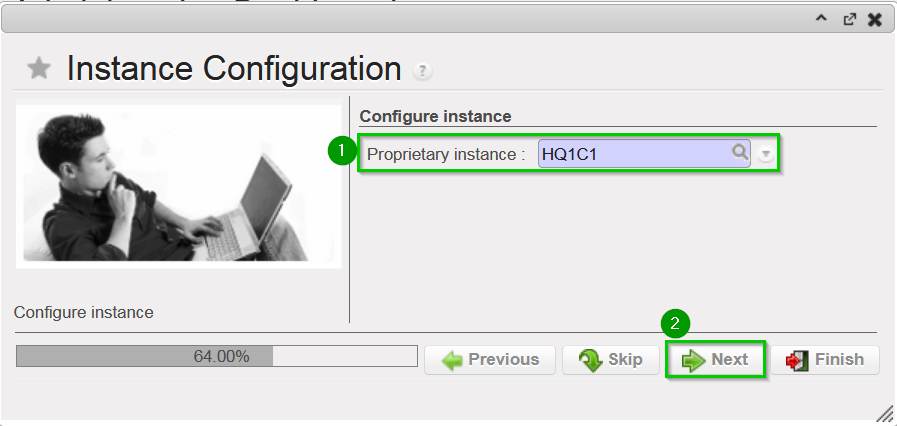 |
| A confirmation message window opens asking you to confirm the choice of the proprietary instance. If its correct click on Next 1, if not click on Previous | |
| Most of the time the property instance’s name matches the instance’s name. If it’s not the case a warning message is displayed. The only exception applies to instances at HQ level. Please be extremely cautious before proceeding after this warning message. | |
Activate the International Commitments Import
Click Next 2 | |
| Activate the Fixed asset configuration Leave default options. Click Next 1 | |
| Activate the Payroll configuration Check the box if you use Homere “Does the system manage Payrolls import from Homere?” Click Next | |
Currencies Configuration
Click Next 2 | |
| Company Configuration Fill in the different values 1 2 3 Click Next 4 | 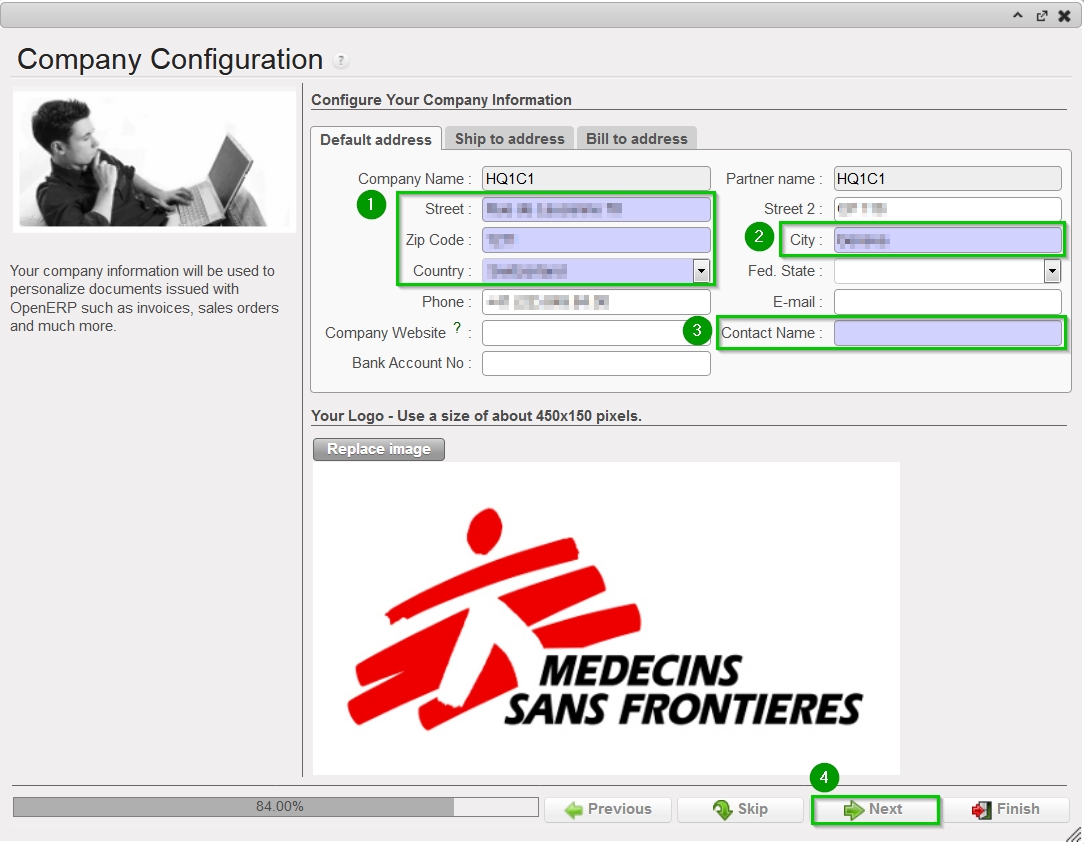 |
| Delivery Process Configuration: Choose the appropriate shipping method 1 (you may leave the default value). Click Next 2 | |
| Allocation Stock Configuration Leave default values. Click Next 1 | |
| Country restrictions Configuration Leave default values Click Next 1 | |
| Allow previous Fiscal Year dates Does the system allow document dates on previous Fiscal Year?: 1
Click Next 2 | |
2.10.6 Import Analytic Journals
| Click Menu Accounting 1, Configuration 2, Analytic Accounting 3, Analytic Journals4 Click on the double arrow icon 5 and import file account.analytic.journal.csvNote: this is the same file as the one used at HQ level. | |
2.10.7 Import GL Journals
| Click Menu Accounting 1, Configuration 2, Financial Accounting 3, Journals 4, Journals 5 Click on the double arrow icon 6 and import file account.journal.csvNote: this is the same file as the one used at HQ level. | |
2.10.8 Perform Internal partner configuration
| Click on Menu Partners 1, Suppliers (2), Suppliers 3 You should see one partner named “Local Market”. Edit this supplier 4 | |
Click on tab Accounting 1 and enter the following codes:
Click on Save 4 | |
| Click Menu Partners 1, Suppliers 2, Suppliers 3 Uncheck filter Supplier 4, check filter Internal 5 You should see 1 partner with the same name as the instance. Edit this supplier 6 | |
Click on tab Accounting 1 and enter the following codes:
Click on Save 4 | |
2.10.9 Perform validation synchronization
Synchronise your instance (as done in step 2.10.4) to send imported data to the SYNC_SERVER. If UniField tells you that you are not connected, follow steps 2.10.1 (only the “Connection” part) and try to synchronize again.
You should wait until the synchronization is finished before starting to configure the project instance.
Important note: at this stage, the configuration of the Coordination instance is finished but the Cost Centers have not yet been received from the HQ due to the mechanism used for validating the Proprietary Instances. In order to finish 100% the installation, it is necessary to:
- Perform synchronization at HQ level (as described in 9.23)
- Once finished, perform a final synchronization at Coordination level
2.10.10 Coordination Companies Configuration
| Click on Menu Administration 1, Companies 2, Companies 3 Click on the edit icon 4 of the company | 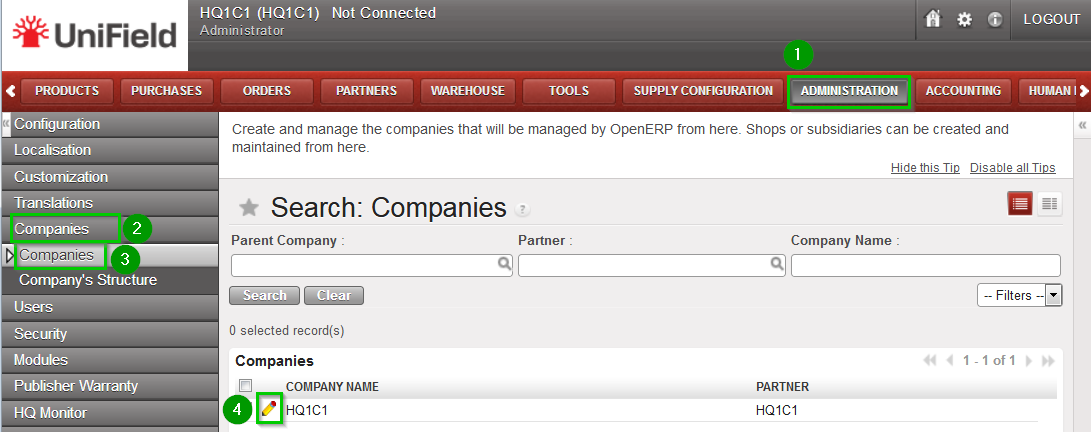 |
| Check first with your finance department the accuracy of those accounts. Click on the tab Configuration 1 Depending of your OC procedure, fill in:
Click on Save 15 | 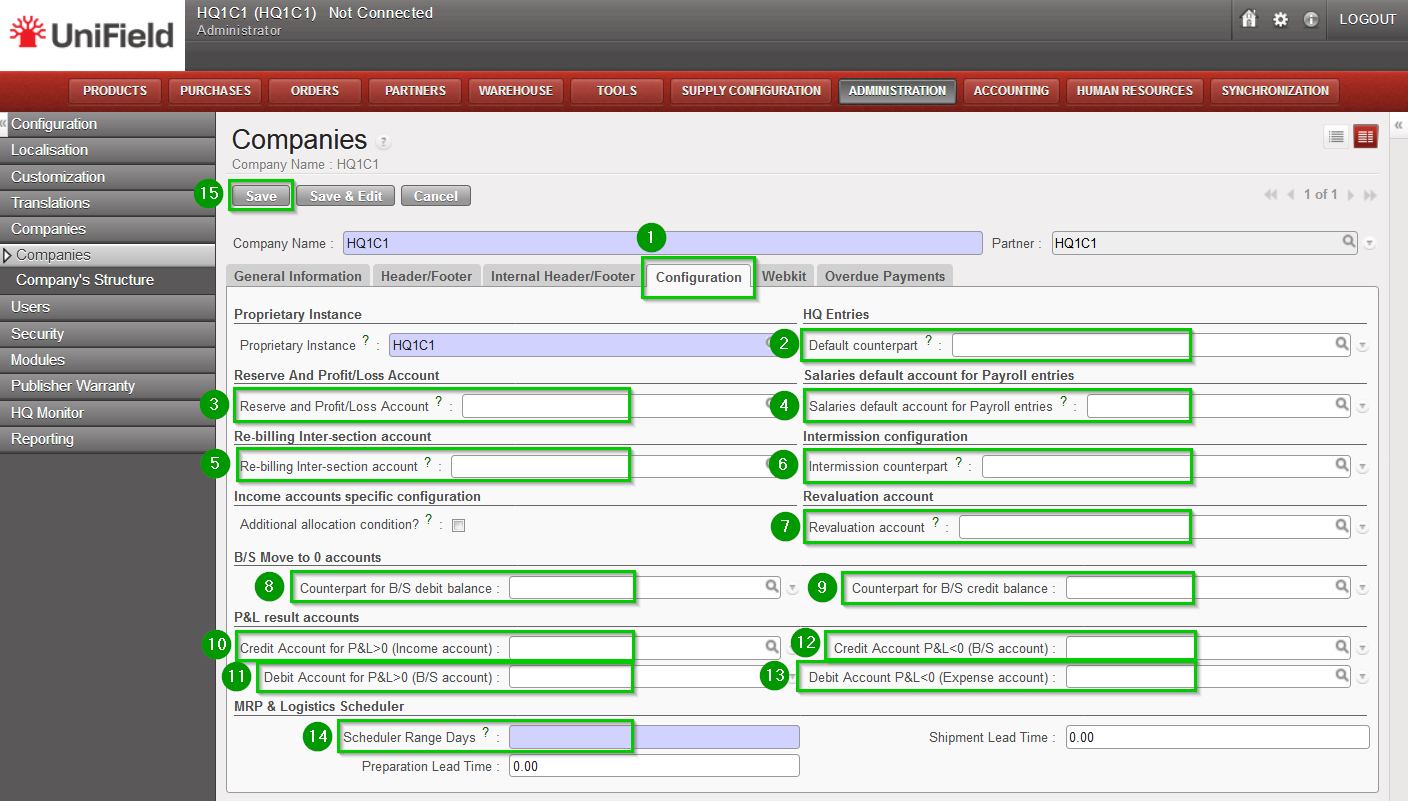 |
2.10.11 Cost Center for FX gain/loss
| Allocate the cost center for the FX exchange rate. Click on Menu Accounting 1, Configuration 2, Analytic Accounting 3, Analytic Accounts 4 Edit the Cost Center 5 defined by your Finance OC procedure | |
| Click the tick box “For FX gain/loss?” 1. Click on Save 2 NB: it has to be the coordination cost center. i.e for OCG= the coordination SUPZZZ cost center | |
2.10.12 Creation of the intermission partner
The Coordination Intermission partners need to be created at the HQ level. Please refer to Section 2.9.25 Configuration of the Intermission partners.
2.9.16 Validate Instance (only at sync_server side)
2.9.16 Validate instance (only at sync_server side)
For Production instance this step is done by the Support Team.
For Sandbox instance login in your_Sync_Server instance with the admin user.
| Click on Menu Administration 1, Synchronization 2, Configuration 3, Instance 4 Click on the edit icon 5 of the HQ instance created in previous steps |  |
Check the following is correct:
Note that at this stage, it is normal that no children appear in the list, they will appear later on when Coordinations are created and defined as children of the HQ. |  |
2.9.17 Configure automatic backups
It is strongly recommended to schedule automatic backups and to save it in another location than the server instance.
| On your HQ instance, click on Menu Synchronization 1, Backup 2, Backup config 3 You must enter an existing path 4 to save backups. The following options 5 are available to run automatic backups, please ensure the backup path exists as the sync. may fail:
Click on Save 7 | |
| To schedule an automatic backup click on Menu Synchronization1, Backup2, Automatic3 Edit the following fields 4:
Tick the Active box 5 | |
It is possible to send your latest backup to OneDrive. This is STRONGLY RECOMMENDED, refer to section Automatic instance backup to the Cloud how to configure it. the configuration is done from the HQ for the HQ and its children instances.
Please note that this IS NOT to be considered as a offsite backup solution (this is for Support Team debbuging, support and BI purpooses)
2.9.18 Perform initial synchronisation
| Click on Menu Synchronization 1, Synchronization 2, Manual 3 A new wizard opens. Click on Start All Synchronization In Background 4 You should wait until the synchronization is finished before starting to configure the Coordinations. | |
| In order to perform this check: Click on Menu Synchronization 1, Monitoring 2, Synchronization Processes Monitor 3 Check 4 that the last synchronization is Done | |
2.9.19 Cost Center for FX gain/loss
| Allocate the cost centre for the FX exchange rate. Click on Menu Accounting 1, Configuration 2, Analytic Accounting 3, Analytic Accounts 4. Click on the edit icon 5 of the Cost Center specifically created for HQ only. |  |
| Click on the tick box 1 “For FX gain/loss?” Click on Save 2 |  |
2.9.20 Configuration of the Intermission partners
Intermission partners are created at the HQ level and will synchronize Top-Down to its children instances.
| Click Menu Partners 1, Suppliers 2, Suppliers 3 Click on New 4 |  |
Fill in with the information:
Click on tab Accounting 3 and enter the following codes:
Click on Save 6 |  |
2.9.12 UniData Products Creation
2.9.12 UniData Products Creation
Since September 2016, UniData types of products as well as their updates are sent by the UniData Team automatically to HQs. That means a specific configuration is needed to be done only at the HQ instance.
This step is required and is part as initial production HQ configuration.Please follow the latest procedure on how to configure your HQ: procedure_UniData_VX.pdf ![]()
2.9.13 Configure Destination / GL accounts link –> TO REVIEW
This step depends on the configuration chosen by each OC for its accounting setup. This data cannot be included in the standard installation (it relies on the data imported in steps 2.9.1 and 2.9.7).
| Click on Menu Accounting 1, Configuration 2, Analytic Accounting 3, Analytic Accounts 4 Click on the double arrow icon 5 and import file destination.GL.link.csv | 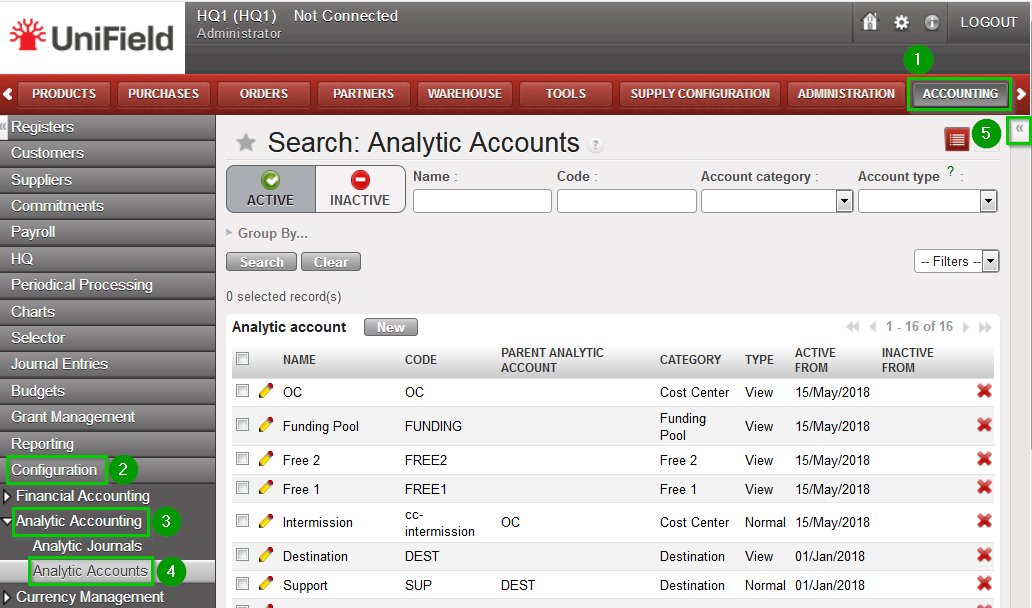 |
The following combinations may be used for
test purposes in section Annexes 2.9.13_Destination_GLaccountlink_example.csv ![]()
| To create (if you don’t import the destination.GL.link.csv file) or modify manually: Click on Menu Accounting 1, Configuration 2, Analytic Accounting 3, Analytic Accounts 4 Choose account Expatriates (EXP) and click on the edit icon 5. | 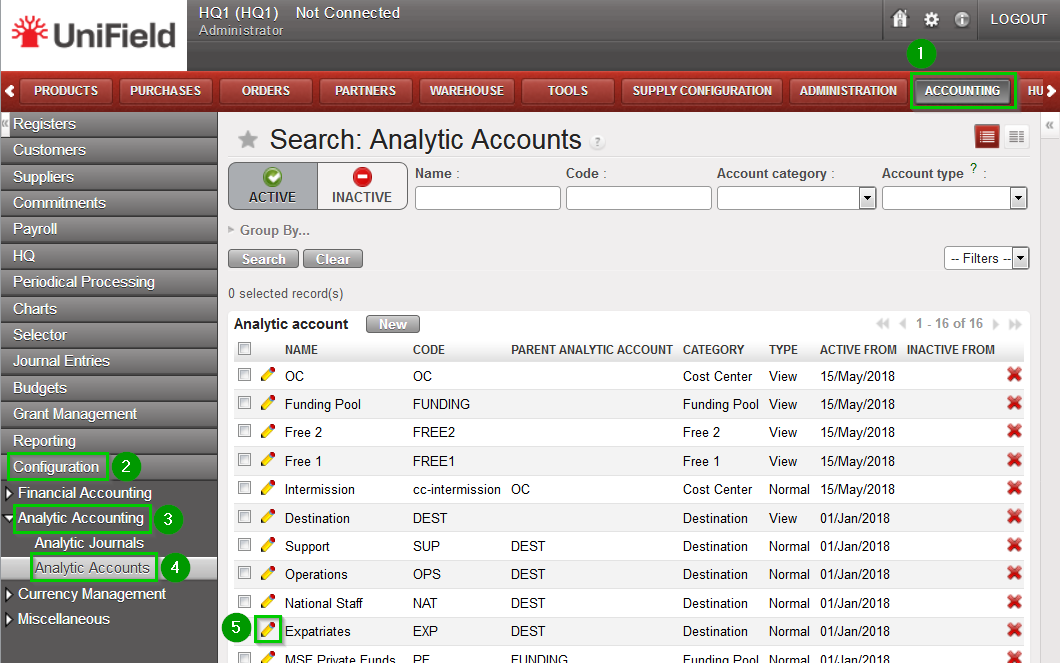 |
| Click on tab Expense Accounts 1 Click on “0-0 of 0” 2 on the top right of the Expenses accounts list. Change the limit to 100. Click on Add 3. Select the GL accounts to be added (see text above) Click on Select and Click on Save Repeat until all necessary GL accounts are added to the destination Repeat operation for accounts National Staff (NAT), Operations (OPS), Support (SUP) | 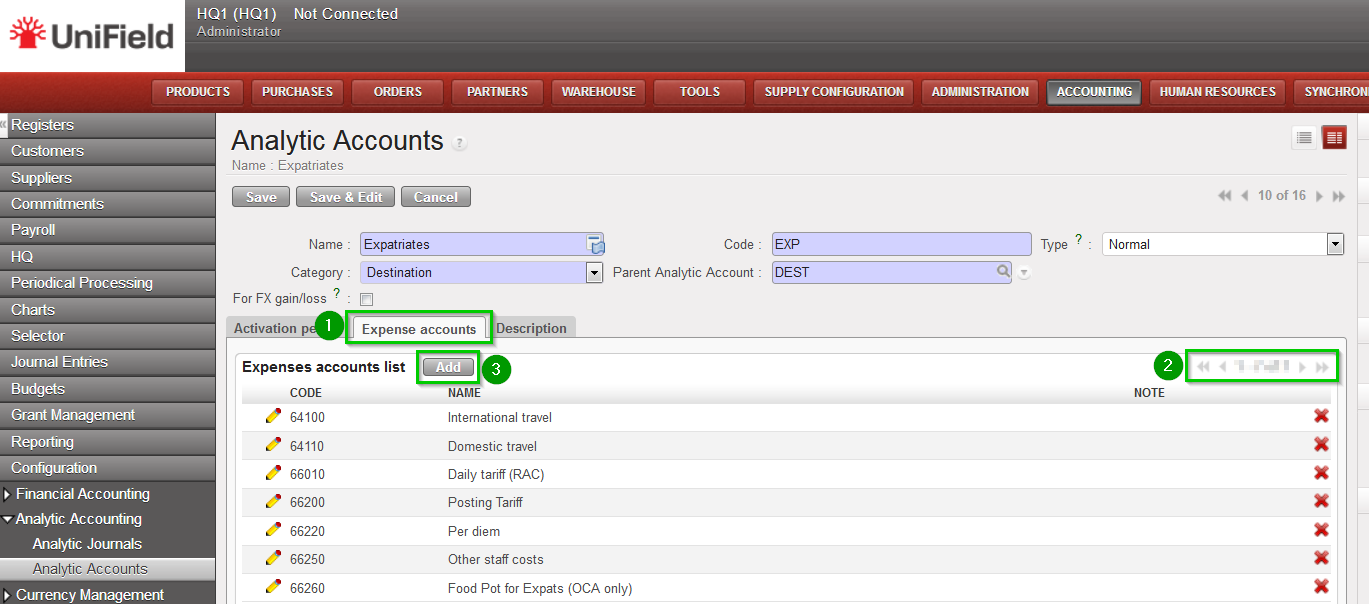 |
2.9.14 Import user rights
User rights are managed through restriction to menus. Since version 11.0 User Right are not imported anymore through your HQ.
From now on User Right are uploaded by the Support Team in the production SYNC_SERVER and are synchronised to the HQ and then to its children Coordinations and Projects.
For Sandboxes please refer to section 9.7 How to import User Rights in the sand box
2.9.15 Connect and register to Synchronization Server
| Connect: Click on Menu Synchronization 1, Registration 2, Connection Manager 3 Click on the edit icon 4 and to edit the Current Connection Host:
Port:
Protocol:
Database Name:
Login on synchro server:
Password:
Max Packet Size: 500 | |
| Register: Click on Menu Synchronization 1, Registration 2, Register 3 A new wizard will open Check that the instance name matches the HQ database name as defined in the installation checklist Enter contact email www 4Click on Next 5 | 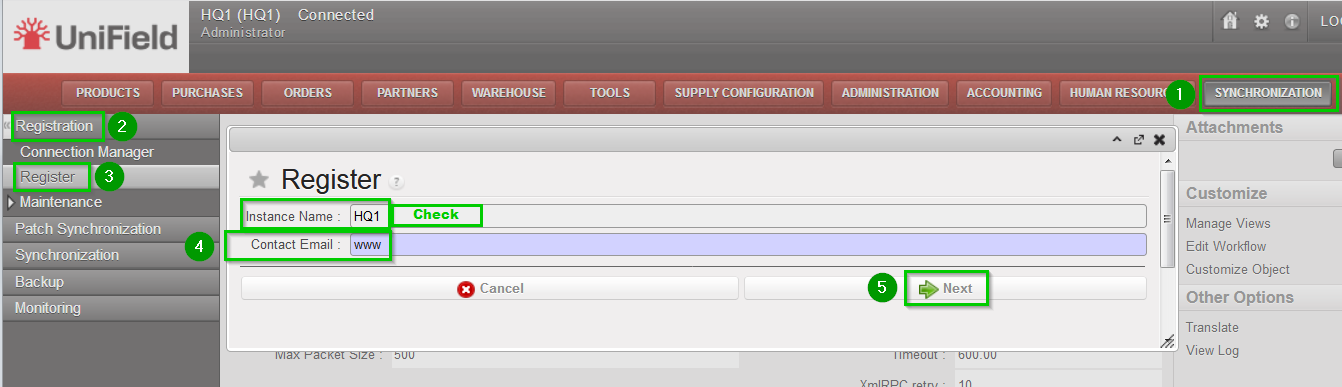 |
| Leave Parent Instance empty1 Select your Operational Center 2 Click on Next 3 | 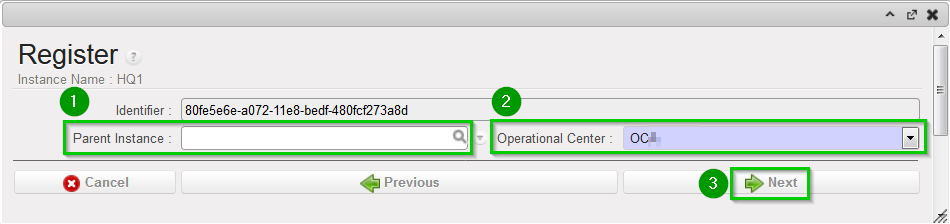 |
| Click on Add 1 Choose groups 2:
Click on Select 3. | 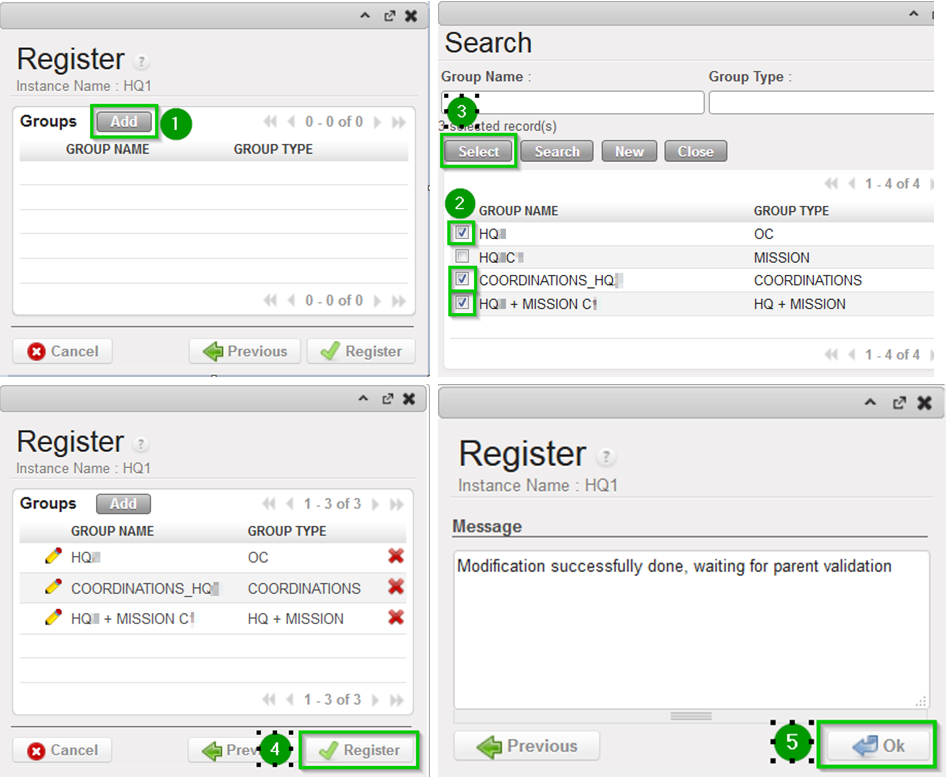 |
2.9.4 Configure Cost Centres for Coordination Proprietary Instances
2.9.4 Configure Cost Centres for Coordination Proprietary Instances
Important note: It is necessary that the prerequisite data described in the installation checklist – step 2.3 is ready and validated before starting this step
| Click on Menu Administration 1, Configuration 2, Proprietary Instance 3 Click on the Edit icon 4 for the first coordination (instance level = Coordo) |  |
| Click on Cost Centres tab 1 Click on Add Cost Centres/ button 2 |  |
| Click on Add 1 |  |
| In the Search Analytic Accounts list, tick 1 the cost centres to add to the Coordination and click on Select 2 |  |
| Back on the Add Cost Centers wizard, double check 1 your data and click on Add Cost Centers 2 |  |
| For each Cost Center that is a target cost center according to the installation checklist: Click on the corresponding Edit icon. Check the IS TARGET checkbox 1 Click on the Save icon (floppy disk) 4 For the main cost center used for budget consolidation: Click on the corresponding Edit icon. Check the TOP COST CENTRE FOR BUDGET CONSOLIDATION checkbox 2. Click on the Save icon (floppy disk) 4 For the cost center used as reference in PO/FO flow: Click on the corresponding Edit icon. Check the COST CENTRE PICKED FOR PO/FO REFERENCE checkbox 3 Click on the Save icon (floppy disk) 4 Click on Save 5 Repeat steps for all Coordination instances |  |
2.9.5 Configure Cost Centres for Project Proprietary Instances
Important note: It is necessary that the prerequisite data described in the installation checklist – step 2.3 is ready and validated before starting this step
| Click Menu Administration 1, Configuration 2, Proprietary Instance 3 Click on the Edit icon 4 for the first project (instance level = Project) |  |
| Click on Cost Centres tab 1 Check that the cost centers added for the parent coordination in step 2.9.4 are present in the list 2 |  |
| For each Cost Center that is a target cost center according to the installation checklist: Click on the corresponding Edit icon. Check the IS TARGET checkbox 1 Click on the Save icon (floppy disk) 4 For the main cost center used for budget consolidation: Click on the corresponding Edit icon. check the TOP COST CENTRE FOR BUDGET CONSOLIDATION checkbox 2. Click on the Save icon (floppy disk) 4 For the cost center used as reference in PO/FO flow: Click on the corresponding Edit icon. Check the COST CENTRE PICKED FOR PO/FO REFERENCE checkbox 3. Click on the Save icon (floppy disk) 4 Click on Save 5 Repeat steps for all Project instances |  |
2.9.6 Import Analytic Journals
| Click Menu Accounting 1, Configuration 2, Analytic Accounting 3, Analytic Journals4 Click on the double arrow icon 5 and import file account.analytic.journal.csv | |
2.9.7 Import GL Chart of Accounts
| Click Menu Accounting 1, Configuration 2, Financial Accounting 3, Accounts 4, Accounts 5 Click on the double arrow icon and import file account.account_to update.csv |  |
2.9.8 Import GL Journals
| Click Menu Accounting 1, Configuration 2, Financial Accounting 3, Journals 4, Journals 5 Click on the double arrow icon 6 and import file account.journal.csv | |
2.9.9 Import Product Nomenclature
| Click on Menu Supply Configuration 1, Product 2, Import Nomenclatures 3, Import Nomenclatures4 A new wizard will open Click on Add Attachment 5 and locate the file nomenclature.csv Click on Import 6. Click on Close Window Note: This operation may take a few seconds. You cannot import products before their nomenclatures. It is possible to check if the import is over on: Menu Supply Configuration, Product, Import Nomenclatures, View Logs. |  |
2.9.10 Import Product Categories
| Click Menu Accounting 1, Configuration 2, Miscellaneous 3, Import Product Category 4, Import Category 5 A new wizard will open. Click on Add Attachment 6 and browse the file product.categories.csv Click on Import 7 Another wizard opens, click on Close Window Note: This operation may take a few seconds. You cannot import products before their nomenclatures. It is possible to check if the import is over navigating on Menu Accounting, Configuration, Miscellaneous, Import Product Category, View Logs |  |
2.9.11 Import Products
Important note: For a production instances please DO NOT IMPORT UniData type of product. A different process is in place; please refer to section UniData products creation.
Importing products is a two-step process; generating the file product.product.csv ![]()
and importing it in UniField.
Generate the file product.product.csv using the latest file of file Create Products vX.X.xls .Open the file and select the tab Products 1, fill the Excel file with the information needed 2, click on Create csv file 3.A pop up message appears 4 confirming the file has been created |  |
| Importing the file: Click Menu Products 1, Import Products 2, Import Products 3 A new wizard will open, click on Add Attachment 4 and browse the file product.product1.csv you just created in the previous step. Click on Import 5 and Click on Close Window |  |
Note: this step is not mandatory and can be performed later, either through import of file or by creating products directly in the system. A template xls file has already been provided in order to generate appropriate csv files for products. This operation may take a long time depending on the size of the file uploaded. It is possible to check if the background process is finished by navigating on Menu Products, Import Products, View Logs.
As soon as the import is finished, a log will appear in the list, detailing the number of products imported/rejected. It is highly recommended to wait until this process is finished before jumping to the next step.
2.9 HQ Instance
2.9 HQ Instance
All steps described in this section are to be performed with the admin user in the HQ instance.
2.9.1 Import cost centers
| Click on Menu Accounting 1, Configuration 2, Analytic Accounting 3, Analytic Accounts 4 Click on the double arrow icon 5 and import file account.analytic.account_to update.csv | 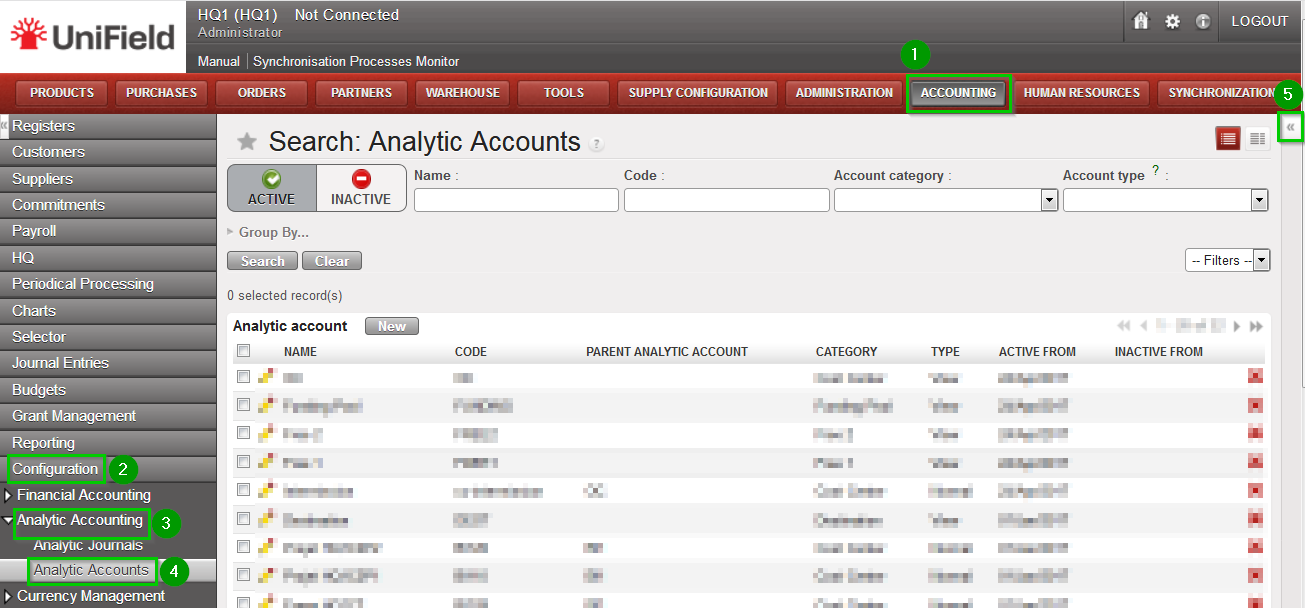 |
2.9.2 Create Proprietary instances
Use the information contained in the Installation Checklist to create the proprietary instances for all instances: HQ, Coordinations and Projects. This data is then synchronized from HQ to the other instances.
| Click on Menu Administration 1, Configuration 2, Proprietary Instances 3. Click on New 4 | 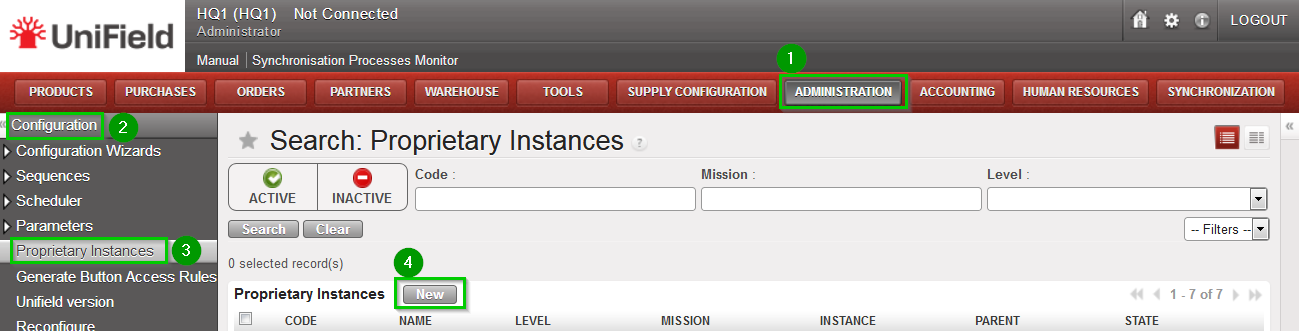 |
Enter the following information:
Click on Save 8 | 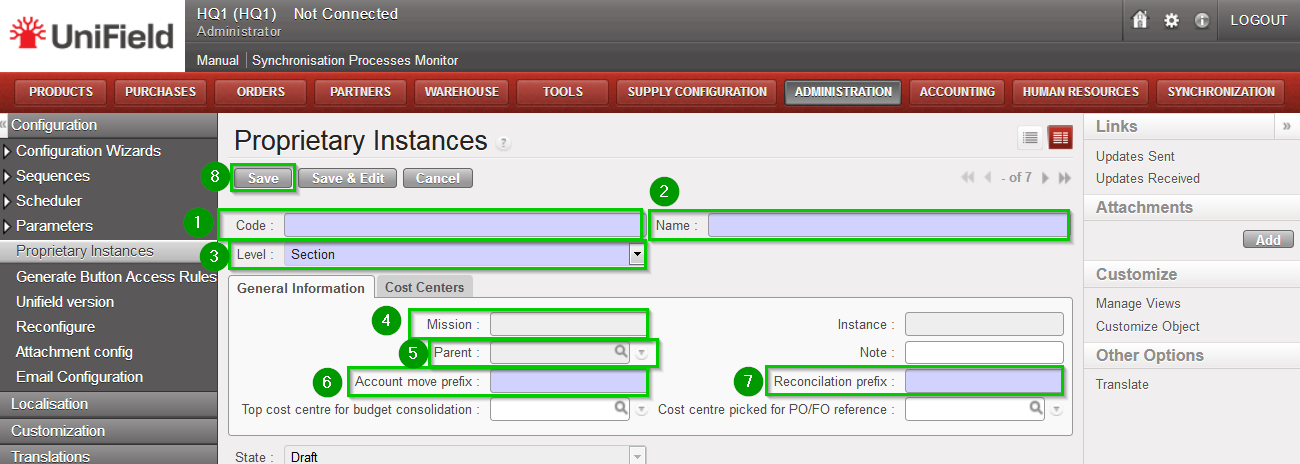 |
If you are installing a sandbox you can import Prop instances_to update.csv This file contains all the proprietary instances required to install an HQ with two missions and two project instances in each of them. | 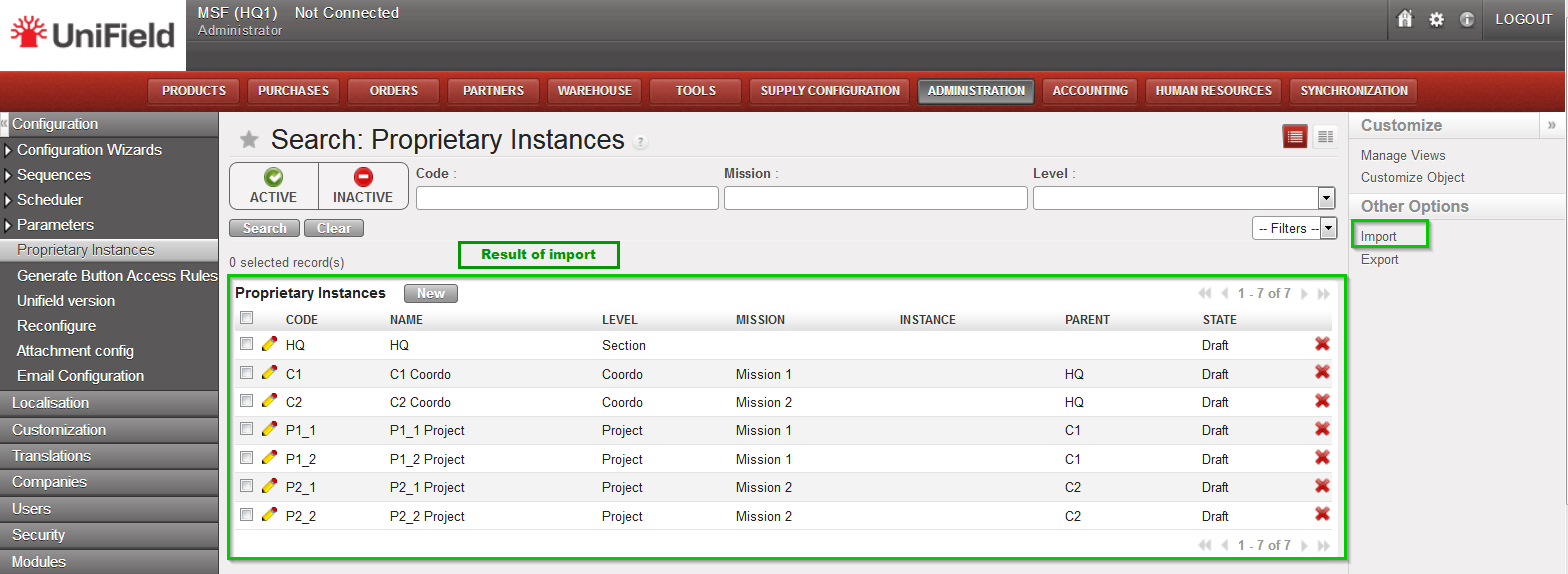 |
2.9.3 Perform Reconfigure
| Click on Menu Administration 1, Configuration 2, Reconfigure 3 A new wizard will open and you would then navigate to various screens. | |
| Instance Configuration Choose the proprietary instance corresponding to the HQ 1 (as created in step 2.9.2). This step cannot be re-done; if the wrong proprietary instance is chosen, the database needs to be dropped and re-created. Choosing a proprietary instance already in use in your OC could lead to corruption of other instances. Click Next 2 | 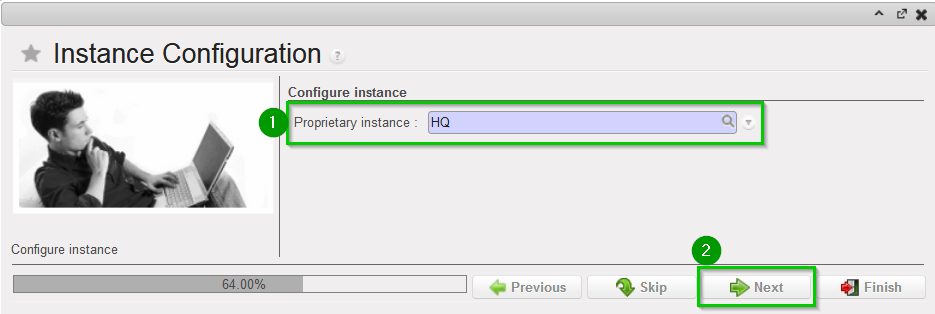 |
| A confirmation message window opens asking you to confirm the choice of the proprietary instance. If its correct click on Next 1, if not click on Previous | 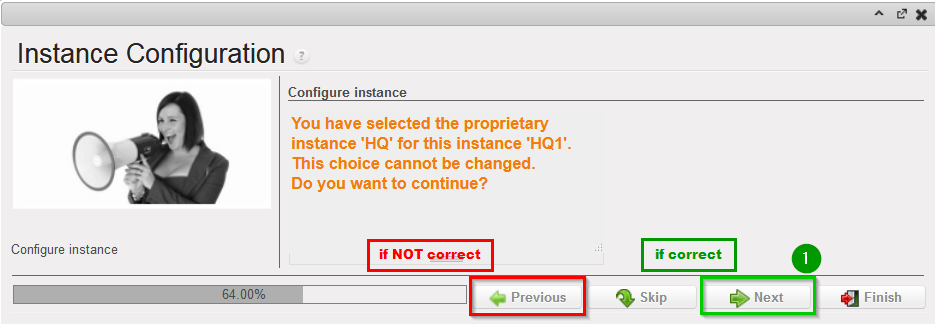 |
| Most of the time the property instance’s name matches the instance’s name. If it’s not the case a warning message is displayed. The only exception applies to instances at HQ level. Please be extremely cautious before proceeding after this warning message. | |
Activate the International Commitments Import
Click Next 2 | |
| Activate the Fixed asset configuration Leave default options. Click Next 1 | |
| Activate the Payroll configuration Check the box if you use Homere “Does the system manage Payrolls import from Homere?” Click Next | |
Currencies Configuration
Click Next 2 | |
| Company Configuration Fill in the different values 1 2 3 Click Next 4 | 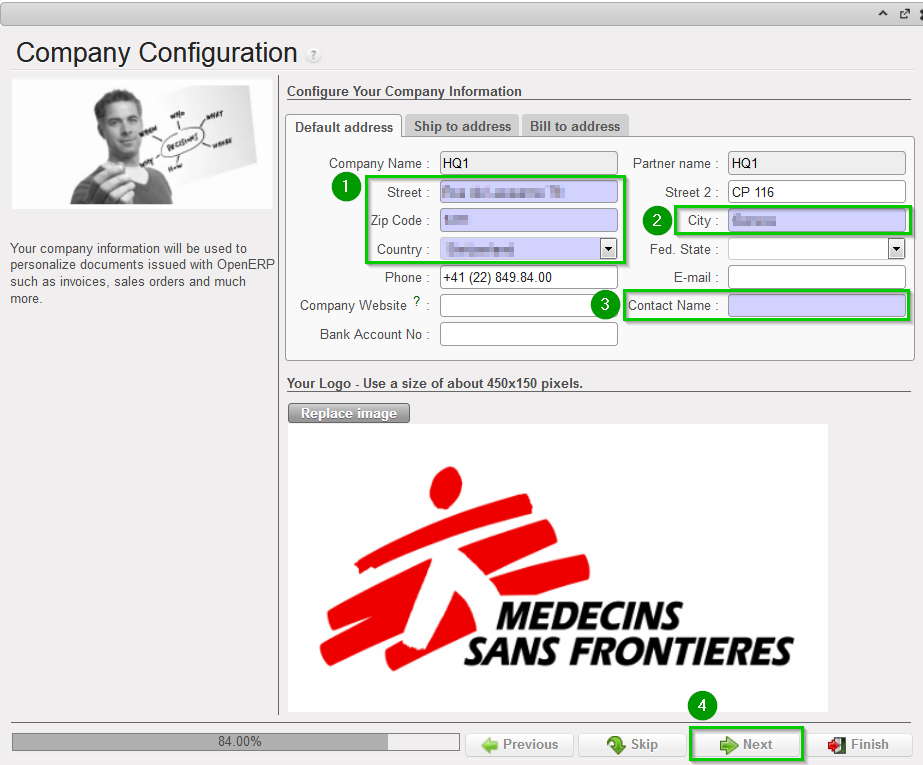 |
| Delivery Process Configuration Choose the appropriate shipping method 1 (you may leave the default value). Click Next 2 | |
| Allocation Stock Configuration Leave default values. Click Next 1 | |
| Country restrictions Configuration Leave default values Click Next 1 | |
| Allow previous Fiscal Year dates Does the system allow document dates on previous Fiscal Year?: 1
Click Next 2 | |
2.8 Synchronization Server
2.8 Synchronization Server
On Production this section is managed by the Support Team.
2.8.1 Import Group Types
| Click on Menu Administration 1, Synchronization 2, Configuration 3, Type of Group 4, click on the double-arrow icon to import the file 5. Import file grouptype.csv This file contains all the groups required to install an HQ with two missions. | 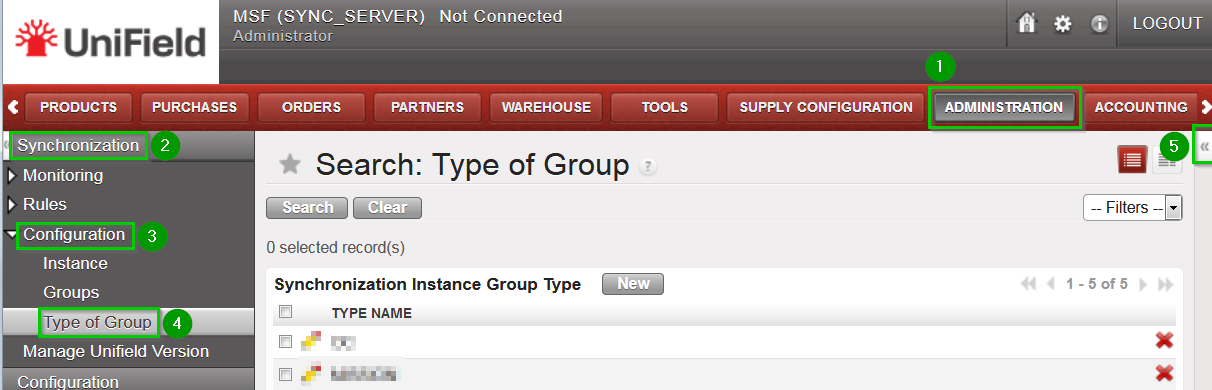 |
2.8.2 Create Groups
The number of groups depends on the structure of the network as defined in the Installation Checklist. The groups are used to determine how the data is to be exchanged between instances.
In order to create a group, proceed as follows:
| Click on Menu Administration 1, Synchronization 2, Configuration 3, Groups 4 Click on New 5 | 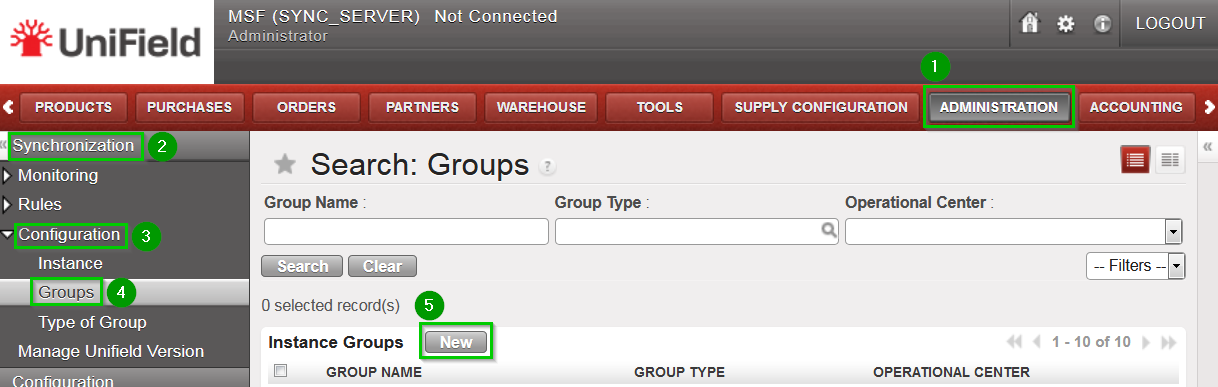 |
| Fill in:
Click on Save 4 | 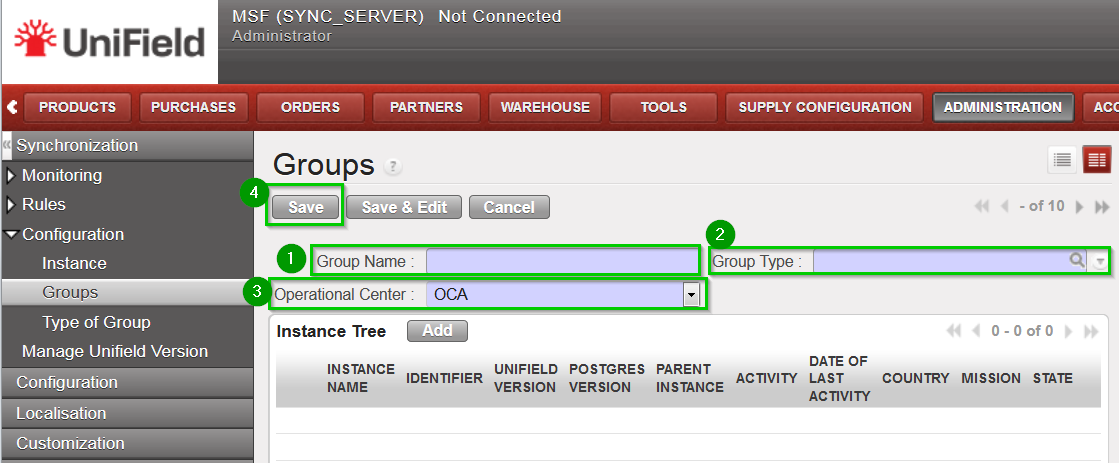 |
The following groups needs to be created:
| Group Name | Group Type |
OCx | OC |
OCx_COORDINATIONS | COORDINATIONS |
OCx_MISSION_AAA | MISSION |
OCx_HQ_MISSION_AAA | HQ + MISSION |
Group OCxrepresents your whole OC and should be named according to your OC (OCA, OCB, OCBA, OCG or OCP). You should have 1 and 1 only group type OC.Group OCx_COORDINATIONSis a standard group to be present in any setup – it is used mainly for intermission accounting processes. You should have 1 and 1 only group type COORDINATIONS.
You will then have as many MISSION and HQ + MISSION groups as you have Missions. We suggest you put the same name as the ones in the Installation Checklist.
2.7 Instances’ Setup
2.7 Instances’ Setup
For setting up each instance (HQ, Coordination, Project and/or SYNC_SERVER ), it is necessary to create or upload some data. The procedure for uploading some data from a .csv file is always the same. This chapter describes how to import a file. It is only for reference.
| Once you are in the menu where to upload the file, open the right-side panel menu by clicking on the double-arrow icon 1 located at the right of the screen. In the Other Options section, click on Import 2 | 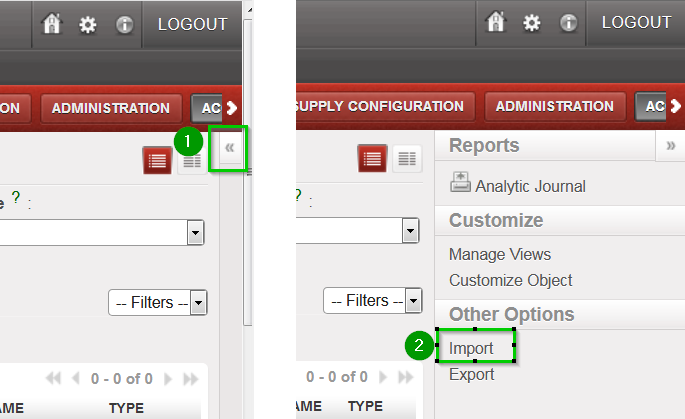 |
| In the following wizard, click on Browse 1, locate the file to be uploaded and click on Import file 2(the wizard will confirm the number of items imported). Click on OK to exit the wizard | 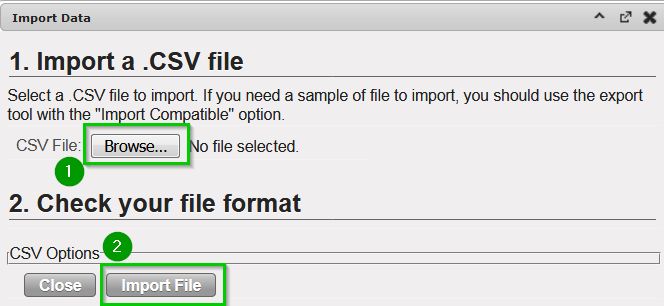 |
The list and all csv file needed to create a Sandbox are available here