9.7 How to import User Rights in the sand box

9.7 How to Import User Rights in the Sandbox

User Rights are imported in the SYNC_SERVER. It would be applied first by the HQs once they synchronise and then to its respective children instance by synchronisation.

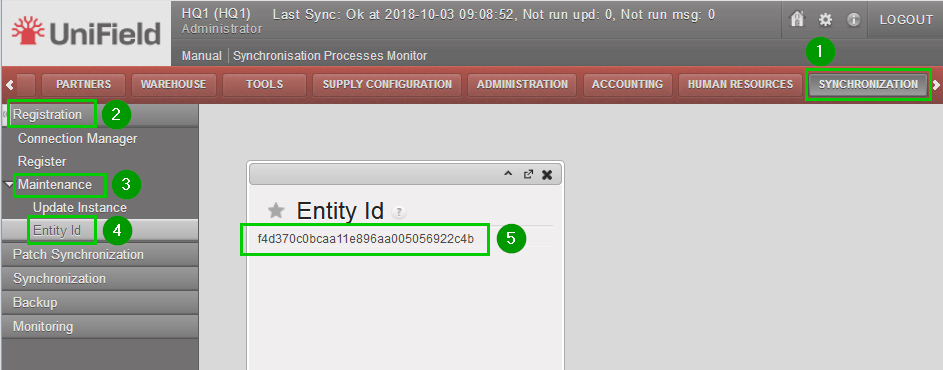
Click on Menu Administration 1, Synchronization 2, Instance User Rights 3.
Click on the top right arrow 4 to expand the right menu.
Click on Add new file 1
a pop up window opens
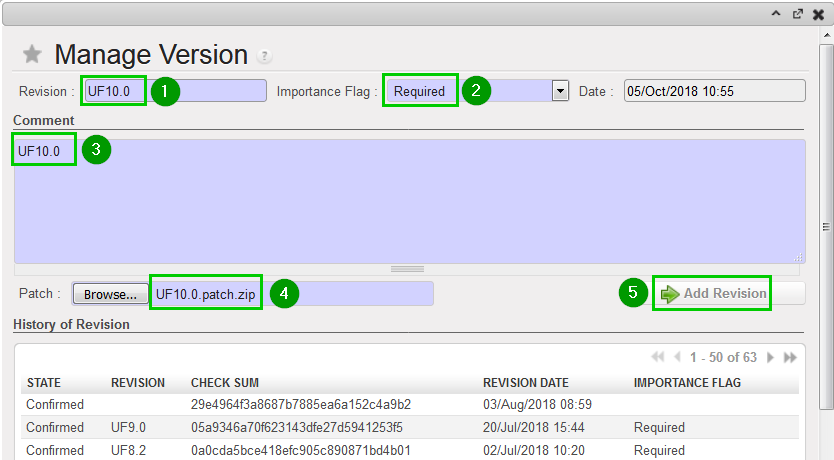
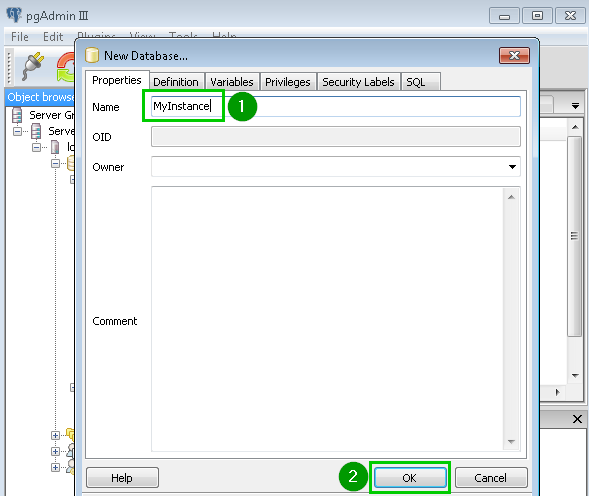
Fill in the information:


  • Version 1: User Right v.currentversion
  • File 2: Browse the User Right file
  • Click on Import 3
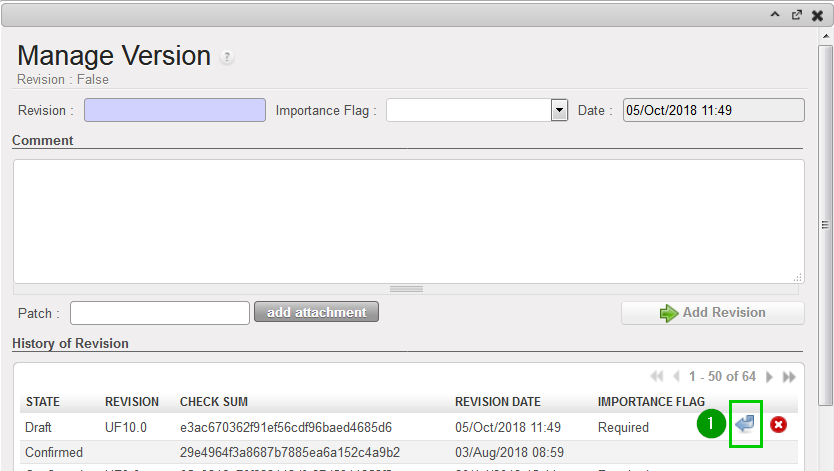
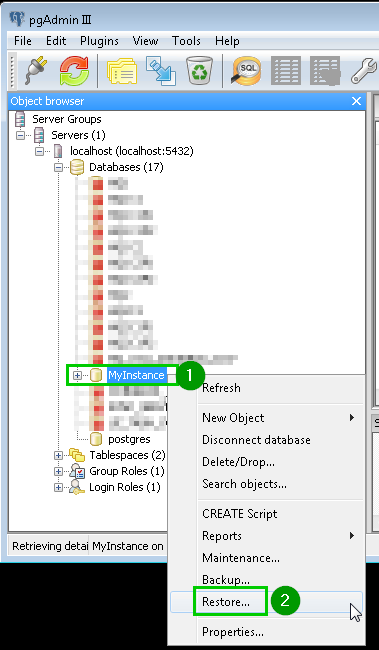
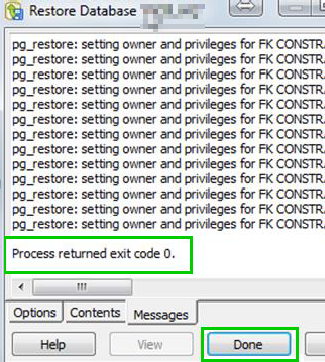
All User Rights files download automatically.
Once it’s completed you will see the Message Import Done 1
Click on Deploy on server 2
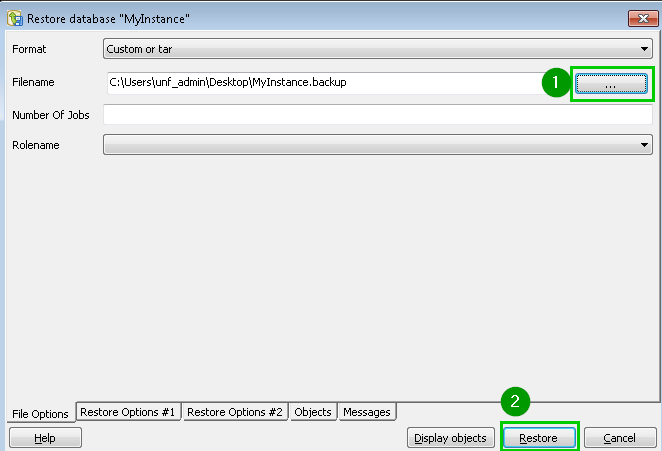
Once done you will be redirected to the Instance User Rights page where you could see the latest User Rights imported and deployed 1

Next time your HQ instance synchronises it would get the latest User Rights. Its children instances would get it after synchronising too (after HQ finishes first)

9.6 How to Patch the Sandbox

9.6 How to Patch the Sandbox

When you need to patch a sandbox, you have to:

  • Add the patch in your SYNC_SERVER – refer to 9.6.1 below
  • Deploy the patch at least in one instance – refer to 9.6.2 below

9.6.1 Creating a patch on the SYNC_SERVER

First of all, you would need to have the .zip file that contains the patch. This .zip file is made up of:

  • A file that describes the release. This file is called py and is saved in the root directory of the zip file.
  • All the source code files that have to be updated or created. The structure is the same as in a UniField instance.

When a patch needs to be deployed, you need to define this patch at the SYNC_SERVER level.

Click on Menu Administration 1, Synchronization 2, Manage Unifield Version 3
A pop up window opens.
Fill in:
Revision 1: Enter the revision version
Importance Flag 2: Select Required (Optional will warn the users but won’t force the upgrade)
Comment 3: Fill in (e.g. with the revision number)
Patch 4: Browse the .zip file
Click on Add Revision 5
In the bottom section “History of Revision” table, click on the blue arrow 1 to activate the patch.
A pop up window will ask you to confirm.
Click on OK

The patch is now activated in your SYNC_SERVER. All instances connected to this SYNC_SERVER are going to be upgraded the next time they synchronize.
Please keep in mind that the SYNC_SERVER has not been upgraded yet. What you have just done is to provide the other instances that connect to this SYNC_SERVER with a new patch.

9.6.2  Deploy the patch at least in one instance which is on the same computer

You can follow the steps described in chapter 6.1 Applying a patch on instances.

9.5 Update the Hardware Identifier in the SYNC_SERVER

9.5 Update the Hardware Identifier in the SYNC_SERVER

The last step before starting a synchronisation is to update the Hardware identifier of your instances in the SYNC_SERVER because if you don’t do it and you try to start a synchronisation from any instances in your Sandbox you would face an error.

Where to find the Hardware identifier.
Log in in one of your instance of the sandbox and click on menu Synchronization 1, Registration 2, Maintenance 3, Entity Id 4
A pop up window opens with the Entity Id 5 which is your Hardware identifier.
Copy this value.
Log out from your instance and log in your_SYNC_SERVER.
Click on menu Administration 1, Synchronization 2, Configuration 3, Instance 4.
Click on the edit icon 5 of the instance you previously copied the Entity Id.
Hardware Identifier 1: paste the Entity Id you copied previously.
Click on Save 2

Perform the same previous steps for the other instances.
The Sandbox is now ready to be used !!!

9.4 Connect Instances with your SYNC_SERVER

9.4 Connect Instances with your SYNC_SERVER

The final step is to connect every instances in your sandbox to your_SYNC_SERVER.

Click on Menu Synchronization 1, Registration 2, Connection Manager 3
Click on the edit icon 4 and to edit the Current Connection:


  • Host: Address of the machine where your_SYNC_SERVER is installed – code>localhost if installed on the same machine
  • Port: Default (8069) or as per your Sandbox configuration
  • Protocol: XMLRPC
  • Database Name: your_SYNC_SERVER_name
  • Login on synchro server your_SYNC_SERVER_login
  • Password: your_SYNC_SERVER_password
  • Max Packet Size: 500
  • Timeout: 600 – The number of seconds the instance will wait during a sync before raising a timeout error
  • XmlRPC retry: 10 – The number of retry during a sync when the instance don’t receive the acknowledge from the SYNC_SERVER with the XmlRPC protocol.
  • Silent upgrade: The instance will patch automatically during the time slot defined if an automatic synchronisation is performed. Only useful if testing patches.

Click on Connect the State switches to connected
Click on Save

9.3 Resetting a Password

9.3 Resetting a Password

When restoring a database, the passwords are kept in the database itself. If you don’t know them but you know the database password you can reset them with the database management tool called pgAdmin. This section explains you how to do so.

Open your pgAdmin then open Databases 1


Select the database for which you want to reset the password and type Ctrl + e to open the SQL Editor
A pop up window opens.
Clear the text written in the main text area if necessary.
Type the command 1:
UPDATE res_users SET password ='myNewPassyword';
Click on the play icon 2 in the toolbar.
A message appears at the bottom of the window telling you that the passwords have been reset 1
Close the current window without saving and close also the main pgAdmin window.
All the passwords are now set to myNewPassword

9.2 Restore Backups

9.2 Restore Backups

Depending on the kind of backup you have the procedure to restore can be slightly different. There are three kinds of backups:

  • Backups extracted from the UniField web interface – see Section 8.4. The file extension is .dump
    Such backups have a naming convention which includes the database name, date/time and the UniField version required to run this backup: e.g HQ1-20181009-113216-UF10.0.dump
  • Backups extracted from pgAdmin. The file extension is .backup. These files are exactly the same as above. However, there is no naming convention. As a result, you cannot restore them via the web interface you have to use pgAdmin.
  • SQL backups. The file extension is .lzma. These backups have a different structure. They take up less disk space than the two previous kinds of backup. This kind of backup is used to take snapshots of the SYNC_SERVER.

The next three sections describe how to restore them. The last section explains what can happen when you log into a restored instance.

Restore a dump via the web interface

Please refer to Section Restoring a database.

Restore a dump via pgAdmin

The procedure is the same if you use pgAdmin III or pgAdmin 4
Open pgAdmin (blue elephant icon).


Double click on the server icon.
Type in the password you chose when installing UniField
Right click on Databases 1
Click on New Databases… 2
Type in the database Name 1 you want to restore.
Click OK 2
Right click 1 on the database you have just created. A popup menu opens.
Click on Restore…2
A new window opens. Select your backup file 1
Tip: only files with .backup extension are displayed. You can change it to display all the files. This is especially important if you look for a .dump file extracted from the UniField web interface.
Click Restore 2
It can take up to a few minutes to import a backup. This time depends on its size. When the restore is completed, you will see a “Process returned exit code 0”. The Done button will be enabled.Click on Done.Your database is ready to be used. You can log in using the credentials saved in the database when you backed it up.If you need to modify the password of the database the next two slides will show you how to do it.

Restore a dump via psql

Uncompress the archive. The most frequent compression algorithm for this kind of backup is .lzma.
We suggest you to use 7zip to uncompress the archive.
Open a cmd prompt
Open a new file explorer window and browse to the bin directory of PostgreSQL. The default location is: C:\Program Files (x86)\pgAdmin III\1.22.
Drag & drop psql.exe to the command prompt you have just opened.
If it doesn’t work, you can type the full path of this executable file in the console. If the path contains spaces you will have to surround it with double quotes.The absolute path of the executable appears in the command prompt. Alternatively, if you don’t want to write the absolute path of  every time, you can add its directory to your PATH as described here. It is better not to change it in production.
Type the following arguments: –U openpg –W SYNC_SERVER
Where:


  • openpg : is the PostgreSQL admin
  • SYNC_SERVER : is the empty database in which you would like to restore the dump. The name of the base should be previously created
Drag & drop your .sql file to the command prompt
Press the enter key
If it doesn’t work, you can type the full path of this file in the console. If the path contains spaces you will have to surround it with double quotes.
Type in the PostgreSQL administrator password as defined in the installation wizard of UniField and press the enter key.

After a few minutes, psql.exe returns and you get another command line.The backup is restored. You can start using it.

Scenarios when log in into a restored database

  • If the database comes from an older instance (the source code was older), it will be upgraded the first time you log in.
  • If the database comes from a newer instance (the source code is newer than the instance you restored the dump in), you will get a Database Newer than UniField version error message and you won’t be able to login. The only way to use this dump is to install a AIO at the same version of the database or higher.

9. How to Create a Sand box

How to Create a Sand box

There are various options to create a Sandbox:

  • Requesting the Support Team to create a Sandbox – please refer to the Service Card here. If you choose this option you could discard the next Sections
  • Restoring your own backups on your Sandbox
  • Creating from scratch your instances – please refer to Section 2.5 and following

No matter the option you choose the latest AIO should be installed on your Sandbox computer.