As a security, the synchronization password is not saved in the database or a file. It means this step must be done every time OpenERP starts. For example when:
the computer was off and is now on
the instance has been upgraded with a patch received from the synchronization server.
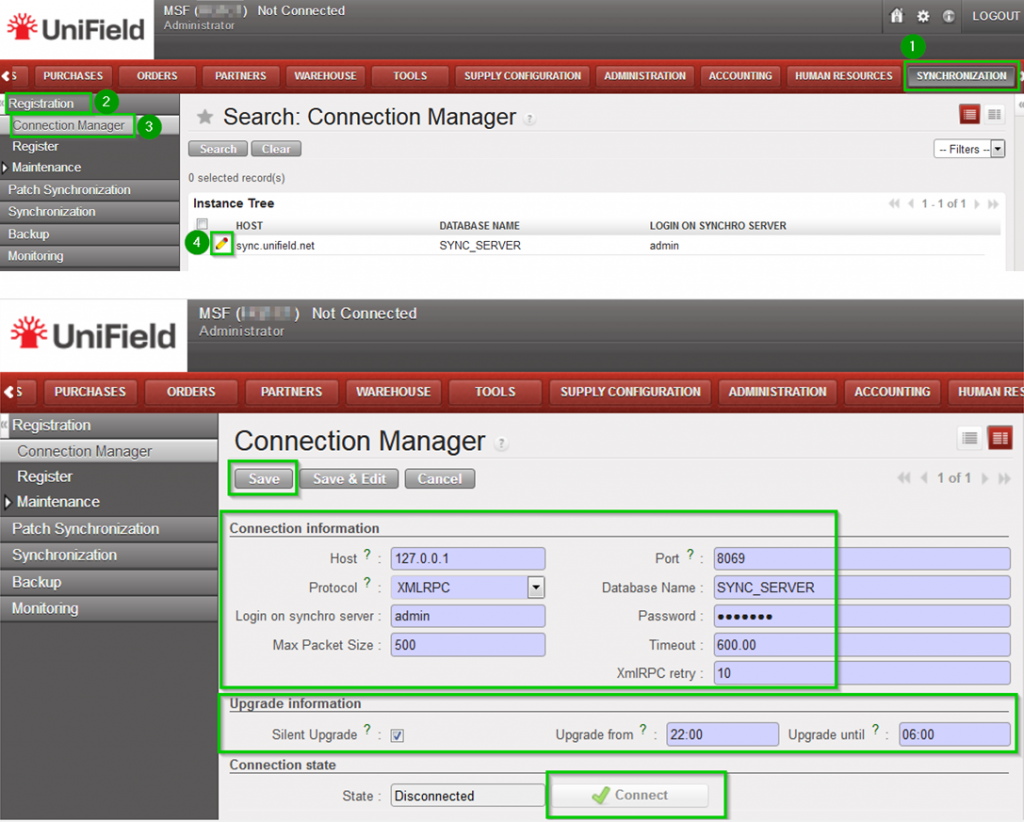
Click on Menu Synchronization 1, Registration 2, Connection Manager 3 Click on the edit icon (4) and to edit the Current Connection Host: * Production instance: sync.unifield.net *Sandbox: Address of the machine where your Sync Server is installed (localhost if installed on the same machine)
Port:
*Production: 443
*Default or Sandbox: 8069
Protocol:
*XMLRPC
*secured compressed XMLRPC
Database Name:
*Production: SYNC_SERVER
*Sandbox: Your_sync_server_name
Login on synchro server:
*Production: provided by the Support Team
*Sandbox: Your_sync_server_login
Password:
*Production: provided by the Support Team
*Sandbox: Your_sync_server_password
Max Packet Size: 500 Timeout:600 – The number of seconds the instance will wait during a sync before raising a timeout error XmlRPC retry: 10 – The number of retry during a sync when the instance don’t receive the acknowledge from the sync server with the XmlRPC protocol. Silent upgrade: The instance will patch automatically during the time slot defined if an automatic synchronisation is performed. It is strongly recommended to activate it Click on Connect 5 the State switches to connected Click on Save
To synchronize, the user must know the synchronization login and password. These credentials will be provided by the Support Team for production instances.
By default groups synchronise top-down from the HQ to all its children instances. This is only configurable at HQ level and restricted to the admin user.
Click on Menu Administration 1, Users 2, Groups 3. Click on the edit button icon 4 next to the group.
Click on the drop down menu button named Levels 1. Select the level 2 the group would synchronise to. In this example we choose Coordination and Click on Save 3. In our example this grop will only synchronise down to the coordination level but not at project level
This group will synchronise down only to Coordination level at the next synchronisation.
3.3 How to Remove the “synchronize” Option of a User (only at HQ)
Depending your needs, you have two different option to remove the synchronize option as shown below.
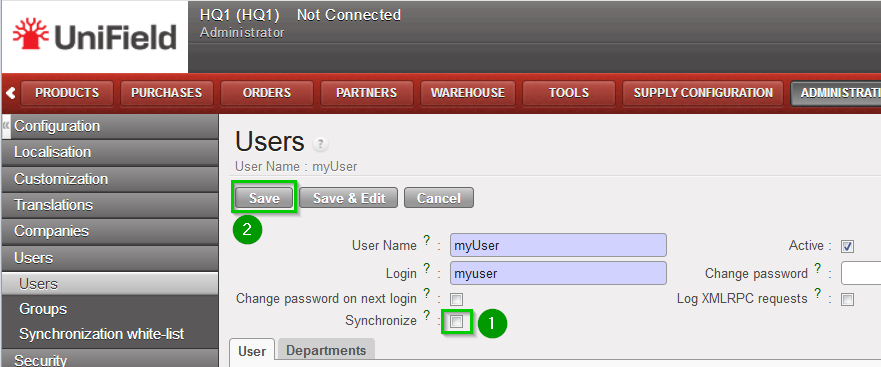
Option 1: On Menu Administration, Users, Users click on the edit button icon next to the user. Un-tick the box Synchronize and click on Save. The user won’t synchronise anymore until you tick the box again.
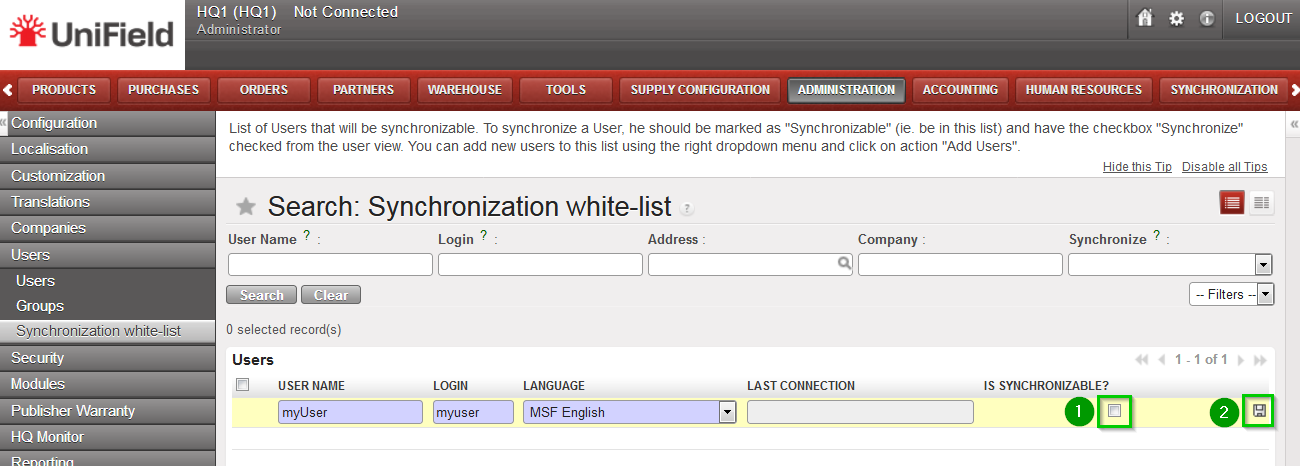
Option 2: On Menu Administration, Users, Synchronisation white-list. Click on the edit icon next to the user. Un-tick the box 1 and click on the Save icon 2.
In this way the user is removed from the white-list. The tick box option Synchronise on its user’s profile under Administration, Users, Users will disappear.
This feature allows you to synchronise a user from the HQ to all its children instances. It is only available at the HQ level and restricted to the “admin” user. Please note that the user only sync from top to down. As user account management is sensitive and to prevent a user to be synchronised wrongly, there is a need to perform a two-step process for the configuration of the user. First step the user will be added into a white-list. The checkbox “Synchronise” would be available in its “User’s details” and would be enabled. If the user is not in the white-list the user won’t be able to synchronise. Second step there is a need to tick the checkbox “Synchronise” [2] in the “User’s details” and Save it.
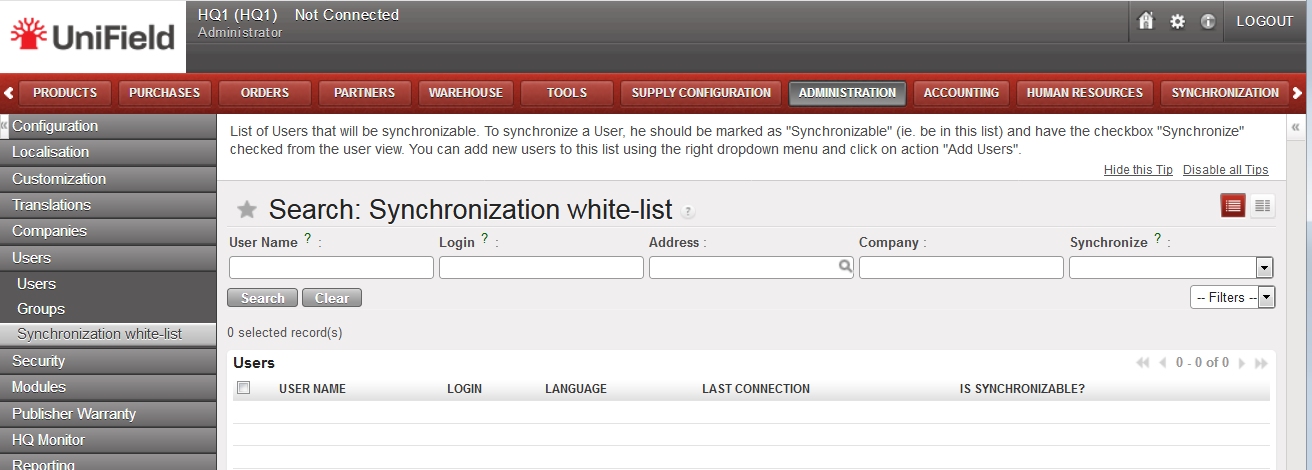
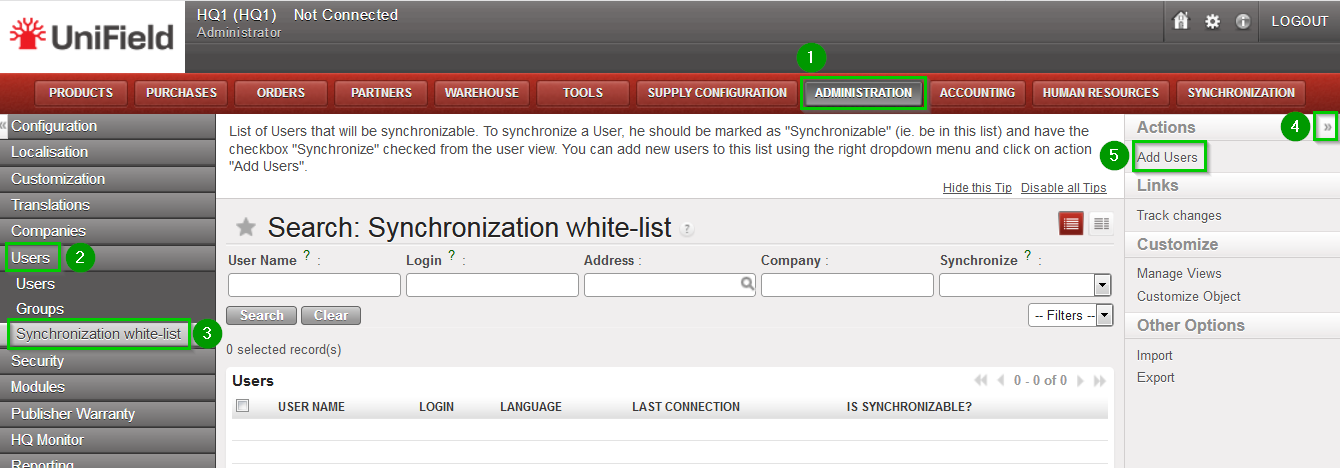
First step Log in your HQ. Click on Menu Administration 1, Users 2, Synchronisation white-list 3. Click on the double Arrow icon 4 in the right panel Under Actions click on Add Users 5
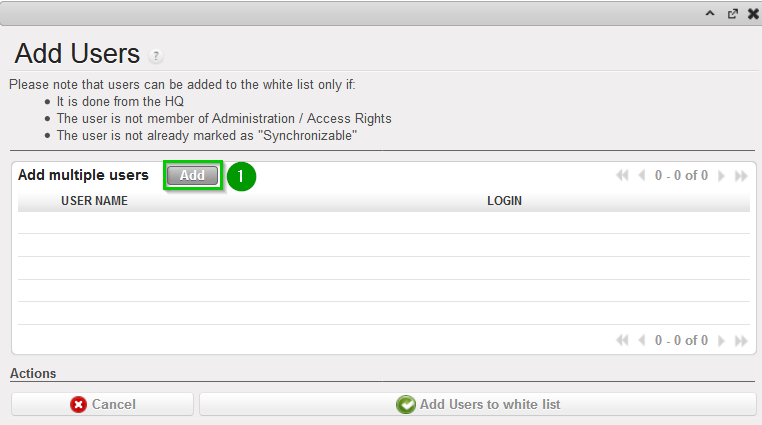
The following pop up window opens. Click on Add 1.
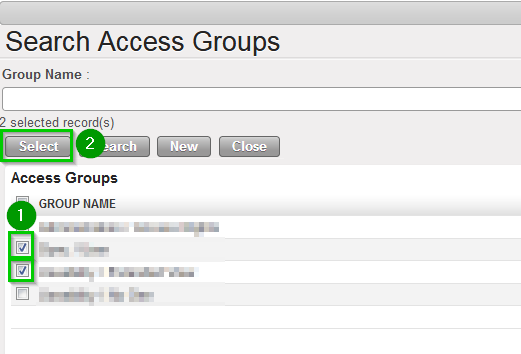
The following window will open Select the user to synchronise by ticking the box 1.You may select as many as you would like. Click on Select 2
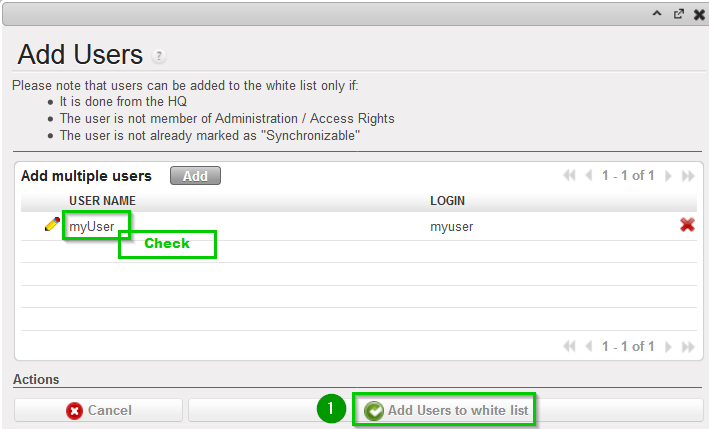
Review that the selected users appear in the list as shown (Check). Click on Add users to white-list 2. Now your user has the option to be synchronised. However you have to enable manually this option.
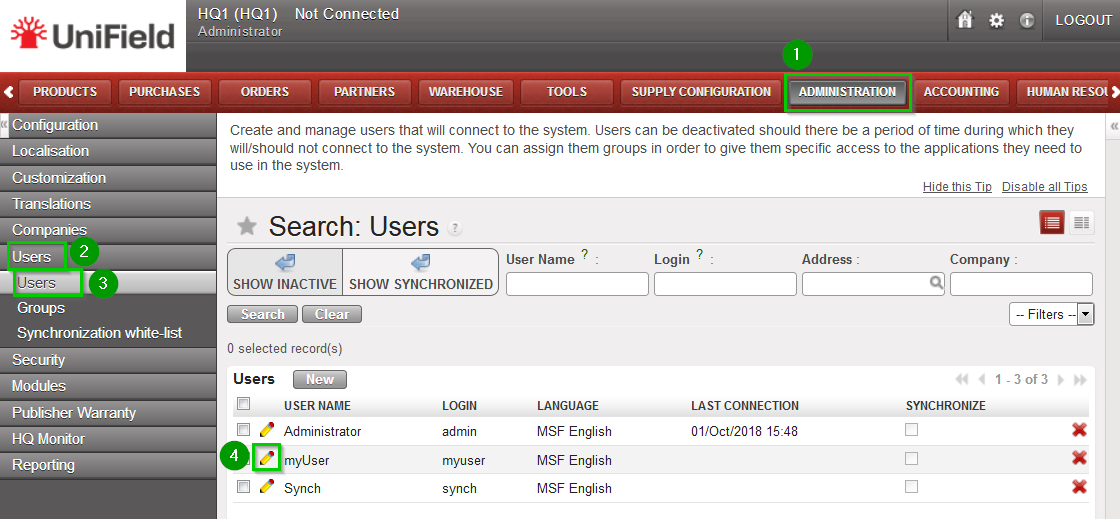
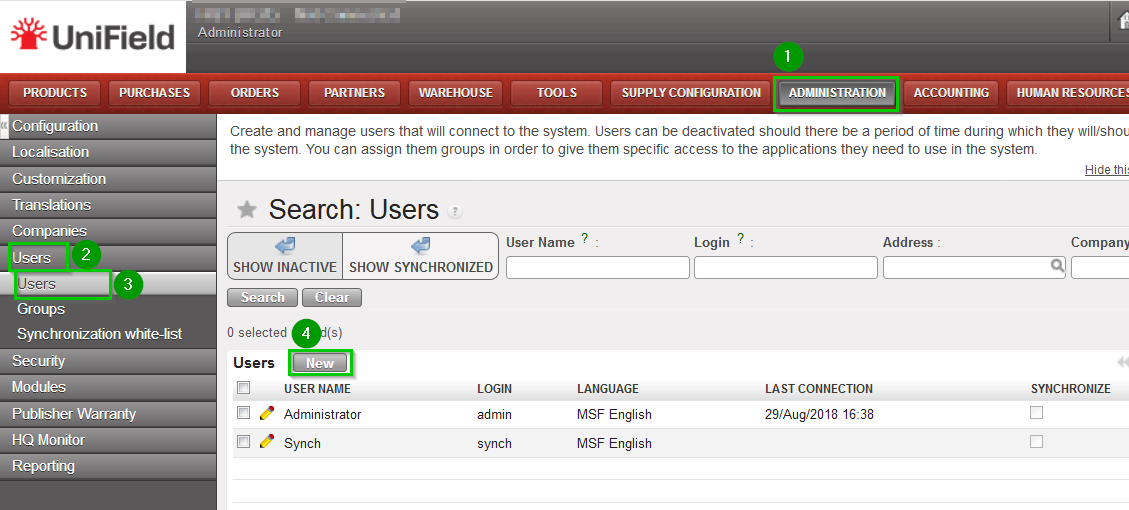
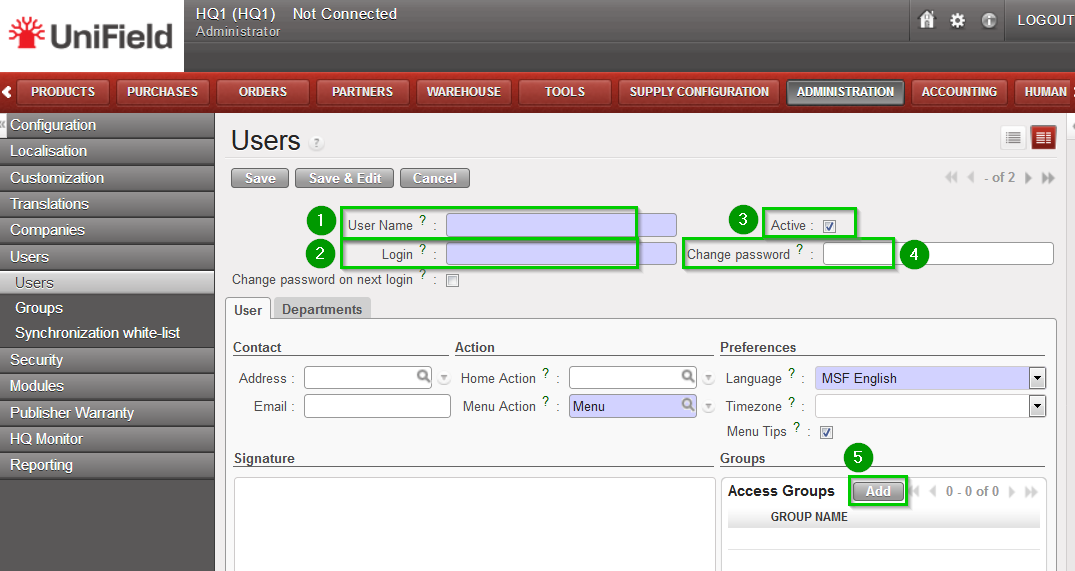
Second step Click on Menu Administration 1, Users 2, Users 3 Click on the edit button icon next to the user you just added in the white-list 4.
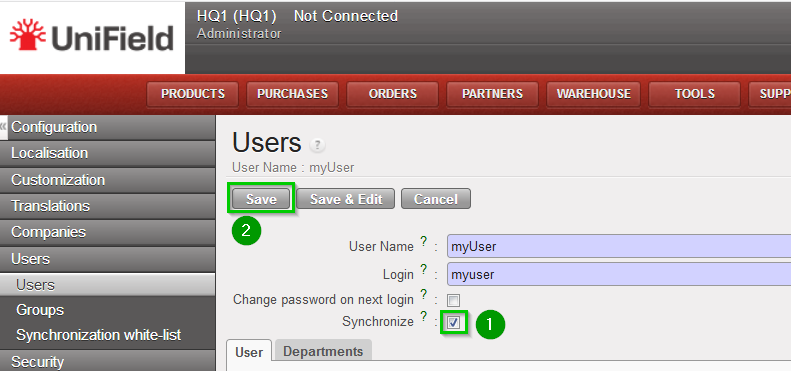
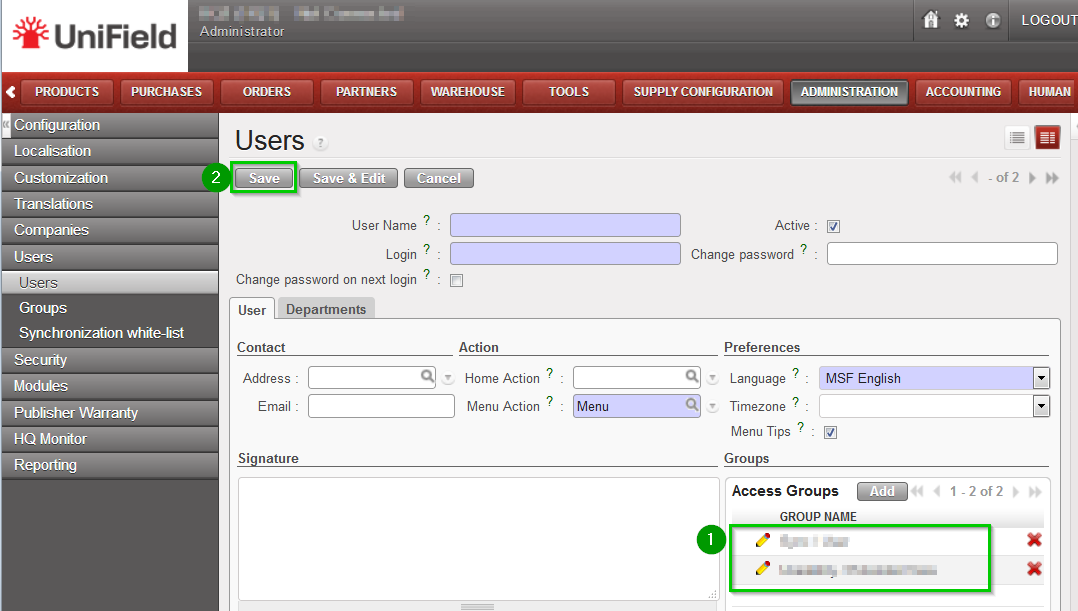
A new window opens with the details of the user. Tick the box Synchronise 1 and click on Save 2 The user will now synchronise to the other instances during the next synchronisation.
All steps described in this section are to be performed with the admin user. It is also important that the coordination’s validation synchronizations described in step 2.10.9 are finished before starting setting up Projects. Log in your Project instance.
2.11.1 Connect and Register to Synchronization Server
Connect Click on Menu Synchronization 1, Registration 2, Connection Manager 3 Click on the edit icon (4) and to edit the Current Connection Host: * Production instance: sync.unifield.net *Sandbox: Address of the machine where your Sync Server is installed (localhost if installed on the same machine)
Port:
*Production: 443
*Default or Sandbox: 8069 Protocol:
*XMLRPC
*secured compressed XMLRPC
Database Name:
*Production: SYNC_SERVER
*Sandbox: Your_sync_server_name
Login on synchro server:
*Production: provided by the Support Team
*Sandbox: Your_sync_server_login
Password:
*Production: provided by the Support Team
*Sandbox: Your_sync_server_password Max Packet Size: 500 Timeout:600 – The number of seconds the instance will wait during a sync before raising a timeout error XmlRPC retry: 10 – The number of retry during a sync when the instance don’t receive the acknowledge from the sync server with the XmlRPC protocol. Silent upgrade: The instance will patch automatically during the time slot defined if an automatic synchronisation is performed. It is strongly recommended to activate it Click on Connect 5 the State switches to connected Click on Save
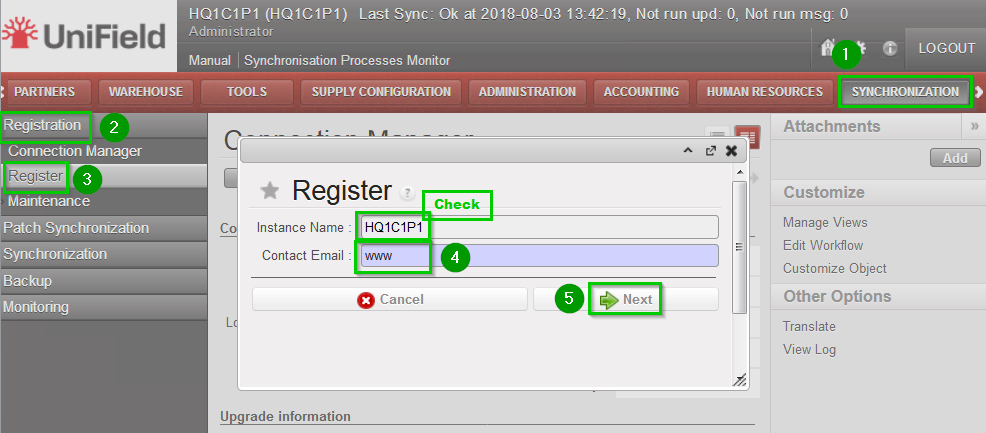
Register: Click on Menu Synchronization 1, Registration 2, Register 3 A new wizard will open Check that the instance name matches the Project database name as defined in the installation checklist Enter contact email 4www Click on Next 5
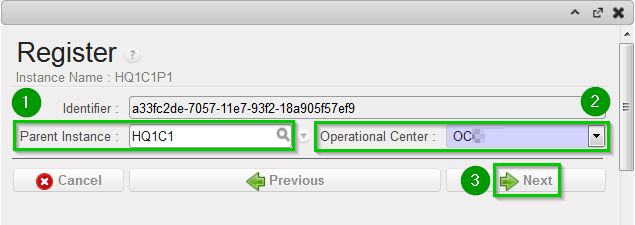
Select your Coordination Parent Instance 1 Select your Operational Center 2 Click on Next 3
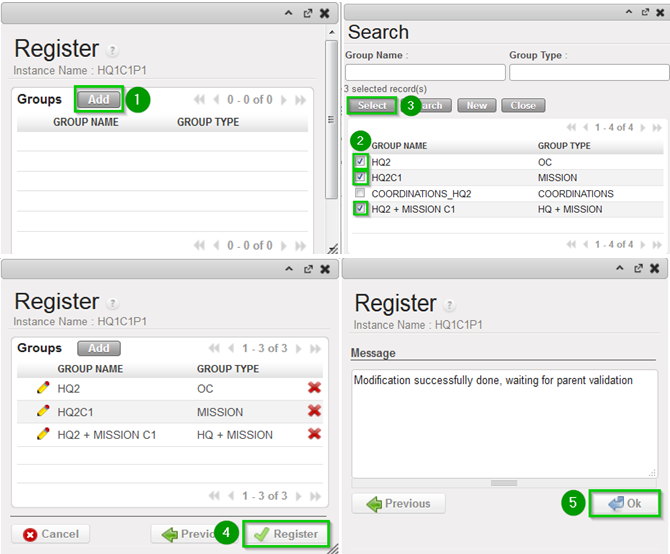
Click on Add 1 Choose groups 2:
OCx
The OCx_MISSION_XX9 group as defined in step 2.8.2.
The OCx_HQ_MISSION_XX9 as defined in step 2.8.2.
Click on Select 3 Click on Register 4 Click OK 5
2.11.2 Validate Instance (only at sync_server side)
For Production instance this step is done by the Support Team. For Sandbox instance login in your_Sync_Server instance with the admin user.
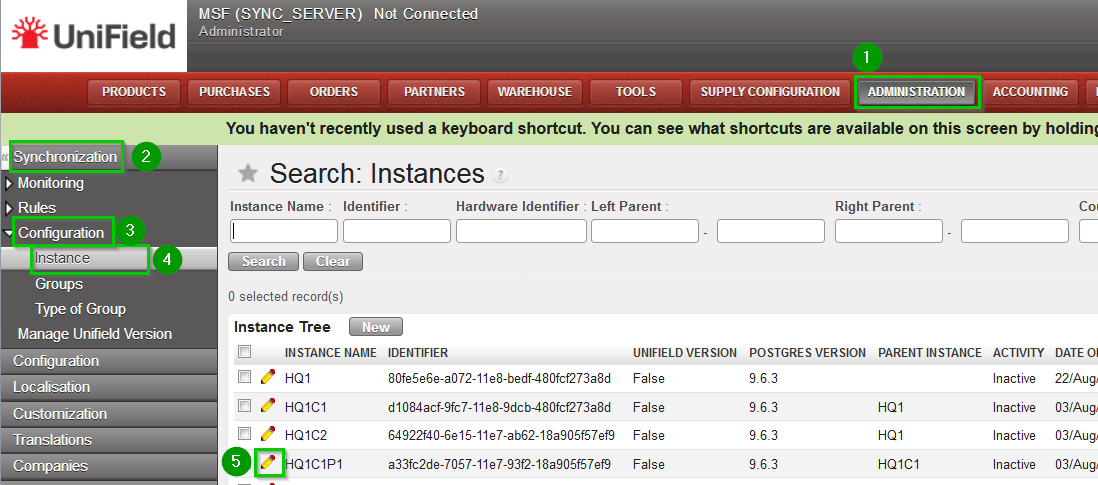
Click on Menu Administration 1, Synchronization 2, Configuration 3, Instance 4 Click on the edit icon 5 of the Project instance created in previous steps
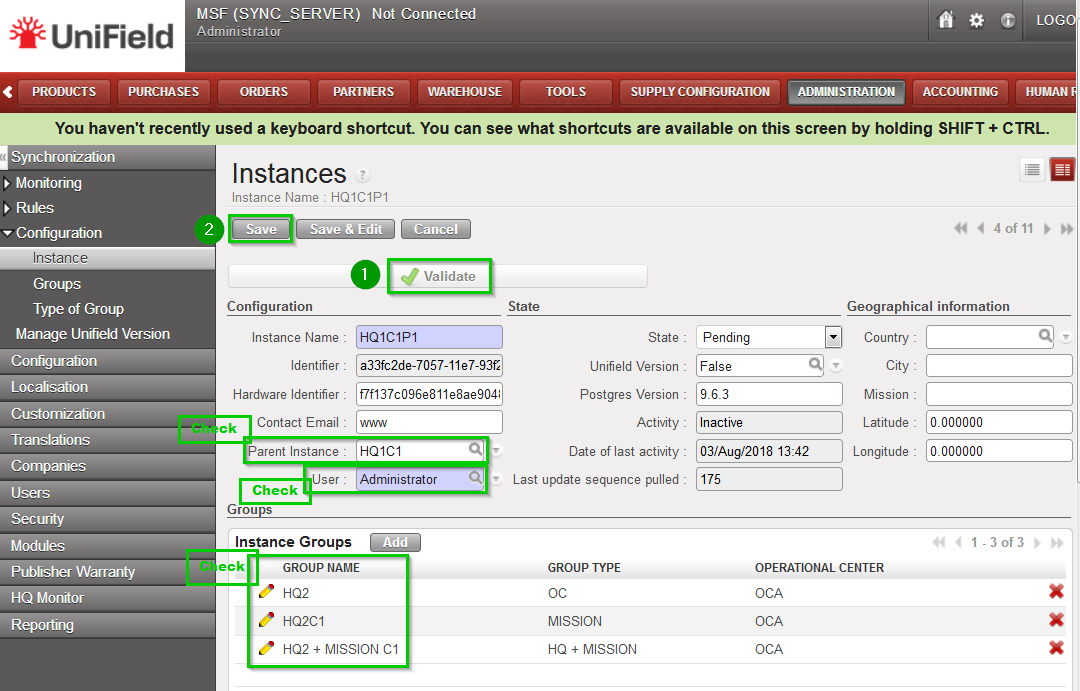
Check the following is correct:
Parent Instance
User
groups are correct (as defined in step 2.8.2)
Note that at this stage, it is normal that no children appear in the list, they will appear later on when Coordinations are created and defined as children of the HQ. If the instance is not added in the right groups, it will not fetch the correct updates during the initial sync. You could end up with a defective instance missing some important data. You can correct any error on this interface. Click on validate 1. State switches to Validated. Click on Save 2
2.11.3 Configure Automatic Backups
It is strongly recommended to schedule automatic backups and to save it in another location than the server instance.
On your HQ instance, click on Menu Synchronization 1, Backup 2, Backup config 3 You must enter an existing path 4 to save backups. The following options 5 are available to run automatic backups, please ensure the backup path exists as the sync. may fail:
backup before and/or after a manual sync.
backup before and/or after an automatic sync.
You can also choose to generate a backup immediately by clicking on the backup button 6
Click on Save 7
To schedule an automatic backup click on Menu Synchronization1, Backup2, Automatic3 Edit the following fields 4:
Interval number
Interval Unit
Next execution date: preferably during none working hours.
Tick the Active box 5 Click on Save 6
It is possible to send your latest backup to OneDrive. This is STRONGLY RECOMMENDED, refer to section 12.2 Automatic instance backup to the Cloud to configure it. the configuration is done from the HQ for the HQ and its children instances. Please note that this IS NOT to be considered as a offsite backup solution (this is for Support Team debbuging, support and BI purpooses)
2.11.4 Perform Initial Synchronization
Click on Menu Synchronization 1, Synchronization 2, Manual 3 A new wizard opens. Click on Start All Synchronization In Background 4 You should wait until the synchronization is finished before starting to configure the Projects.
In order to perform this check: Click on Menu Synchronization 1, Monitoring 2, Synchronization Processes Monitor 3 Check 4 that the last synchronization is Done
2.11.5 Perform Reconfigure
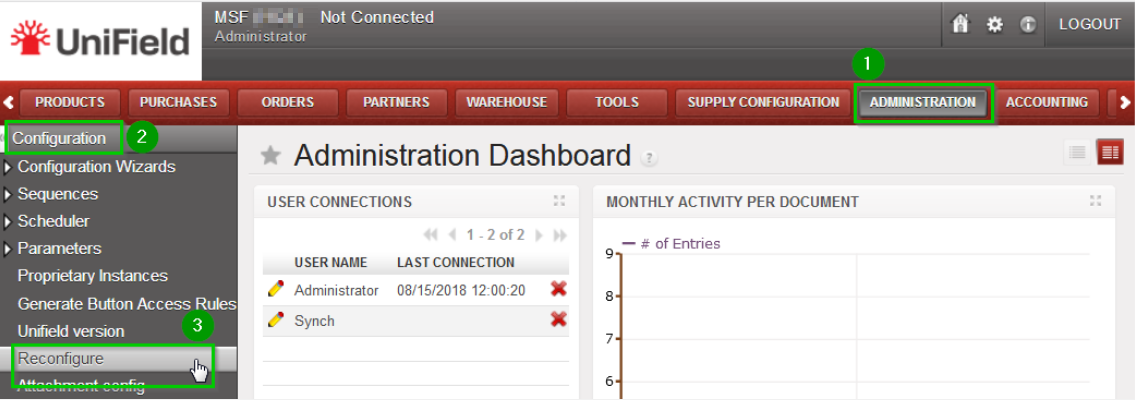
Click Menu Administration 1, Configuration 2, Reconfigure 3 A new wizard will open and you would then navigate to various screens.
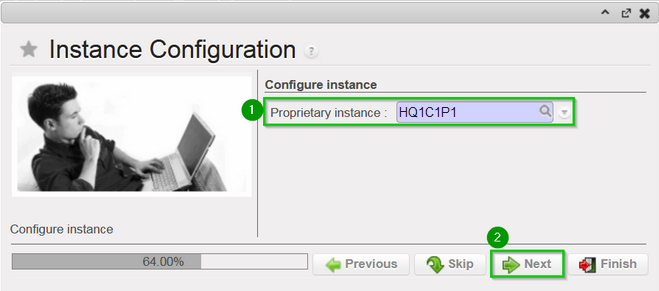
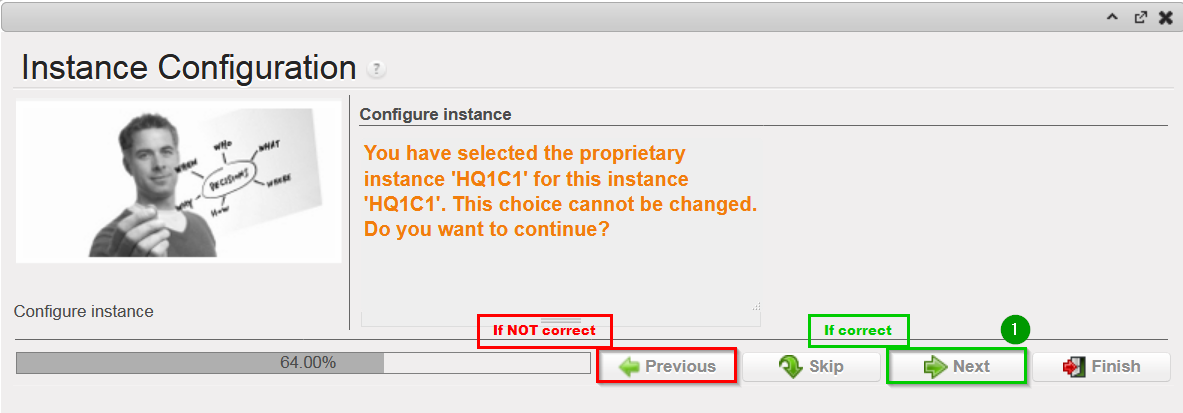
Instance Configuration: Choose the proprietary instance corresponding to the project1 (as created in step 2.9.2). This step cannot be re-done; if the wrong proprietary instance is chosen, the database needs to be dropped and re-created. Choosing a proprietary instance already in use in your OC could lead to corruption of other instances. Most of the time the proprietary instance’s name and the instance’s name will be the same. Click on Next 2
A confirmation message window opens asking you to confirm the choice of the proprietary instance. If its correct click on Next 1, if not click on Previous
Most of the time the property instance’s name matches the instance’s name. If it’s not the case a warning message is displayed. The only exception applies to instances at HQ level. Please be extremely cautious before proceeding after this warning message.
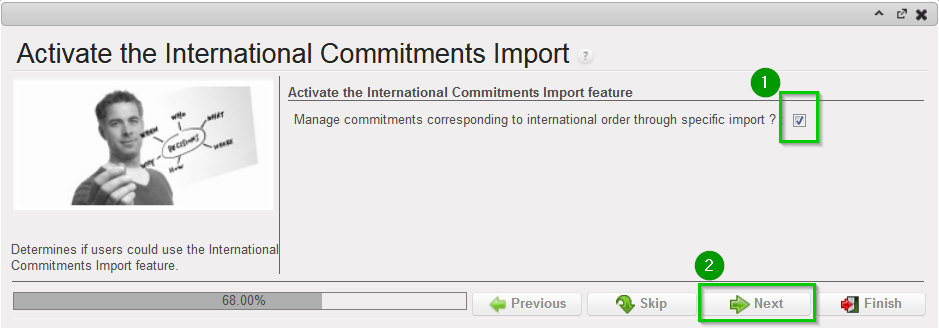
Activate the International Commitments Import
If OCA and OCB: leave default options 1
If OCG: unchecked the box 1
Click Next2
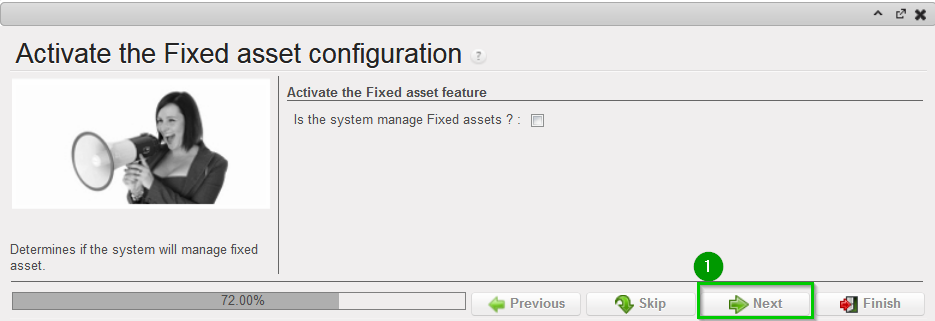
Activate the Fixed asset configuration Leave default options. Click Next1
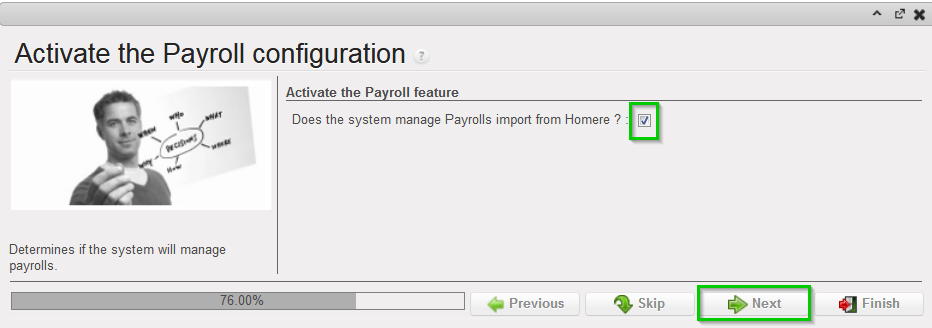
Activate the Payroll configuration Check the box if you use Homere “Does the system manage Payrolls import from Homere?” Click Next
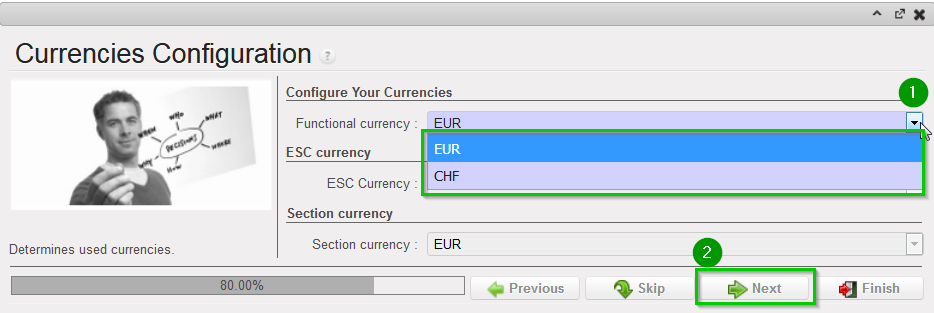
Currencies Configuration
If OCG: Choose CHF as functional currency 1
If Others: choose EUR as functional currency 1
Click Next2
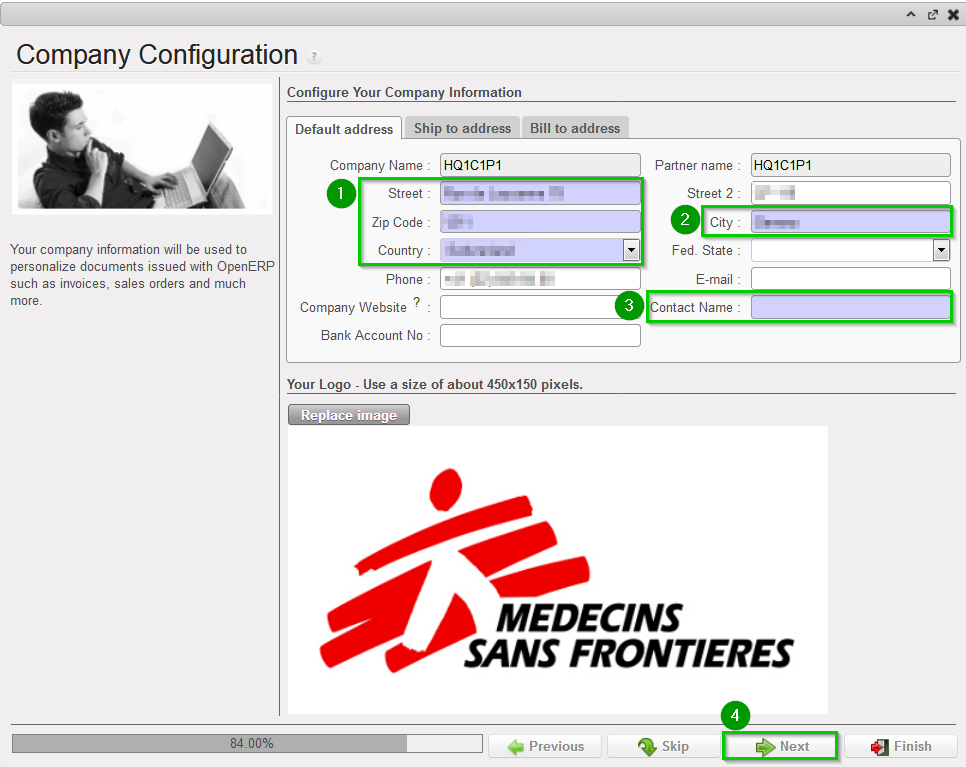
Company Configuration Fill in the different values123 Click Next4
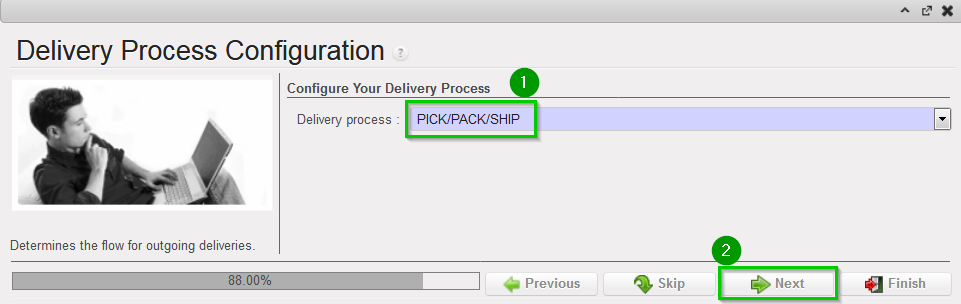
Delivery Process Configuration: Choose the appropriate shipping method 1 (you may leave the default value). Click Next 2
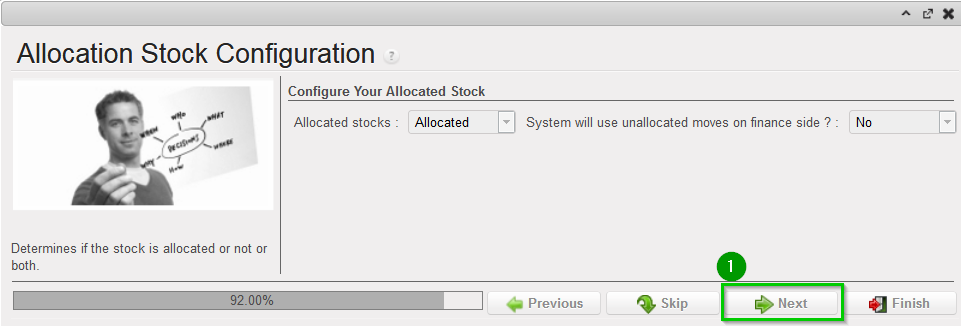
Allocation Stock Configuration Leave default values. Click Next 1
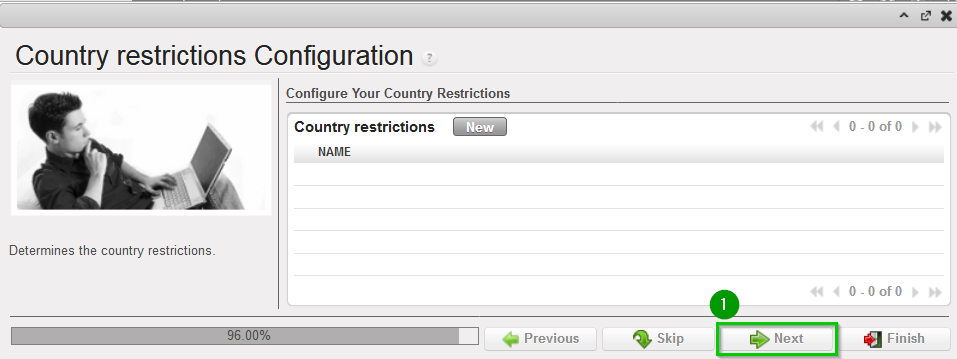
Country restrictions Configuration Leave default values Click Next 1
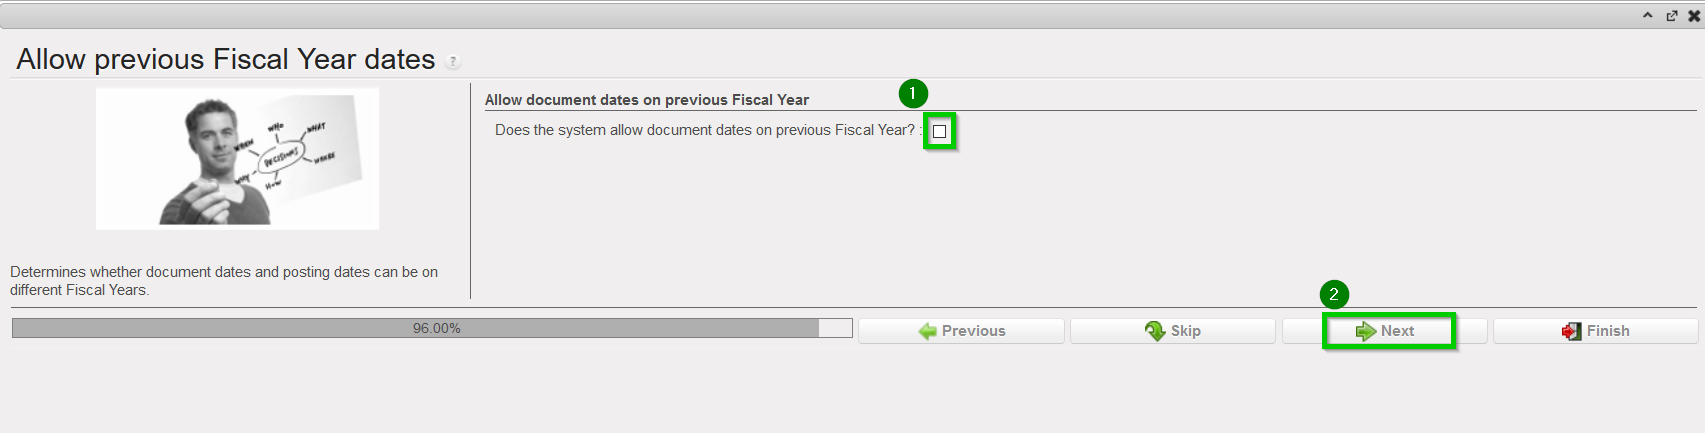
Allow previous Fiscal Year dates Does the system allow document dates on previous Fiscal Year?: 1
If OCA or OCG leave the box unchecked.
If OCB or OCP tick the box.
Click Next 2
2.11.6 Import Analytic Journals
Click Menu Accounting 1, Configuration 2, Analytic Accounting 3, Analytic Journals4 Click on the double arrow icon 5 and import file account.analytic.journal.csv Note: this is the same file as the one used at HQ level.
2.11.7 Import GL Journals
Click Menu Accounting 1, Configuration 2, Financial Accounting 3, Journals 4, Journals 5 Click on the double arrow icon 6 and import file account.journal.csv Note: this is the same file as the one used at HQ level.
2.11.8 Perform Internal Partner Configuration
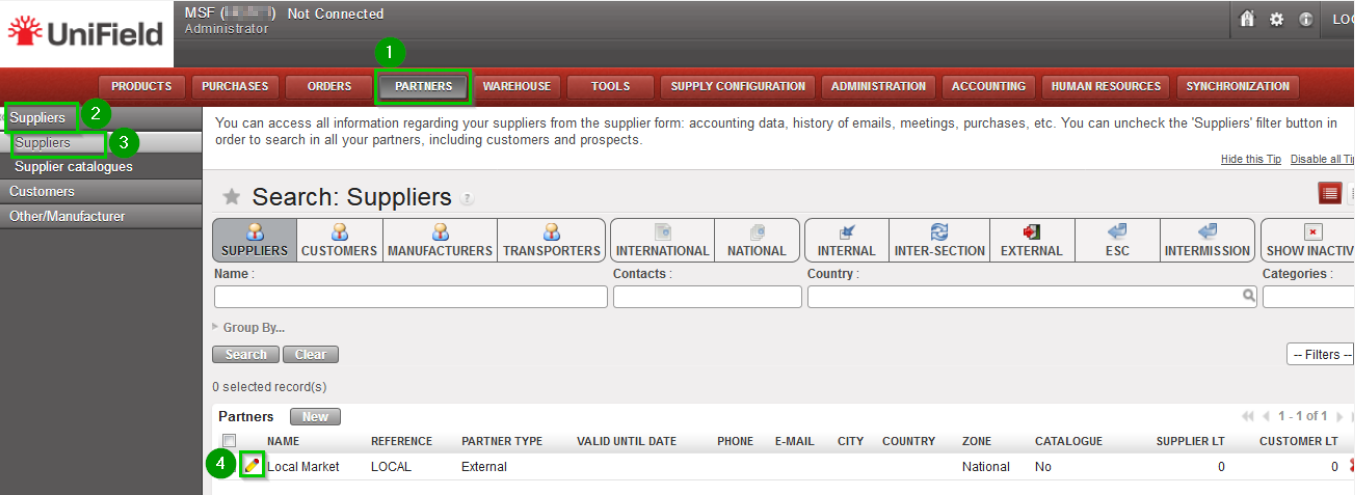
Click on Menu Partners 1, Suppliers (2), Suppliers 3 You should see one partner named “Local Market”. Edit this supplier 4
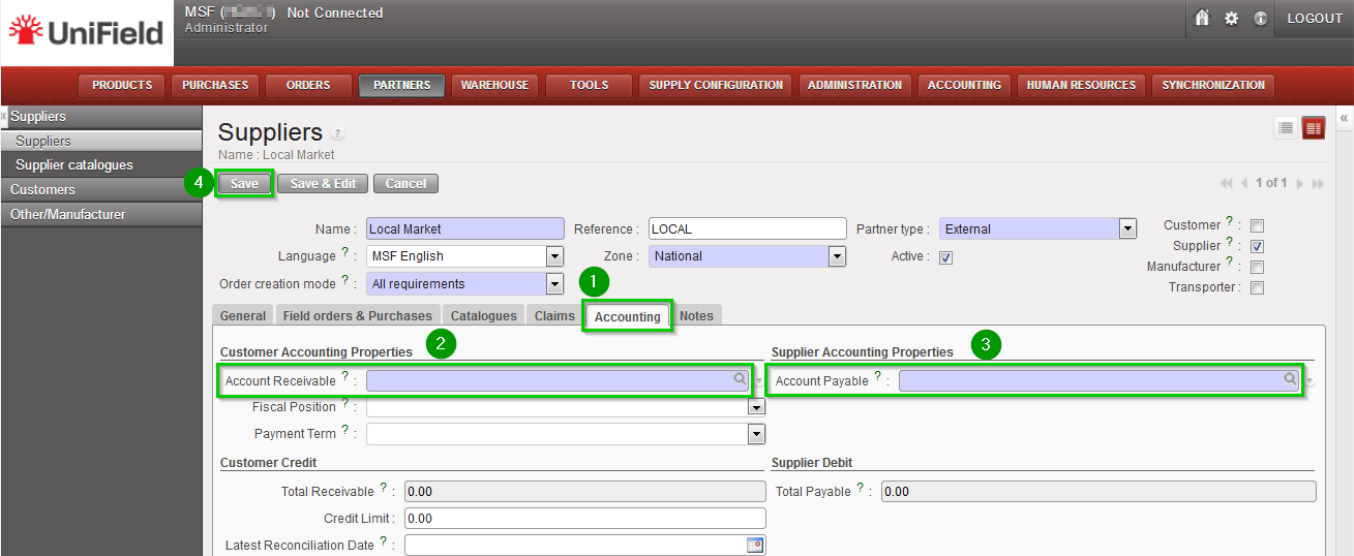
Click on tab Accounting 1 and enter the following codes:
Account receivable 2: If OCA: 12680 / If OCG or OCB: 12050
Account Payable 3: If OCA: 15600 / If OCG or OCB: 30020
Click on Save 4
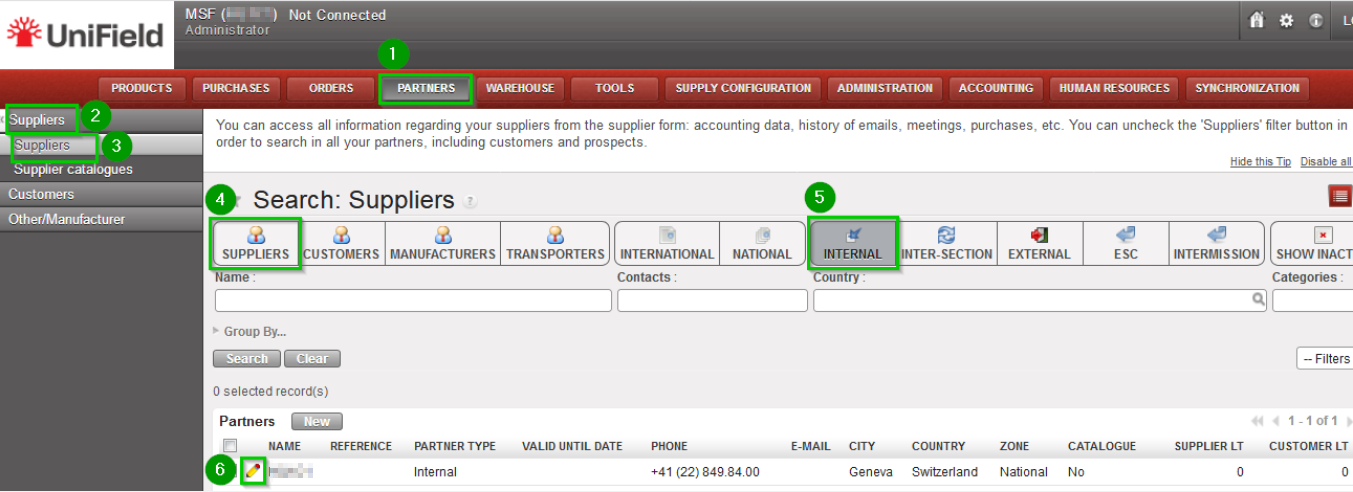
Click Menu Partners 1, Suppliers 2, Suppliers 3 Uncheck filter Supplier 4, check filter Internal 5 You should see 1 partner with the same name as the instance. Edit this supplier 6
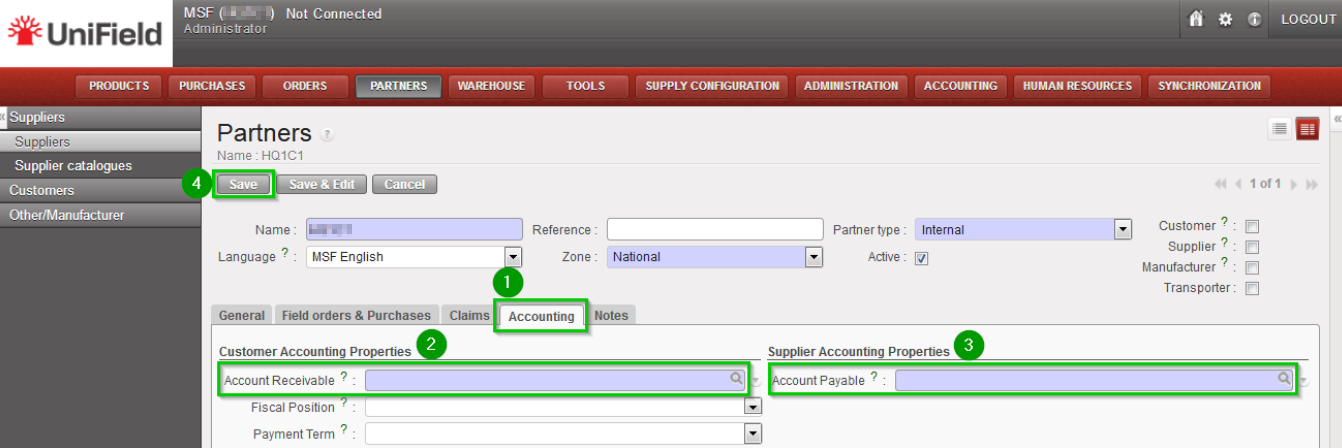
Click on tab Accounting 1 and enter the following codes:
Account receivable 2: If OCA: 12680 / If OCG and OCB: 12050
Account Payable 3: If OCA: 15600 / If OCG and OCB: 30020
Click on Save 4
2.11.9 Perform validation synchronization
Synchronise your instance (as done in step 2.11.4) to send imported data to the SYNC_SERVER. If UniField tells you that you are not connected, follow steps 2.11.1 (only the “Connection” part) and try to synchronize again. Important note: at this stage, the configuration of the Project instance is finished but the Cost Centers have not yet been received from the HQ due to the mechanism used for validating the Proprietary Instances. In order to finish 100% the installation, it is necessary to:
Perform synchronization at HQ level (as described in 9.23)
Once finished, perform a final synchronization at Project level
2.11.10 Project Companies Configuration
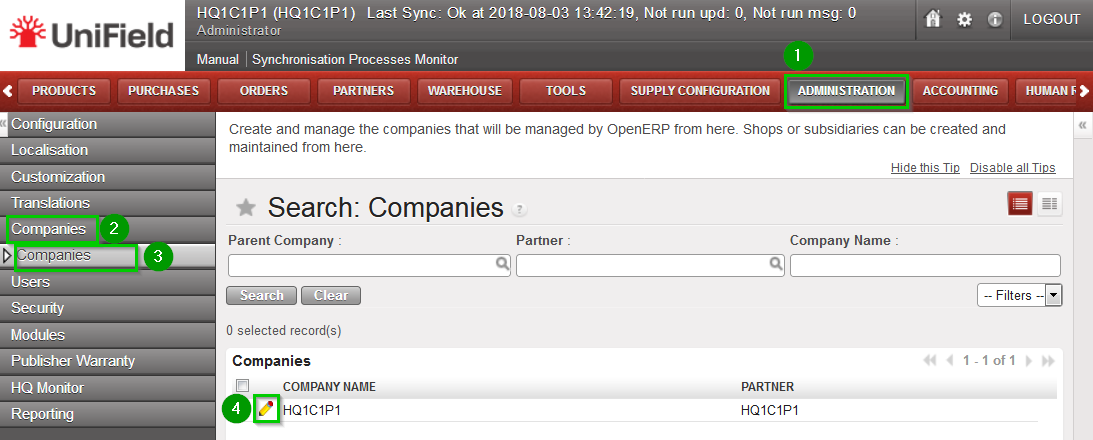
Click on Menu Administration 1, Companies 2, Companies 3 Click on the edit icon 4 of the company
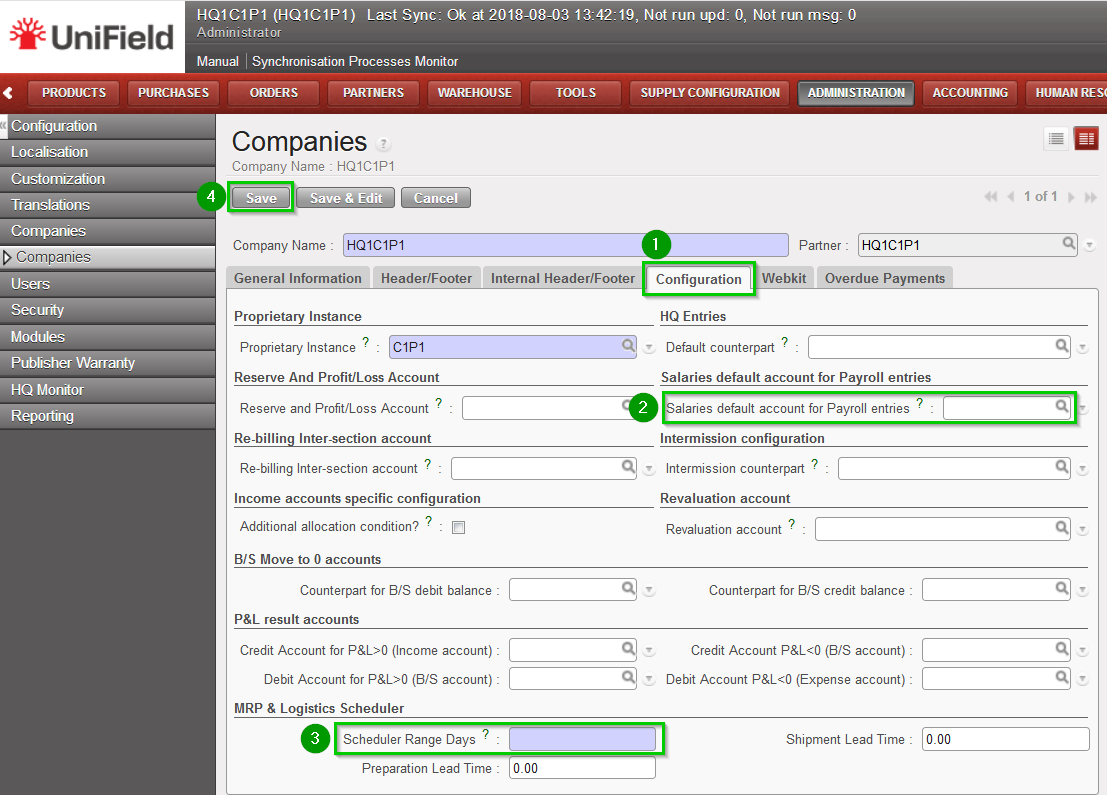
Check first with your finance department the accuracy of those accounts. Click on the tab Configuration 1 Depending of your OC procedure, fill in:
Salaries default account for payroll entries 2: OCB, OCG and OCP=30100 / OCA=25600
Scheduler range days 3: OCG=180 / OCB and OCA=365
Click on Save 4 after you made all the modification needed.
2.11.11 Cost Center For FX Gain/Loss
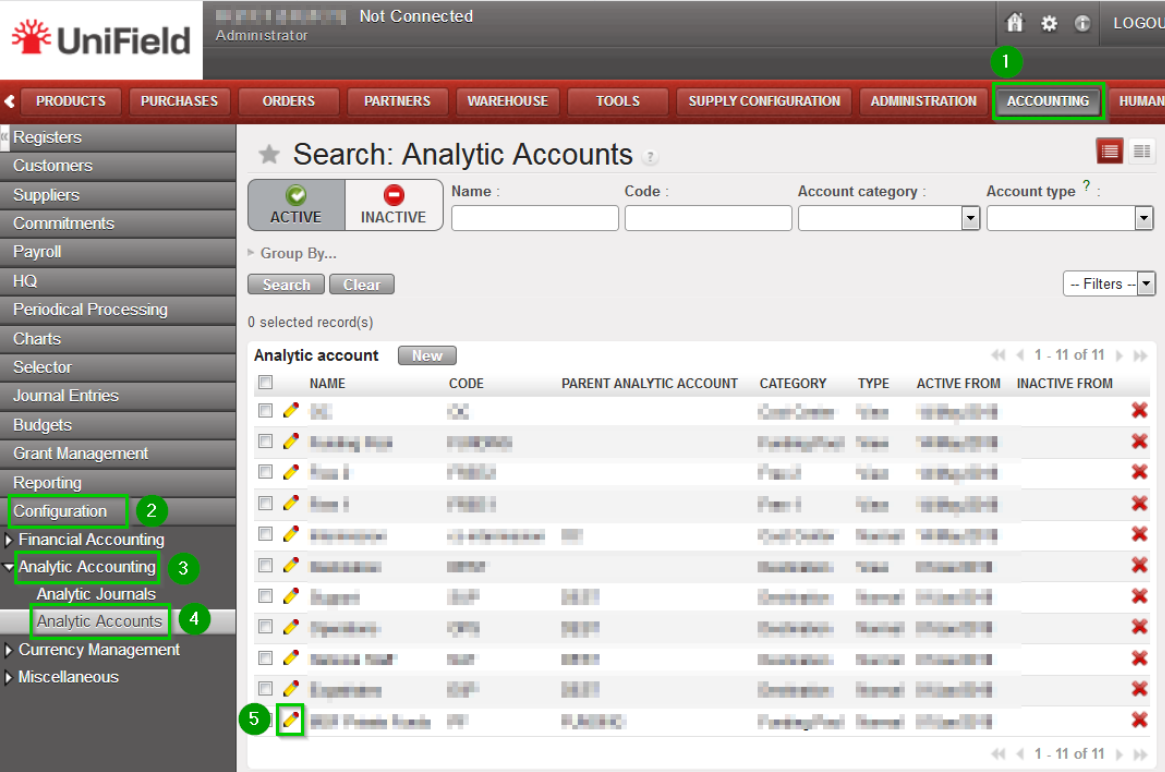
Allocate the cost center for the FX exchange rate. Click on Menu Accounting 1, Configuration 2, Analytic Accounting 3, Analytic Accounts 4 Edit the Cost Center 5 defined by your Finance OC procedure
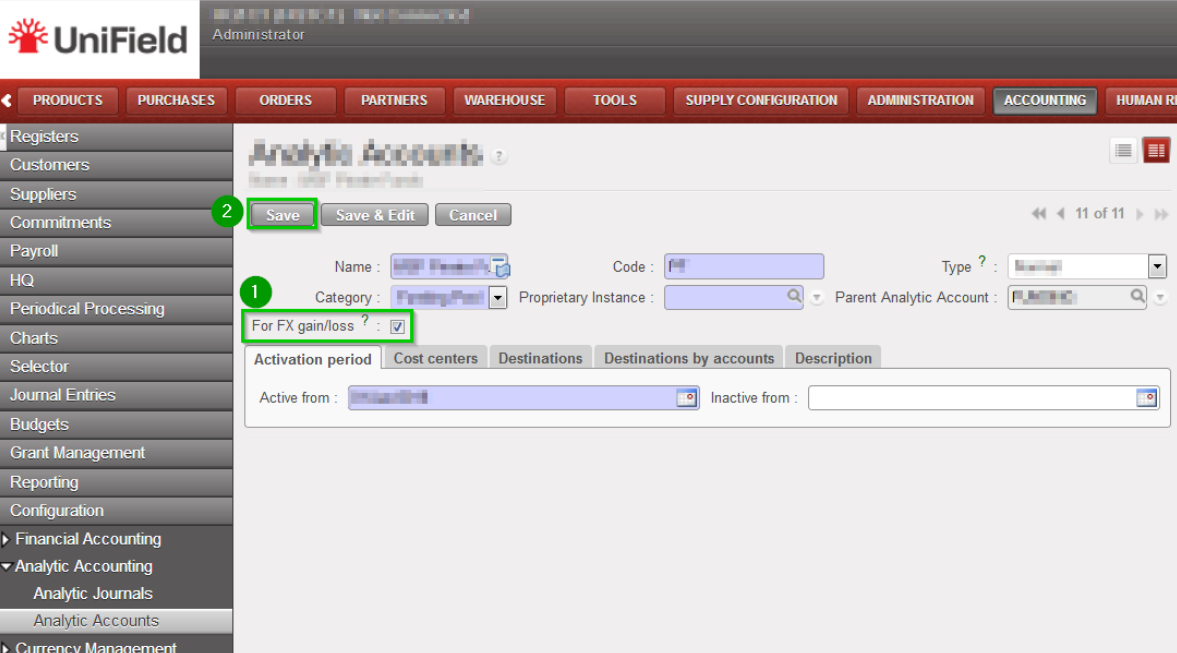
Click the tick box “For FX gain/loss?” 1. Click on Save 2 NB: it has to be the coordination cost center. i.e for OCG= the coordination SUPZZZ cost center
2.11.12 Creation of the Intermission Partner
The ProjectIntermission partners need to be created at the HQ level. Please refer to Section 2.9.25 Configuration of the Intermission partners.
We use cookies to ensure that we give you the best experience on our website. If you continue to use this site we will assume that you are happy with it.